While I was at CES 2024 (Consumer Electronics Show) in Las Vegas, Nevada last month I attended the JETRO (Japan External Trade Organization) session. One of the demonstrations was both at the same time incredibly simple yet producing an almost unbelievable outcome. It was put on by Sound Fun Corporation of Japan demonstrating the technology behind their new Mirai Speaker. In essence they developed and patented the AudibleWave™ Technology used in the Mirai that helps produce clear dialog from televisions. Based on some initial research by a university professor that found elderly individuals could hear music more easily when it was played through an old style gramophone, they spent years perfecting how to curve sound when projected from speakers so that it can be more easily heard and understood. The demonstration was done using just his unamplified voice either behind a straight piece of plastic sheet or curving the same sheet, so it bowed out in the center towards us. When he spoke through the straight sheet it was hard to clearly hear him, however, when he curved the sheet, you could easily hear and understand what he was saying.
Here is a similar demonstration from Sound Fun’s website.
Courtesy Sound Fun Corporation
This was intriguing to say the least. So, when their team offered a Mirai Speaker unit to review I jumped at the opportunity.
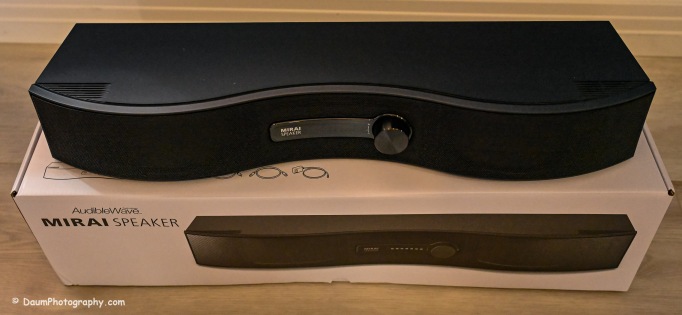
Here is what the Mirai Speaker looks like as unboxed:
The Mirai Speaker is very well made and finished. The unit weighs 3 lbs. 10.6 oz/1.6625kg and is 21” W x 6” D (at its widest point) x 3.5”H/542mmW x 160mmD x 87mmH. It was designed and developed in Japan and manufactured in Vietnam. It retails for US$299. The unit is well packaged and comes with everything you need to set it up and start using it including a remote with two AA batteries, two means of connecting it to the sound source: Optical cable or analog audio cable, AC power supply and instruction pamphlet.
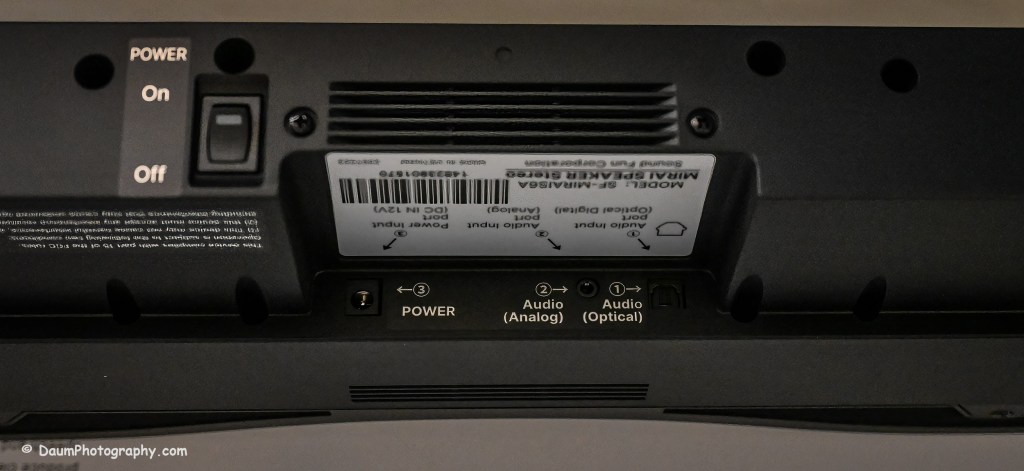
It is primarily intended to be connected to a television using either the optical output or analog output connection. In addition, the unit needs to have its small power adapter plugged into an AC outlet. If you use the optical outlet, you have two ways you can listen to the television. You can use just the Mirai Speaker system or use a balance between the television and the Mirai Speaker. If you use the analog outlet, you cannot use both simultaneously.
Initial Impressions
The setup was straight forward and easy. Even though the instruction pamphlet states it may take a few days to notice a real difference when using the Mirai Speaker, the effect of their AudibleWave™ Technology was immediately apparent in doing comparisons of just television speakers versus just the Mirai Speaker. It wasn’t louder but was a cleaner, clearer sound with respect to any dialog. It will take some time to refine the balance between the regular speakers and the Mirai Speaker for the best overall sound for example, in watching a movie.
So, in a word does it work? Yes. I believe this would be a nice reasonably priced addition, when you have one or more individuals in your home with some hearing loss normally associated with aging. I plan on doing more testing and also trying it incorporated into a full surround sound system set up. Stay tuned!
The focus (yes, literally and figuratively 😊 ) of this review is a comparison of two new BlackVue dash cameras, DR970X-2CH Plus and DR970X-2CH LTE Plus, to my current benchmark, the BlackVue DR900S-2CH camera unit. I reviewed the DR900S in 2020 and found it to be an excellent choice out of the already crowded field of dashcams. You can see my review here https://insight.daumphotography.com/2020/07/11/product-review-blackvue-dr900s-2ch-field-test/ . The new DR970X Plus units were provided to me by the Marketing Team of Pittasoft Company, who manufactures the BlackVue units in their own factory in Korea.
Technically speaking based on BlackVue press releases, the DR970X Plus appears to have several improvements over the DR900S including a faster processor chip, improved CMOS sensors, and in the case of the DR970X-2CH LTE Plus, built in SIM card capability. Top of my interest in carrying out this comparison and review is the DR970X Plus noticeably better in actual day-to-day use?
Before jumping into the field results, here are some of the respective technical specifications.
Physical dimensions:
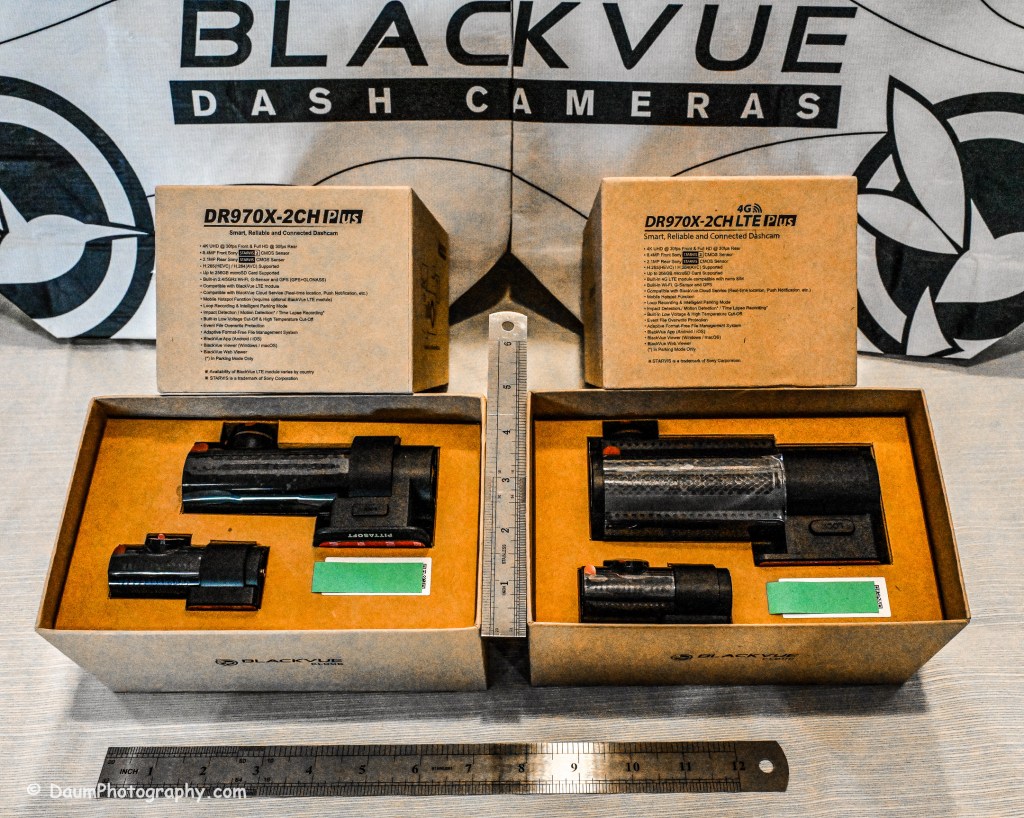
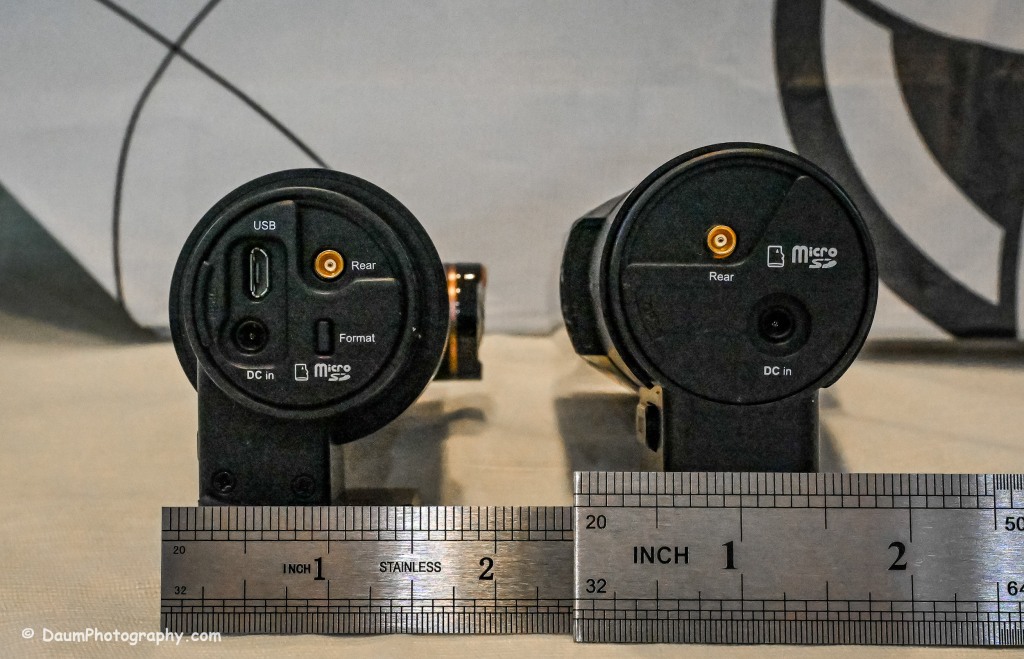
The DR970X-2CH Plus and DR970X-2CH LTE Plus have identical core components, that is, the lens, sensor, chips, etc., with the exception that the DR970X-2CH LTE Plus has a built-in LTE SIM micro card receiver and related circuitry. This results in the DR970X-2CH LTE Plus being a little larger and slightly heavier than the sister unit.
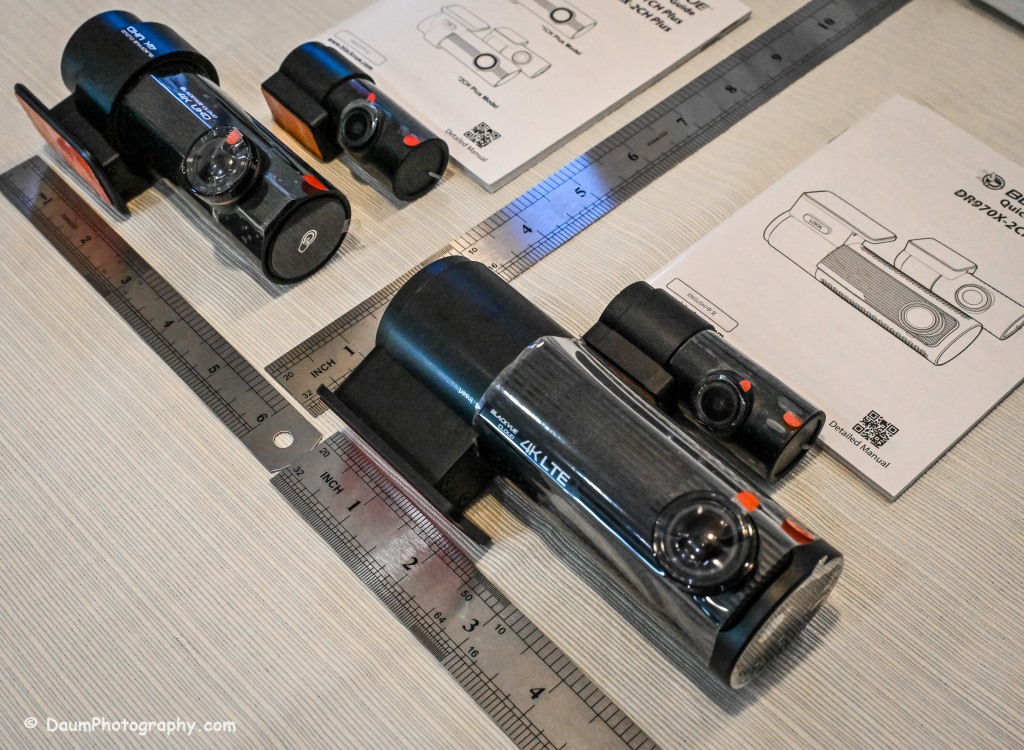
DR970X-2CH LTE Plus vs DR970X-2CH Plus vs DR900S:
-Weight with mount: 6.8 oz (192.7g) vs 5 oz (141.7g) vs 4 oz (113.39g)
-Dimension: 5.42in (137.6mm) L x 2.67in (60.3mm) W x 1.69in (43mm) H vs 4.67in (118.6mm) L x 1.86in (47.7mm) W x 1.4 (36mm) H vs 4.66in (118.5mm) L x 1.4in (36mm) H
The rear camera is essentially physically the same on all three models: 2.6in (66mm) L x 1.1in (27.94mm) D and 1.0 oz (28.35g)
The DR970X Plus and the DR900S are almost the same physical size and weight, with the DR970X-2CH LTE being almost 2 ounces (56g) heavier as well as somewhat longer and rounder than the other two.
The lenses:
The DR970X-2CH Plus cameras (remember, both units are identical with respect to cameras and image capture) have a 125-degree horizontal and 68-degree vertical lens in the front unit, with a 107-degree horizontal and 55-degree vertical viewing angle in the back camera. The DR900S-2CH camera has a slightly wider capture with a 136-degree horizontal and 77-degree vertical lens in the front unit, with a 116-degree horizontal and 61-degree vertical viewing angle in the back camera.
The resolutions and frame rates are identical for all three units at their highest settings: 3840×2160 @ 30 fps.
Image quality for the DR970X-2CH Plus units is 60+10 Mbps at the highest setting vs the DR900S is 25+10 Mbps, and all three have the same 8+6 Mbps with quality set to Normal.
Compression Codec is the same on all three units: H.265 (HEVC), H.264 (AVC)
Additional technology:
The DR970X-2CH Plus cameras use a STARVIS 2 CMOS Sensor of approximately 8.4 Megapixels on the front camera and a STARVIS CMOS Sensor or approximately 2.1 Megapixels on the rear camera, while the DR900S uses an 8-Megapixel CMOS Sensor on the front camera, and a Sony STARVIS CMOS Sensor of approximate 2 Megapixels on the rear camera.
All three cameras record in 4k UHD front and full HD rear.
All three camera units have built-in GPS but the DR970X Plus has dual band GPS, GLONASS. They also have built-in WiFi with the DR900 supporting 802.11 2.4 GHz and 802.11 ac 5GHz dual band while the DR970X supports 802.11 a.b.g.n.ac.
All three record automatically when powered up and automatically over-write Normal recordings when the microSD card is full. They also record and preserve impact detection events that occur while driving and while in parking mode (if powered). Manual recording is also preserved. They can take microSD cards from 16GB to 256GB (but strongly recommend only using BlackVue cards- more on this later). Power is retained for a short period after shut down via built-in Super Capacitors.
All three cameras have a built-in microphone and speaker. One or both can be turned off via the BlackVue app.
All three camera units offer video recording saving to the cloud using optional paid plans, and the DR970X-2CH LTE Plus includes a free one-month trial SIM card and optional paid plans. However, you don’t have to use the cloud and can either view your saved videos or live images by means of the free BlackVue phone app. You can also download to your phone or remove the microSD card and transfer the files. More on this shortly.
Power consumption per hour (really only important if you are using a dashcam in Parking Mode with the engine turned off) as expected, highest for the DR970X-2CH LTE being 590mA/12V in Normal Mode, 430mA/12V in Parking Mode vs the DR970X-2CH Plus at 480mA/12V Normal Mode, 370mA/12V Parking Mode vs the DR900S 380mA/12V in Normal Mode (Parking Mode was not part of the DR900S, so no equivalent power consumption available)
Recorded file size: The typical DR970X Plus series front camera file size per recording (each is 1 minute in length) is 443 MB and for the rear camera 79.7 MB, while the DR900S file size per recording (1 minute in length) is 188 MB and for the rear camera 81.1 MB. So, the DR970X Plus files for the front camera are more than 2.3 times larger than the DR900S, while the rear camera files are close in size. This means that your microSD card is going to hold less than half the videos before it starts over writing as compared to the DR900S.
All come boxed with everything you need for either accessory plug powering or hard wire powering (both sets of power cords included), a starter BlackVue microSD card, connector line for linking and powering the rear camera, plastic trim pry tool, 3M adhesive for the cameras, small self-adhesive wire holders, Quick Start Guidebooks and a set of ‘nifty’ BlackVue stickers. In my experience, the supplied power lines (hardwire or accessory, and rear camera) are more than adequate for proper setup in most vehicles.
Here is what the unboxing and components look like:
Preliminary Field-Testing Results
Though I will not cover permanent mounting in this review, it is fairly straightforward. Running and tucking (hiding) the wiring needs some patience and varies from the OEM and type of your vehicle. For an example you can check out my install in a BMW X3 here https://insight.daumphotography.com/2020/02/19/blackvue-dr900s-2ch-dash-cameras-install/ . I will be doing a hardwire installation within a few months in a couple of different vehicles- a BMW i4 and a Chevrolet Corvette. A link will be provided to that when available. While these cameras all (the DR900S needs the optional Parking accessory wiring component) support automatic switch over to ‘Parking’ recording when hardwired, many vehicles today have battery management software built-in that will either cut the power to the dashcam or cut other non-essential power draws when the vehicle is turned off and the draw exceeds a certain level, to ensure the main battery has sufficient power remaining to start the engine. You can buy optional battery packs to power a dashcam for a specified amount of time, typically from a few hours to a few days by piggybacking them per manufacturer’s directions. BlackVue sells them for their cameras as do other organizations. Currently these battery packs add considerable cost especially if you are looking for several days of parking coverage. Beyond that, long term parking will require the auxiliary battery packs get recharged either by removing them to charge them or by a solar panel placed in the windshield if feasible.
The videos (MP4) can be viewed and/or downloaded through the excellent (and free) BlackVue app, or you can remove the microSD card and load the files onto your computer. Again, BlackVue has an excellent app for either PCs or Apple (I will discuss it shortly). For this review I removed the respective microSD cards and transferred the videos to my PC. All video captures and still images presented here are not retouched or corrected and appear as recorded. In some examples I have enlarged or cropped images for easier evaluation.
As I stated in my earlier dash camera review, for most dashcam users, the primary purpose is to document traffic as you are driving. Dashcams have become popular as a means of providing evidence in the event of road rage and/or an accident. Ideally the dashcam will capture clear, time and gps marked images, both during daytime and nighttime driving to aid in this objective. To begin evaluating how well these BlackVue cameras achieve this, let’s first look at a short comparison between the DR970X Plus and the DR900S.
A couple of observations- both BlackVues do well in documenting what is happening. To my eye, the DR900S images are slightly sharper during the day than the DR970X, while the opposite is true of the nighttime images. This is probably a result of the new STARVIS 2 CMOS Sensor in the DR970X. I should mention that Pittasoft has indicated a firmware update is planned for the DR970X series, while I don’t know what it will fix, perhaps focus refinement will be part of it.
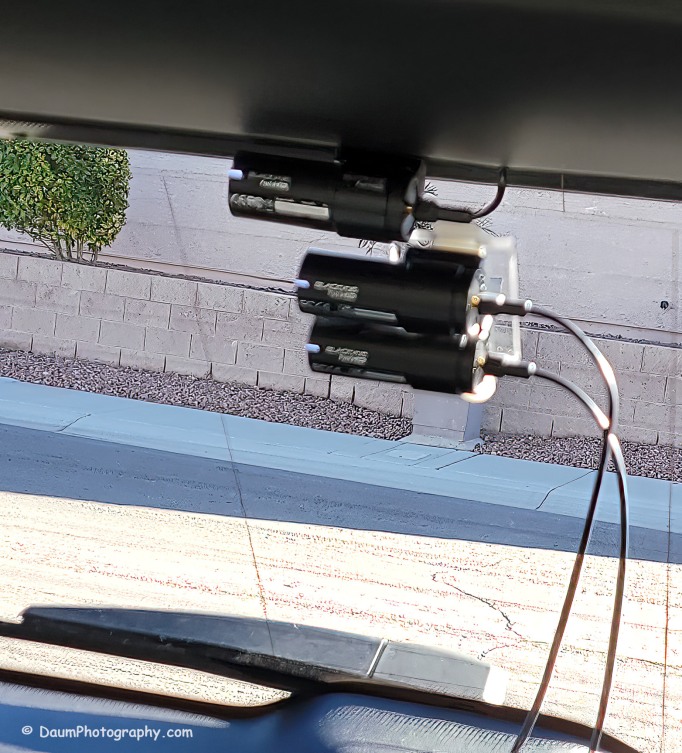
You might be wondering what is in the right side of the DR900S. That is actually the bracket supporting the two DR970X cameras mounted below. Here is the set up I used:
Here are comparisons between the DR970X Plus and DR900S where you can see both the respective front and rear facing camera views, one day time and one nighttime set:
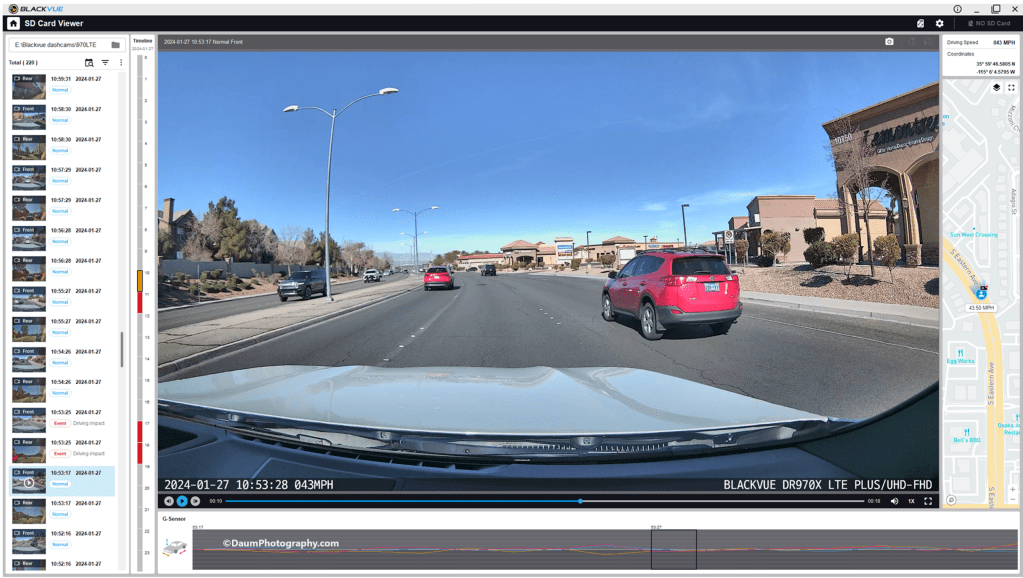
By the way, those simultaneous front and back views were generated using the free BlackVue PC app. It is a very easy to use application that also can show each video along with a GPS location on a dynamic map, as well as a g sensor graph. The g sensor shows any impact or bumps/rough road (which will also result in the video getting an “Impact” vs “Normal” label. Here is what it looks like:
Here are some still images with the DR900S on the left and DR970X on the right:
Front camera
Rear camera
As with the videos, the greatest difference between the DR900S and DR970X is in the nighttime comparisons. All images are viable straight from the respective cameras and could, if necessary, be sharpened with editing software. One real advantage of the DR970X Plus series is that the WiFi is always on and that allows you to quickly view any saved or live images using the BlackVue app on your phone. For the DR900S you have to turn on the WiFi at the front camera unit by pressing a button until it turns on (and it will automatically turn off in a few minutes). Once turned on you can then link to the camera using the app.
Summary
As in prior comparisons, BlackVue continues to produce top line dashcams with the most important features built in. Of course, quality does come at a price with the DR970X 2CH Plus including a 64GB microSD card retailing at US$474.99 and the DR970X LTE 2CH Plus including a 64GB microSD card, SIM card with a free trial of 1GB for one month retailing at US$544.99. The BlackVue DR900S has been in my vehicle for four years now and has performed flawlessly in all temperatures from freezing to extreme desert heat. I have no reason to think the new DR970X Plus series won’t perform equally well.
BlackVue states that you should use their microSD cards for optimal performance. I did experiment early on with several non-BlackVue microSD cards (all were name brand high-quality professional level cards, designed specifically for handling the frequent record events typical of security cameras designed for video recording), and while they would work for a period, inevitably they would stop working or have glitches. Once I went back to BlackVue’s own card I never had it stop working or fail.
These cameras offer pricing plans for saving files to the cloud as well as in the case of the DR970X Plus LTE, a built-in SIM card to simplify the recording directly to the cloud. As noted, it is easy to either download the video files or temporarily remove the microSD card and transfer the files to your computer.
The fit and finish of the new DR970X Plus is excellent (as was the DR900S) and all the included components are high quality.
If you are highly concerned about your vehicle when it is parked and unattended, you should consider purchasing optional battery packs to power the dashcam when the engine is off. One option is BlackVue’s Power Magic Battery Pack (US$159). It is designed for plugging into your accessory outlet and in turn your dashcam. It provides about 12 hours of front camera recording or about 7.6 hours of front and rear camera recording.
A second option is to purchase Blackvue’s Power Magic Ultra Battery (US$389.99). It is designed for either accessory plug or hardwire installation and then connection to your dashcam. The Ultra unit is a high-capacity rechargeable unit that provides about 30 hours of record time for just the front camera, or about 19 hours record time with both front and back camera recording and can be piggy-backed to increase the total record time while parked.
Final thoughts: Many of my readers have asked ‘Do you really need a dashcam, and if so which one?” Hopefully this review is helpful in reaching a decision. For me personally I always want to have documentation of what is going on around my vehicle when I am driving, so all my cars have dashcams and when I rent a car, I put in a portable dashcam before I leave the lot. I also find it is nice to have videos of scenic drives and the ones from BlackVue are perfect for this.
Thanks for visiting and reading. If you have a question, please feel free to ask below!
Simply put, a gimbal stabilizeris intended to help take videos minimizing movement created by the way you hold the camera while shooting. If you have looked at adding a gimbal stabilizer to your equipment, you found an abundance of options out there.
This review is of the new Weebill3S and how ZHIYUN designed it to stand out from the rest of gimbal stabilizers. The unit was provided to me by ZHIYUN and GlobalPR.
What Is In The Box
When you order the Weebill 3S it is shipped directly from Hong Kong to you and the price includes free shipping and no additional custom’s duty and import taxes. In my case it arrived quickly and in excellent shape. All components are well packed.
There are two options when you place your order: the basic Weebill 3S at US$319 or the Weebill 3S Combo at US$439. ZHIYUN is offering a 10% off discount code for my readers. Links are provided in footnote at the bottom for orders from their site or Amazon.1 I recommend the combo over the base since it includes the extension handle and wrist support which make the unit much more manageable. Both come with the same warranty: free replacement or repair for quality defects within 15 days of receipt of product. Free repair from ZHIYUN for defective material or workmanship that results in product failure for 12 months from date of selling.
Included in the box is a heavy duty nicely designed case that can hold the Weebill 3S and all of its components as well as your camera and lens. Though, if you are like me, you already have multiple camera cases and probably won’t end up using the ZHIYUN case.
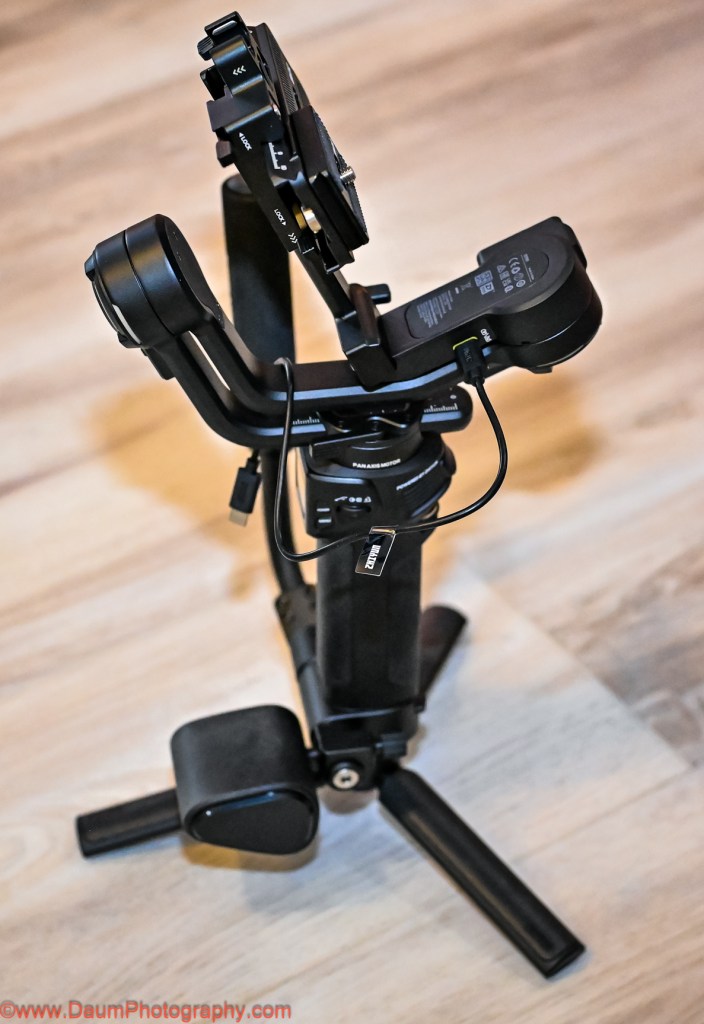
The components (image above) include #1 the Weebill 3S, #2 the extendable Sling Grip and Trans Mount Wrist Rest, #3 assorted cables for direct connection to different OEM cameras, #4 the Quick Release plate, Camera Backing Base, M4 wrench and ¼” screws, #5 Tripod base and Quick Start Guide.
The first step was to download the user manual from ZHIYUN ( https://www.zhiyun-tech.com/en/download/instruction/617?type=website&page=download_software&source=instruction ) and charge up the Weebill 3S (NOTE: as with many electronics today, no USB charger was included with the Combo. Any USB C phone charger 14 W PD or less will do). It takes about two hours from empty to full charge, with the state of charge showing on the small built-in screen. Based on how you use the unit, the charge can last up to 11 hours.
Putting the components together was fairly straightforward. NOTE: When assembling the quick release plate to the camera, the provided ¼” screw will only fit into the end of the center slot on one side- the end which has ZHIYUN printed on the underside. It takes a few tries to get the screw to perfectly match the threads in the plate. The same is true when putting the screws into the camera backing base. The screws will only thread into the end of the backing base which has ZHIYUN printed on the underside. You’ll use the provided M4 wrench to tighten the screws.
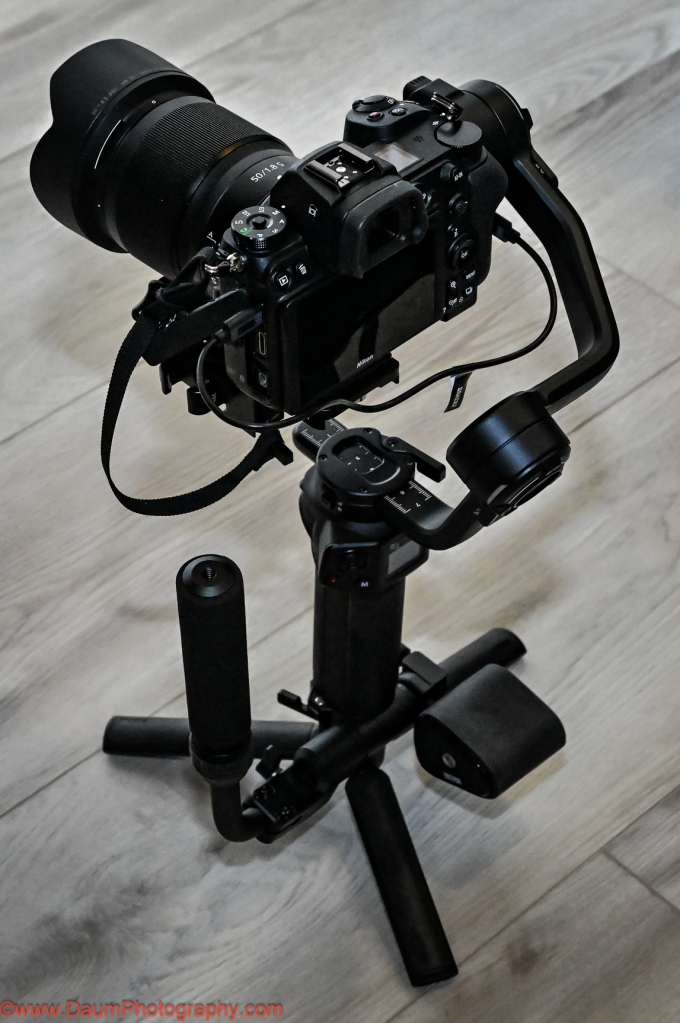
The main unit weighs 2 lb. 4.2 oz (1.026 kilograms), adding on the extension handle, tripod and mounting plate brings it to 3 lb. 13.8 oz (1.752 kilograms).
For my testing, I used a Nikon Z7 mirrorless digital camera and a Nikkor 50 mm 1.8 S lens. This camera and lens were listed on ZHIYUN’s compatibility chart. The actual weight of the Nikon with lens came to 2 lbs. 7.6 oz (1.1226 kilograms).
Once you get the Weebill 3S fully assembled and your camera and lens mounted, connect your camera to the Weebill 3S using one of the supplied USB cables. Later you can potentially use a Bluetooth connection. In my case, the Bluetooth connection would not work.
Next you will need to go through the balancing steps for each of the gimbal’s three axes. Especially If you are new to gimbals know this is a critical step that must be completed carefully to ensure that the gimbal will work properly.
The above-mentioned videos will walk you through the process including how to update the Weebill 3S software. If you haven’t balanced another gimble in the past, you may find it frustrating the first time, but it gets easier after just a few attempts.
NOTE: the Weebill 3S is very sensitive to the slightest change in camera/lens combinations, so be sure to remove your lens cover, and have your battery and memory card inserted before doing the balancing.
After getting your camera and lens balanced, you need to allow the Weebill motor software to make final adjustments (again as mentioned in the ZHIYUN videos above). Now you are ready to go.
INITIAL FIELD TESTS
My first test was to shoot a static object while moving around it. For comparison I shot the scene twice, once using the Nikon on the Weebill 3S and a second time hand holding the Nikon, trying to shoot the scene as close as possible to the first time. This would attempt to partially answer “is a gimbal set up worth it for simple videos?”
In this and the following videos, the top frame video is always the one taken using the Weebill 3S and the bottom frame video is the handheld without the use of the gimbal. Physically for this the camera and lens are sitting on top of the Weebill 3S in the three axes gimbal set up, and you are holding it with two hands by a combination of the Weebill 3S body and either the tripod or sling grip.
As can be seen there is movement generated by the camera in both versions, but the top frame one which used the Weebill 3S has noticeably less camera induced movement.
Next test was replicating shooting a video while both you and the target are moving.
Again, there is movement generated by my moving in both versions, but the top frame one which used the Weebill 3S has less movement caused by my walking while videoing.
This next test was of the Sling Mode, where the Sling Grip is moved so that the camera and Weebill 3S are under the Sling Grip. This setup allows for capturing images/video from a perspective starting at or near the ground/floor. The Weebill 3S and camera are actually more easily supported by just one hand lightly on the Sling Grip.
This Sling setup resulted in very little camera movement and a perspective that would have been difficult to duplicate without the Weebill 3S unless you were lying down on the floor holding the camera.
The Weebill 3S comes programmed with several cinematic features to enable creative shots. It can be easily set to PF or pan follow, POV point of view, F follow, L gimbals locked, and V vortex mode. Each mode locks or unlocks individually one, two or all three axis. You can also remotely control its movement via the ZYPlay app. Here is a brief example of Vortex mode:
A fun effect that would be very difficult to duplicate without the Weebill 3S!
PRELIMINARY CONCLUSIONS
Some thoughts/suggestions:
ZY Play app requires your scrolling through and agreeing to a User Agreement that ran on for about a dozen screens on Android and second agreement of about ten more screens. This one appears to be written by a legal team that never had to read it on a phone screen. Why not have a simplified agreement?
Here is just one of the extensive sets of screens.
Earlier production units included a magnetic key that was attached to the underside of the camera mounting bracket and could be used for tightening the attachment screws. That is no longer provided. However, an Allen wrench is provided to serve the same purpose. Either go back to the magnetic key or have an attachment place on the Weebill 3S body for the wrench so it is at the ready in the field.
A more significant change at this stage of production occurred with the Camera Backing Base. This used to be a Quick Release Base. Now the Camera Backing Base attaches to the camera body with one ¼” screw and the use of the M4 wrench. In turn, the Camera Backing Base attaches to the larger Quick Release Base using two ¼” screws and the M4 wrench. What this means is that you can’t just release the Camera Backing Base as with previous versions but must either unscrew the base from the Quick Release Base or release and slide out the Quick Release Base to remove the camera. When you go to replace the camera, this ends up resulting in it being in a slightly different balance point and requires the rebalancing of the Weebill 3S before proceeding. Fortunately, I found that it normally only required the rebalancing of one of the axes.
At least for use with the Nikon Z7, you have to remove the camera still attached to the quick release plate to change the battery and/or the memory card. Consider a raised camera base plate that will allow changing the battery without having to remove the camera.
Suggest getting a spare M4 wrench if you don’t have one handy.
Positives:
The Weebill 3S appears to be very well constructed and feels solid. I had no concerns about my camera suddenly dropping off or swinging wildly out of control.
The Weebill 3S has a built-in LED light that you can adjust in terms of intensity from 1000 lux down, and color temperature ranging from 2600k to 5500k. It is a very handy fill light when needed.
It is ergonomically designed to allow easy access to the menu options (visible on its building screen), change operating modes, turning on and off the built-in LED light, starting and stopping your camera’s recording, etc. The front rotary switch also can be user programmed.
Tripod extension is very useful as both an extension of the grip and to set the Weebill 3S and attached camera down on a flat surface without it tipping over. It can also be used to perform super smooth panorama shots either manually or through the ZY Play app automatically.
The quick release allows for easy change from landscape to portrait orientation with minimal or no rebalancing needed.
In Summary
I think that ZHIYUN has done an admirable job of setting this Weebill 3S three axes gimbal apart from its competition. It is very well made, compact and reasonably lightweight. The Weebill 3S comes loaded with usable features that will enhance your videos along with reducing shake caused by how you hold your camera and move. Just be sure that your intended camera and lens are on the ZHIYUN compatibility chart. Based on how sensitive I found the Weebill 3S to the positioning of my Nikon and lens, I think even though it is on the compatibility chart it was near the top limit of the Weebill’s motors.
I hope you found this useful. Please let me know if you have any questions!
Cheers
1 To obtain the 10% discount use the code DaumWB3S. And one of these purchase links: ZHIYUN official store: https://geni.us/wb3s_str_dp
One of the individuals I met at the 2021 AAPEX/SEMA convention was Dean Martin- no not the singer via hologram nor a Vegas impersonator, but Dean Martin, President of iTEKT, a Canadian company specializing in nano ceramic coatings for windshields.
Dean is highly exuberant about his iTEKT nano product which purports to offer:
Water repellent up to one year
Helps to repel dirt, snow, ice and insects
Improved visibility during harsh weather conditions
The kit sells for CAN$49.95 with free shipping. It contains a small container of Cerium used sparingly to remove any grease, wax or silicone-based products from the windshield; a 12mL vile of cleaner along with a blue application cloth; a 12mL vile of Protector (Nano Ceramic) along with another blue application cloth; an orange microfiber finishing cloth; and an instruction sheet.
Included on the instruction sheet as well as on the box, is a scannable QR code that takes you to application videos.
The process is straight forward. You first use the Cerium if you have any grease, wax or silicone-based products from the windshield by using “2 pinches” of the Cerium powder on a dampened blue cloth. Then you rinse your windshield with hot water.
You follow this by decontaminating the windshield using the cleaner in vile #1 and a blue cloth. Next wipe dry with the microfiber cloth.
Now be sure that your windshield is dry and warm 30-40 degrees C or 86-104 degrees F. You can do this by several means: run your defroster on high, use a hair dryer or set your vehicle in direct sunlight (in warmer climates).
Now apply 3 thin layers of the Protector from bottle #2. Pour 2mL (0.07 US oz) on the blue wipe and spread it over half of your windshield for 30 seconds until the wipe is dry. Repeat two more times the same way on that part of the windshield. Next, do the same 3 thin layers of the Protector from bottle #2 on the other half of your windshield.
Finally wipe the entire windshield with the microfiber cloth, using downward pressure. As you do it you should hear some static crackles as you wipe the entire windshield with pressure.
Depending on environmental conditions, Dean said the treatment should last 6 months to a year.
FIELD TEST
I applied three thin layers of the iTEKT Nano Ceramic to my BMW following the clear instructions after prepping the windshield. And, yes, I did hear static crackles on the final wipe 😊.
I took it on a 2500 mile trip that included lots of rain, dew, suicidal bugs, dirt and some road debris (small gravel).
The iTEKT did a superb job of having light rain bead up and off the windshield and made for very clean sweeps of heavier rain using the windshield washers.
After each day’s drive (that is ones without rain), the suicidal bugs were easily removed from the windshield using a water dampened microfiber cloth.
Unfortunately, the claim of “20% superior shatter and scratch resistance” did not seem to hold up. My windshield suffered several small scratches caused by road debris (presumed to be small pebbles kicked up by vehicles in front) and one chip with nickel-sized cracks.
PRELIMINARY CONCLUSIONS
The iTEKT Nano Ceramic is relatively easy to apply to a windshield. It does enhance the glass’s ability to shed water and make it easy to remove smashed bugs even after leaving them on the windshield until the end of a day’s drive.
From an anecdotal standpoint, the claim of “20% superior shatter and scratch resistance” was not substantiated. While it could have been coincidental rather than a case of causality, my windshield suffered several small nick scratches and one small chip with spider cracks on the outer surface of the windshield. Fortunately, this is only the second chip with spider cracks I have had over many years of driving fifty plus vehicles. Of note, there were no paint chips on the hood, fenders, or mirror caps during this same trip.
Bottom line, iTEKT Nano Ceramic appears to really help repel water and make bug splatter easier to remove but did not seem to provide superior shatter and scratch resistance to the windshield.
If you are like me, as you accumulated personal electronic devices like your phone, ear buds, laptop, smart watch, etc., you ended up with a gaggle of chargers.
In many cases the chargers were designed to work with a specific device and therefore have a different end (C, micro usb, Lightning) and item specific voltage output. When you took a trip, you had to remember to bring each one.
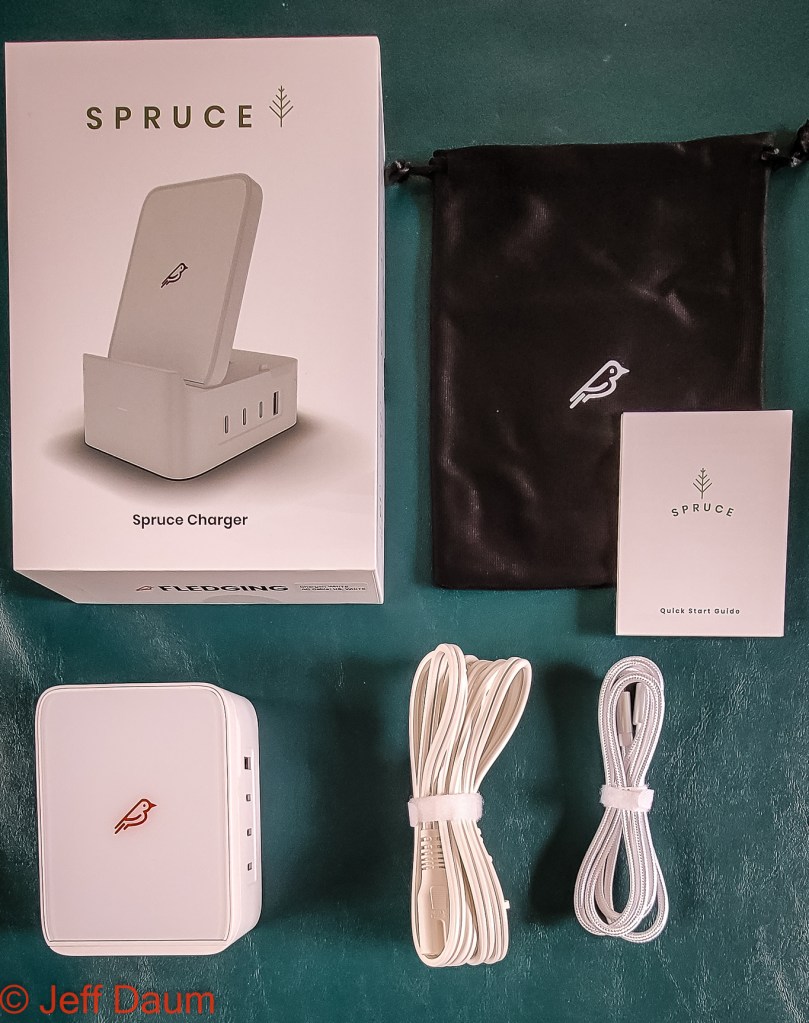
This brings us to the FLEDGING Spruce® all-in-one Charger, supplied to me by their Head of Marketing for review.[1] The Spruce is a compact charger unit capable of charging up to five devices simultaneously, quickly, and all at the proper voltage.
By my measurements the unit is 4.33”x3.15”x1.89” (110.2mm x 80.1mm x 48.1mm) and weighs 1lb 0.8 oz. (475g). It comes standard with the country specific power cord (type A, C or G) you select when ordering, a C to C cable, soft carry case and instructions.
Designed in the USA, the unit is manufactured in China. It lists for USD 124.99 on their website.[2]
The fit, finish and quality of build is excellent.
The compact unit has a phone or tablet wireless charging pad on top that can be used flat or raised up to 70 degrees, 3 USB C and 1 USB A ports on the side.
Wireless charging pad
On the back of the unit is a schematic showing the relative outputs in wattage for each of the ports.
–
The Spruce is powered by a GaN (Gallium Nitride) semi-conductor with software that provides the appropriate wattage for each plugged in device.
Included with my Spruce was FLEDGING new magnetic power cable. This very clever cable has a male USB A connector on one end and a magnetic port on the other that accepts interchangeable connectors of either C, Lightning or micro USB. Additionally, the cord has magnetic rings on it so that it coils and holds to itself when not stretched out.
I was informed that this FLEDGING new magnetic power cable will available later this year as an optional addon to the Spruce.
Field Test:
You will find the instruction manual is not necessary, since all you need to do is plug in the power cord and your respective cords to your electronic devices and/or place your phone or tablet on the charging pad and you are good to go.
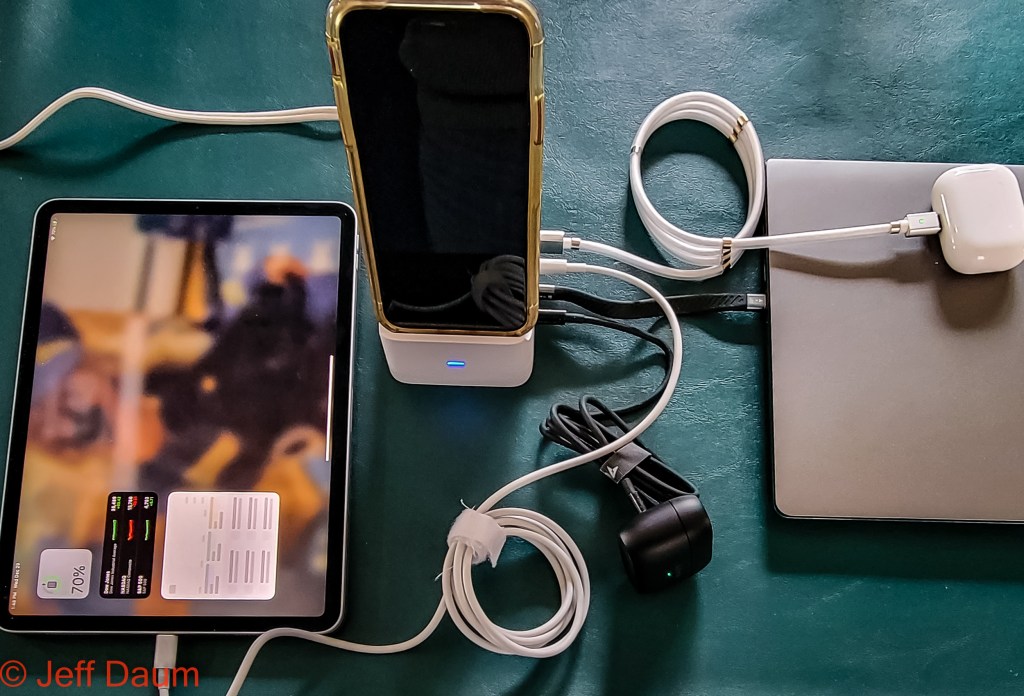
I used it to simultaneously charge an iPhone, iPad, 2 sets of ear buds, and laptop. The Spruce remained cool and charged each of the 5 electronic items to 100% as quickly as their individual rapid or quick chargers normally do. Simple, highly efficient and eliminates all the respective chargers as well as having to find either 5 available outlets or the use of a multi-outlet power strip.
The compactness of the unit can’t be beat versus having five individual chargers. Now you might be wondering about the fact it weighs in a about a pound or 475 grams. Sure, that is more than a single phone charger weighs, but when you put all the respective five chargers (phone, laptop, tablet, ear bud, etc.) you would need together, you will find they will be close to a pound or 475 grams or even more, in total weight.
Conclusion The FLEDGING Spruce is a welcome solution to simultaneously charging multiple electronic units from one source. Very well designed and constructed with easy functionality.
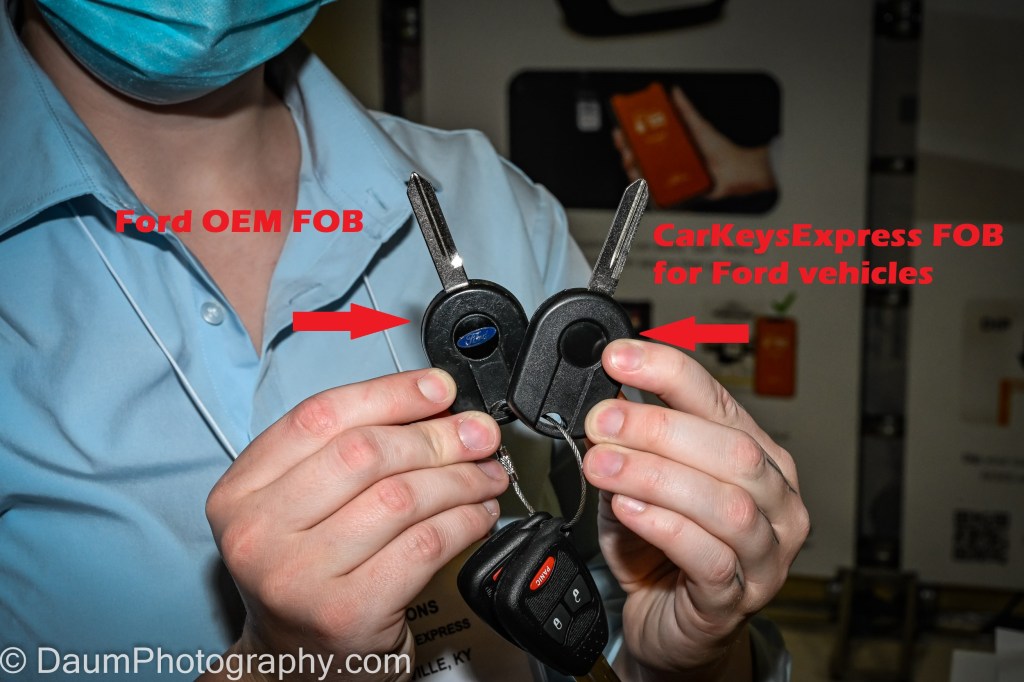
If you have ever lost your OEM FOB you know what a hassle it typically is to get a replacement from the dealer and to get it programmed properly, let alone the steep cost you incur.
While there have been non-OEM FOBs available for years, most don’t end up working or require you to still go to the dealer to get it properly programmed, again at a significant cost.
Enter Car Keys Express.[1] Their byline elegantly sums it up: Replacing car keys is simple and affordable again.™ Founded in 2006 by CEO Mark Lanwehr, no not in his garage 😊 but on the dining room table of his one room apartment. By 2006 it was the first online retailer of automotive keys and keyless entry remotes. Two years later Mark started offering his services to dealerships and fleet owners and now serves over 3,000 cities in the US and Canada. Along the way they added self-serve kiosks and remote optical scanners for dealerships. They are now the largest key/key FOB replacement company around.
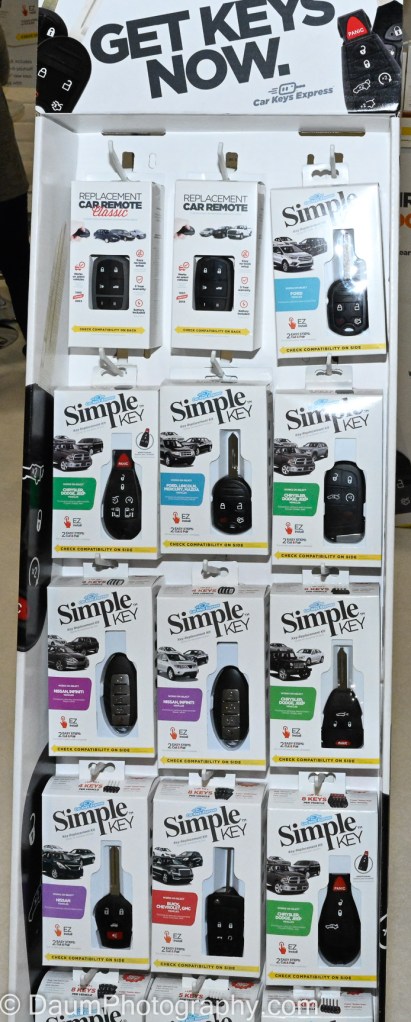
In their booth at AAPEX 2021 they had samples of their products including their ROKS or retail optical key scanner, their Keys Now, their Simple Key, the Universal EZ Installer™ and the EZ Installer™. The ROKS is stand alone unit that you insert your existing key for scanning. Then they send you the key completely cut. Their FOB to use with the key can then be paired up with your car using their Universal EZ Installer and a free phone app. The process saves you about 70% of the cost as compared to going to the OEM dealer.
Simple Key (a kit premade for each specific OEM) comes with the EZ Installer. Costs vary depending on the OEM and vehicle, but ranges from US$99 to $149 versus if you went through the dealer where you would pay in the range of US$300 to $500 or more.
The difference between the Universal EZ Installer™ and the EZ Installer™ is that EZ Installers are designed to only work with one OEM, such as Ford, GM, Mazda, etc., while the Universal will work with about 95% of OEMs (and since this is a brand-new product, they are working refine its software to work across all OEMs). Once purchased the Universal EZ Installer or the EZ Installer and connected to the owner’s vehicle via the OBD2 port, the imbedded software becomes linked to the VIN. This means the owner can make multiple duplicates but only for that specific VIN. It can not be used after that on another vehicle.
Options for the end user currently include purchasing a kit from them online, locating and driving to one of their Car Keys Express locations in your city, having their mobile service scheduled to come to you, and a priority option of having them come within 24 hours. The respective pricing ranges from about US$99 if you drive to them $169 for a scheduled come to you and $315 for 24 hours service. All well below the hassle and cost of getting it done through your OEM Service Dealership.
In my discussion with Kirk Stewart, Retail Marketing Director of Car Keys Express, he told me that it takes about 18 months on average for them to reverse engineer an OEM FOB, and develop their own proprietary software and chip design, extensively test it out before selling them. They design their units to exceed the OEM in terms of quality, latest electronics, and durability. The finished product is waterproof to 30 feet (OEMs are not) and have better battery life as well as range of operation.
They currently have their circuit boards made in China to their proprietary design, but are looking to bring that phase of the process to the United States. Car Keys Express design, engineer, load their own software on the boards, and package all of the units in the United States (Louisville, Ky). They guarantee their products for 3 years (parts and labor) versus the OEMs’ ninety days to one year.
Most, if not all of us if we are being honest, have experienced that awkward moment of panic when we have a vehicle ‘suddenly appear out of nowhere’ as we are driving down the highway.
I consider myself to be a capable accident-free driver and have taken high performance driving courses. My mirrors in each of my cars are set following the Society of Automotive Engineers (SAE) recommendations for setting side mirrors to minimize blind spots.[1] Additionally, my newest vehicle has blind spot warning that alerts to when a vehicle is in the car’s blind spots. But I have found it is still possible to be ‘surprised’ by the appearance of a car or truck that has come up behind me and that wasn’t visible in my side mirrors.
The team at NxTGEN® Automotiveprovided me with a set of their EXTENDED VIEW custom blind spot mirrors for review on my BMW X3.
Several features set NxTGEN® Automotive blind spot mirrors apart from other blind spot mirror vendors and their related products:
Their mirrors are developed for specific vehicle model applications
The are made of real glass
The scale, ratio and curvature of the glass is researched and designed to provide an ultra-clear continuous image despite being actually a combination of nine planes refined to capture all of the blind zone for each specific model
When you order for your specific model BMW or Tesla (currently the only OEMs models with available NxTGEN® Automotive blind spot mirrors), you receive a card with the two glass lens and abbreviated application instructions.
Installation
Installation is straight forward with a caveat: you need to pay attention to where on your respective mirror it is supposed to go. Depending on which BMW model you order, the NxTGEN® mirror is to be mounted in the lower or upper outside corner (for all Tesla models, the mirror is mounted in the upper outside corner).
In addition to the NxTGEN® mirrors, you’ll need isopropyl (rubbing) alcohol and a microfiber or paper towel and a hair dryer (to activate the adhesive).
The first step is to test place the NxTGEN® mirror on your side mirror to see where you will be placing its contour to match your OEM mirror contour. Next, wipe the side mirror with isopropyl (rubbing) alcohol and a microfiber or paper towelto remove any contaminates.
Now you remove the protective sheet off the adhesive backing of the NxTGEN® mirrorand carefully align with the OEM mirror contour. Press fully in place. This next step is important to ensure the blind spot mirrors remain bonded to the side mirror glass. Use the hair dryer on high to heat up the entire NxTGEN® mirror for 1 to 2 minutes. Follow this by using a microfiber towel and press all areas of the NxTGEN® mirror for about 30 seconds and you are done. Repeat with the remaining side mirror.
Here is what it will look like:
Do they work? A demonstration test.
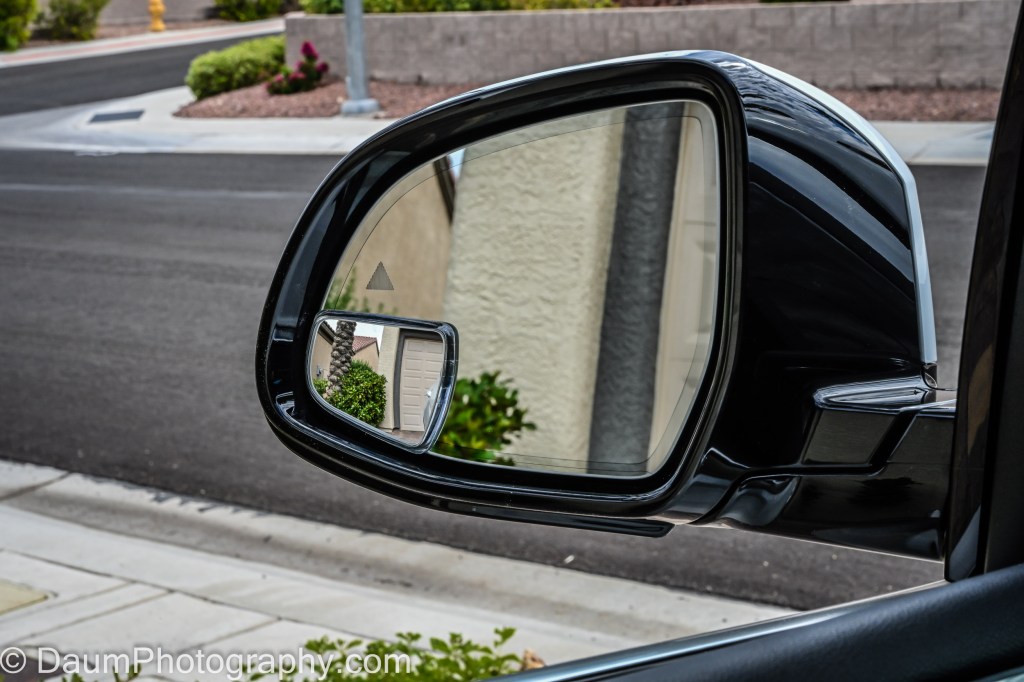
To see the degree of blind spot reduction with the NxTGEN® mirrors, I set up a simple test. Prior to installing them, I took my BMW to a parking lot and parked so that cars were behind me similar to being on a multi-lane road. I also positioned a tripod off the left side of my BMW to represent a person or bicycle coming along my normal blind spot zone. As mentioned earlier, my mirrors were already set following SAE guidelines.
Here is what I could see:
Next, I temporarily affixed the NxTGEN® mirrors and was extremely pleased by how it had virtually eliminated the entire blind zone on the driver side. Here is what it showed:
You can see that in addition to the same car on my left, from a safety point of view, two critical elements are in the NxTGEN® mirror that were not in the OEM mirror: my pseudo person/bicyclist and the car behind me. Also, you can see another car to the left that was not in the regular mirror view.
[Technical note, the OEM mirror was not readjusted, my car had not moved, and the camera I used to take all the images was in the same head/eye level position each time.]
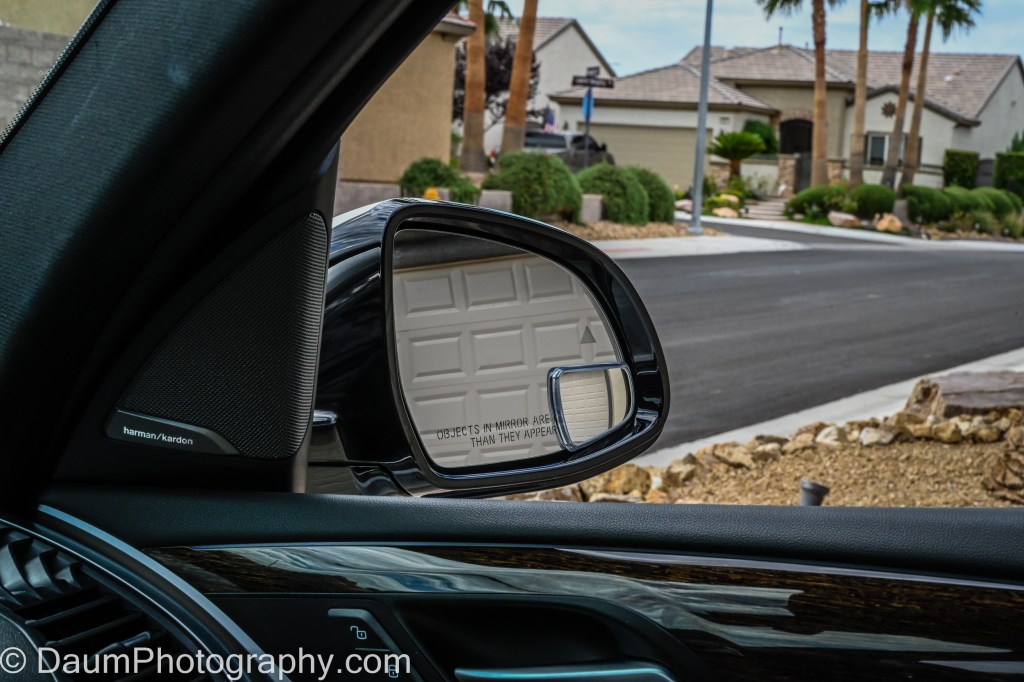
The results for the passenger side were less impressive. I repeated the same set up as with the driver side including the tripod pseudo person/bicyclist. The OEM mirror set to the SAE recommendations does not have a blind zone immediately next to car like the driver side does, and the pseudo person/bicyclist was easily seen. The only difference with the addition the NxTGEN® mirrorwas that you saw more of the car in the next lane than you saw in the OEM mirror. This means that with the NxTGEN® mirror you will no longer have the split-second blind spot when a car passing you on your right transitions from being visible in your mirror to being visible out the passenger window.
Driving Test
After my demonstration test, I properly affixed the two mirrors following the steps described above. I drove on city streets and the highway. The NxTGEN® mirrors clearly (literally and figuratively) eliminate the blind zones. What I noticed is the driver side NxTGEN® mirrorin addition to capturing any vehicle coming up on your left side also shows you any vehicle behind you in the same lane you are. As you can see in this driver side image, the NxTGEN® mirror not only shows the same car as the OEM mirror, but also one that is in front of that car but in the OEM blind zone, and part of one directly behind me.
Conclusion
These NxTGEN® mirrors, at msrp $27 for the set, are definitely worth purchasing and installing, even if you have blind spot warning on your vehicle. They provide a crystal clear virtually non-distorted image that appears to fully eliminate blind zones in mirrors set up per SAE guidelines.
How To Convert Your Golf Cart to Run on Lithium Batteries
This product review focuses on a decision many golf cart owners face when the original lead acid batteries start failing: replace with the exact same or consider an alternative brand lead acid batteries. Until recently, these were the only viable options. You could call the shop you bought your cart from and have them order and replace the lead acid batteries, you could locate a supplier of similar sized lead acid batteries and do it yourself, or you could just buy a new golf cart. Ok, maybe that last option is a bit extreme, but I know owners who do just that.
A few years ago, some of the OEM golf cart manufacturers started selling their carts with the option of a single large lithium battery versus the traditional four (12-volt) or six (8-volt) lead acid batteries in 48-volt powered golf cars.
Around the same time that OEM golf cart manufactures began offering lithium batteries as an option, a few battery manufacturers started producing lithium batteries for replacement of lead acid batteries in existing golf carts. This opened a new alternative to consider and brings us to this review.
I have a 2017 Yamaha Drive2 PTV golf cart with Yamaha’s AC motor, and it came new with six 8-volt lead acid batteries. The cart gets used an average of three times per week on one of our two golf courses, both of which have sizeable elevation changes throughout the courses. After three and one-half years the original Trojan T-875 batteries were failing and barely able to make it through one round. Based on my research, I decided to go with RELi3ON® InSight lithium batteries, provided at cost by RELi3ON®.
This review focuses on the logic behind my decision, the replacement process, and the result.
The logic behind my decision
Lithium batteries offer several compelling advantages over lead acid batteries, including:
Lighter weight
No maintenance
Faster charge
Retains charge for longer
Longevity
Direct fit, no modification
The weight savings of lithium over wet lead acid batteries is one of the biggest advantages. A normal set of lead acid batteries tips the scales at 378 pounds. Lithium batteries pack more power than lead acid, and in the case of InSight batteries, each battery supplies 48 volts and 30-amp hours. You can comfortably replace the six lead acid batteries in your cart with just two lithium batteries. If you go with two lithium InSight batteries, your total weight will be 69 pounds or a savings of 309 pounds! Even if you go with four lithium batteries as I did because of the considerable elevation changes on our courses, your new total weight will be 138 pounds, or a savings of 240 pounds!
This weight savings is immediately noticeable in your cart’s moving from a full stop, in its steering and handling. Hauling a minimum of 240 pounds less each time you drive your cart will mean components like brakes, suspension and tires will last longer.
Another advantage of lithium batteries is that there is zero maintenance. You never have to check or add water for the life of the battery.
Because of the chemistry, the lithium batteries charge much faster than lead acid, typically coming up to full charge after a round in just a few hours. Also, unlike lead acid batteries that lose their capacity quickly over time (when not left on a charger/maintainer), lithium will still have 80% of their capacity after 60 days and will take two years to drop to 20% of their capacity.
Lead acid golf cart batteries normally last between three and five years, and usually have a 12-to-18-month warranty. Lithium batteries are rated to last eight to ten or more years. The RELi3ON® InSight lithium batteries reviewed here, carry a 7-year full warranty (and in the 8th, 9th and 10th year, a 10 percent discount on a replacement) and are rated for greater than 6,000 cycles @ 80% depth of discharge.
A consideration, especially for the DIY golf cart owner, is how difficult will be the conversion from wet lead acid to lithium batteries. As it turns out, not difficult at all since the RELi3ON® InSight batteries are a direct size replacement for the OEM lead acid batteries. More on that shortly.
With the advantages being so impressive, why wouldn’t everyone replace their lead acid batteries with lithiums when it is time? There are a couple of reasons I can think of. Many golf cart shops are still unfamiliar with, and have no experience with, lithium options for replacements. Similarly, since it is a relatively new technology, few golf cart owners have heard of lithium aftermarket batteries and therefore do not consider them when their batteries die. But the biggest reason is the initial cost outlay difference.
If you are in the market for a new golf cart, possibly your dealer has offered a lithium version as an option. Currently the lithium option adds between US$2200-$4000 to the regular cart price over traditional lead acid batteries. Returning to the focus here, replacing original lead acid batteries in the golf cart you already own, a set of six good lead acid batteries will cost about $1600 plus installation plus another $75 to $100 for a battery fill kit if you want/need one.
Depending on how you use your golf cart, and how hilly your golf course is, you can choose to replace the six eight-volt batteries (48-volt system) with either two, three or four 48-volt lithium batteries. A major difference between the lead acid batteries in a golf cart and lithium, is that lithium is scalable. That is, you can start with a two-lithium battery system, and if you find you need more range, you can simply add one or two more lithium batteries to your system later.
Two InSight batteries will provide 60-amp hours and 20-35 miles per charge, three will provide 90-amp hours and 30-50 miles per charge and four will go 40-65 miles per charge with 120- amp hours. The current price for the RELi3ON® InSight lithium 48-volt batteries is two for $2595, three for $3295 and four for $3995. This price includes free shipping to your door, spacer batteries to fill the empty battery slots, a RELiON approved charger (that works through your cart’s regular charge port), and CAN cables (allow each battery to ‘communicate’ data to the other batteries). [Note: check with RELiON’s web site to get the latest pricing and bundle options. The latest bundle includes their new fuel gauge, discussed towards the end of this review.]
Considering cost alone, for example, if instead of replacing the lead acid batteries twice over eight years you purchased two InSight lithium batteries, you would save $500 to $600. If you went with three InSight lithium batteries, you basically break even, and if you went with four you would spend an additional $700 to $800 over the lead acid batteries. When you consider the advantages of lithium discussed earlier, it could be a very good option for you.
Why RELi3ON® over other lithium options? I was impressed by several factors including the actual design of their InSight battery, their steps to ensure the safety of lithium technology for this application, and their customer service. Unlike some competitors, RELi3ON® did not modify existing lithium batteries and components to work in a golf cart environment, rather they designed the InSight from the proverbial Tabula Rasa or ‘clean sheet’ approach. In essence they laid out everything they wanted a lithium battery to be able to do in a golf cart and golf cart environment, and then designed the battery to do that. I encourage you to check out their website[1] to learn more detail about the battery’s chemistry, construction and impressive ‘unique SuperSmart BMS’- battery management system that is incorporated into each battery. They also have a number of very informative YouTube videos, for example, explaining the construction of the battery.[2]
Installation
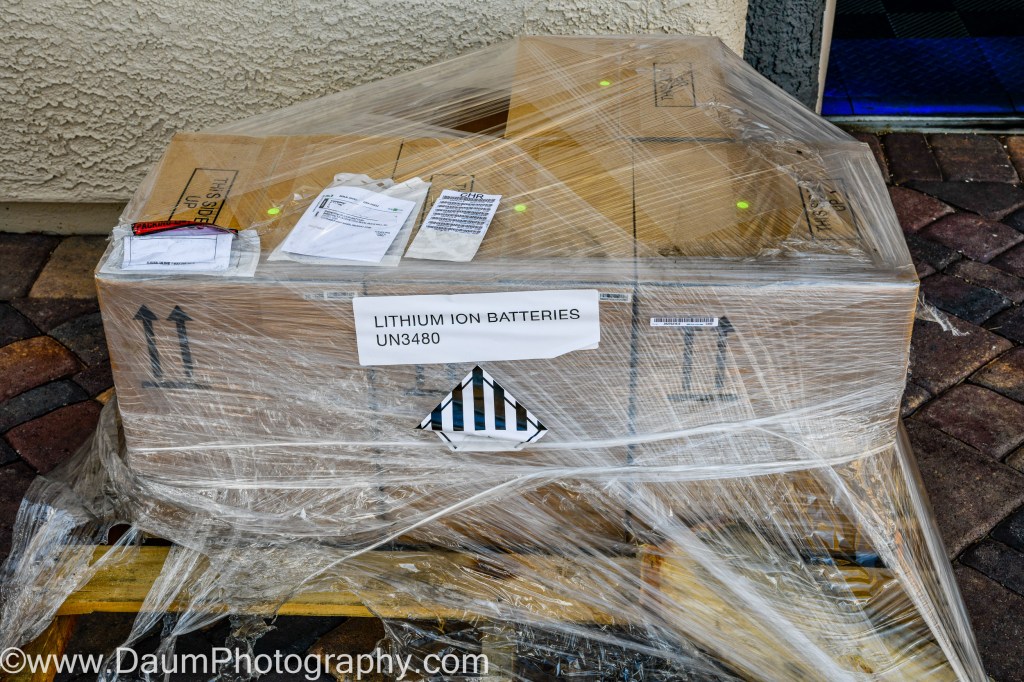
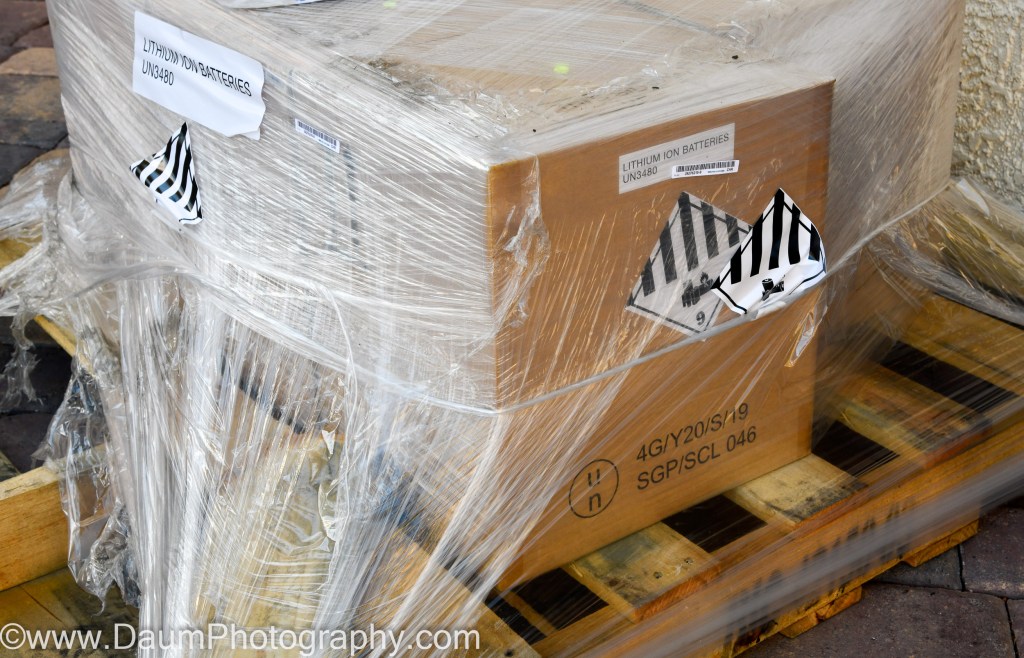
The four RELi3ON® InSight lithium 48-volt batteries along with the charger unit arrived within about a week of ordering and were delivered on a pallet.
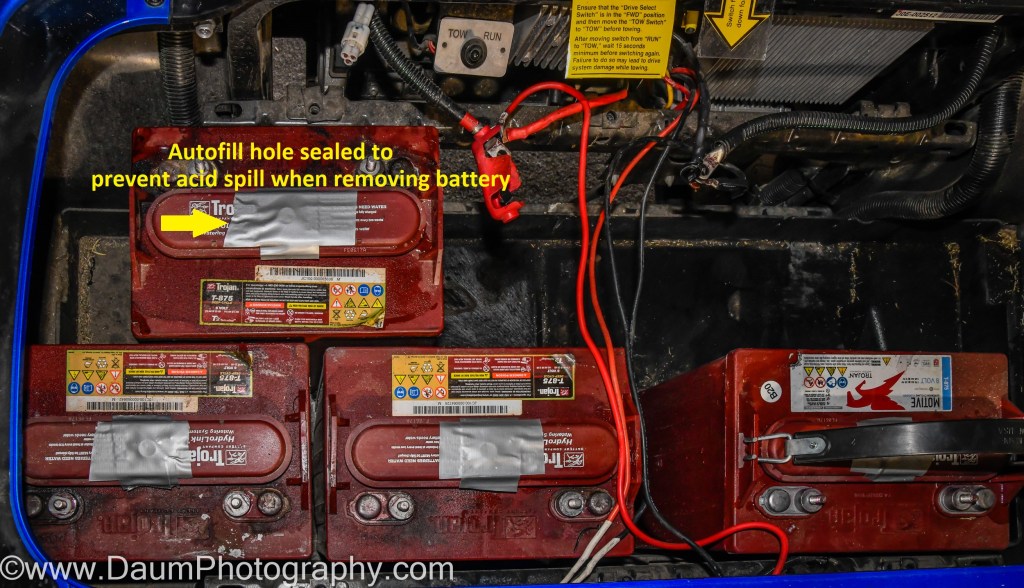
The first step was to remove the six 8-volt Trojan T-875 lead acid batteries from my cart. To facilitate this, I removed the seat and switched the “Tow/Run” switch to tow to ensure that the cart motor and electronics were not inadvertently damaged by the removal and installation of the batteries.
My cart had an auto-fill system attached to each of the Trojan batteries (this system makes it easier to maintain the correct fill level when adding distilled water for required battery maintenance). After I removed the hose connections, I put duct tape across the fill hole in each battery to ensure no acid sloshed out when I removed the battery.
Next, I used a 9/16 or a 14mm socket to remove the nuts securing the battery cables (be careful to not short across the terminals with your wrench). You can save and reuse the original cables; I discuss this shortly. Follow by removing the nuts on the battery retainer brackets. On my cart, these required a 12mm socket.
Now you are ready to lift the batteries out. The easiest way is to use a battery lifting strap (under $10 at an auto parts store or Amazon) that hooks onto the lift tabs at top of the batteries. Take care, as the batteries each weigh about 60+ pounds and you want to lift each up as straight as possible to avoid spilling out any of the battery acid. You can dispose of the lead acid batteries at most auto supply shops or battery shops (like Batteries Plus Bulbs) for free. If that is not convenient, call your local recycling facility.
After you remove the batteries, take a couple of minutes to clean out the battery tray of any debris that has accumulated. Also use some sandpaper to clean the cable ends from your cart that run from the batteries to the motor/controller and from the charging port.
Empty battery tray
As mentioned, you can reuse some of the battery cables you removed (you won’t need all of them), but it is best to use cables of equal length for the connections between your new lithium batteries. If your original cables are equal length and in good shape, go ahead and use them. If not, I recommend you order new 4 AWG cables. You will need one pair of new cables if you go with a two-lithium battery set up, two pairs for a three-lithium battery set up, and three pairs for a four-lithium battery set up like I did. The length that you need to order will depend on how your batteries sit in your battery tray. In my case, I ordered ($15 per pair from Amazon) three sets of Spartan Power 4 AGW one-foot-long cables with 5/16 ring terminals.
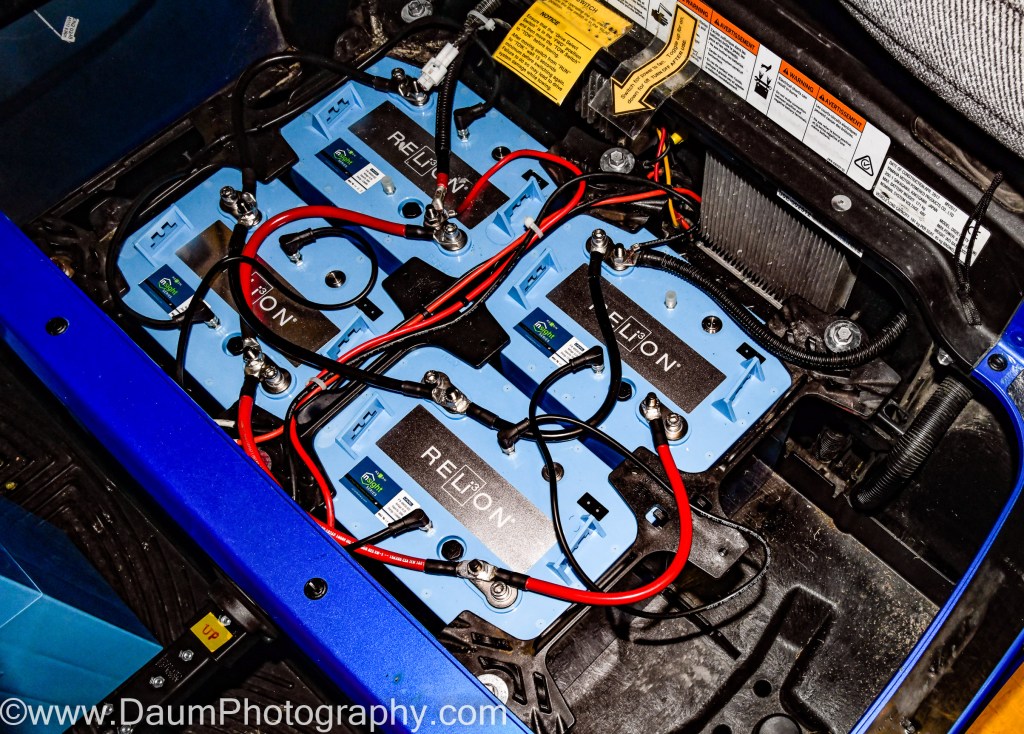
Now you are ready to install the RELi3ON® InSight lithium 48-volt batteries. This process is the same, whether you decided to go with two, three or four to power your cart. Place the lithium batteries onto the battery tray, using the positions closest to the negative and positive cables from your motor/controller. You will follow by putting in the spacer units that came with your batteries to enable the reuse of the battery retainer brackets. Finish by reattaching the battery retainer brackets.
Next step is attaching the cables. Note: this is very different from how your lead acid batteries were connected. Your lithium batteries are connected in parallel. That means the cable from one battery’s positive terminal is connected to the next battery’s positive terminal. Similarly, the cable from one battery’s negative terminal is connected to the next battery’s negative terminal.
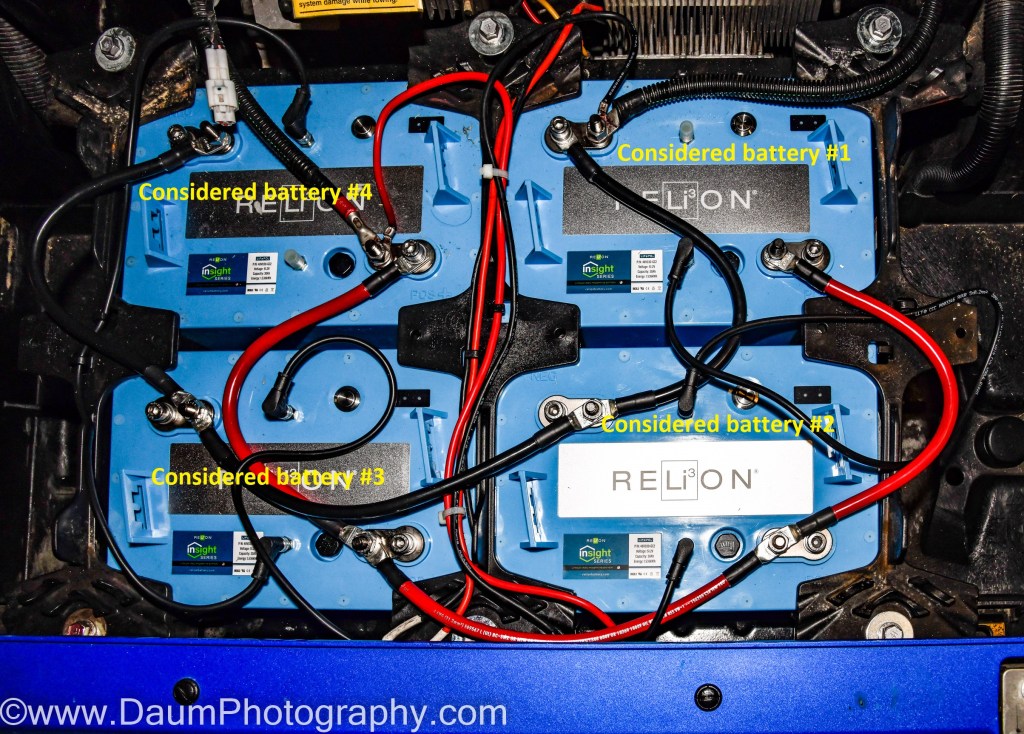
Start with your ‘first’ lithium battery in the group—that will be the lithium battery you are connecting the negative cable from your motor/controller (see above picture, first battery is labelled #1). On that battery, you connect the negative cable from your motor/controller and one connecting cable to the same negative post on the RELi3ON® InSight battery. You will also connect the negative cable from your cart’s charger port here. The nut on the RELi3ON® InSight battery post uses a 13mm socket (there is also a stud that uses an M8 Allen wrench that can be used). Tighten to 6.6 to 7.4 ft-lbs if you have a torque wrench. Otherwise, tighten firmly but do not over tighten. Now connect the other end of the cable attached to the first battery negative terminal to the next battery’s negative terminal. Continue connecting each of your battery negative terminals the same way.
Going back to the ‘first’ lithium battery, now connect its positive terminal to the second battery, again using either the 13mm nut or M8 stud. Continue to your last battery. Now connect the positive cable from your motor/controller to the last battery’s positive terminal. Also, connect the positive cable from your cart’s charger port here.
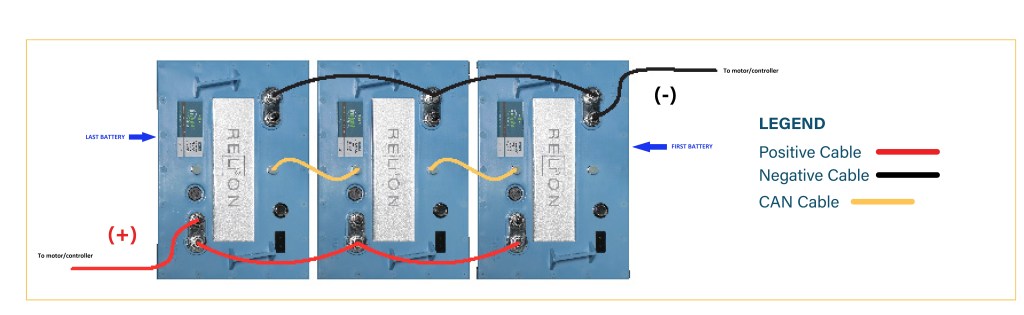
Recheck all of your cable connections. The first battery should have the negative cable from your motor/controller and be connected to the second battery negative terminal. The first battery does NOT connect to your motor/controller positive cable. Its positive terminal only connects to the second battery positive terminal. The last battery in your system should have the positive cable from the motor/controller connected to its positive terminal, as well as be connected to the positive terminal on the next battery in the parallel set up. The last battery does NOT have a connection from its negative terminal to the motor/controller negative cable. You can see this in the following image.
Positive connections highlighted in green, Negative highlighted in yellow
When you opened the boxes with your new RELi3ON® InSight batteries, on top was a CAN cable for interconnecting the batteries. This cable is used to enhance charge and discharge balancing between batteries.
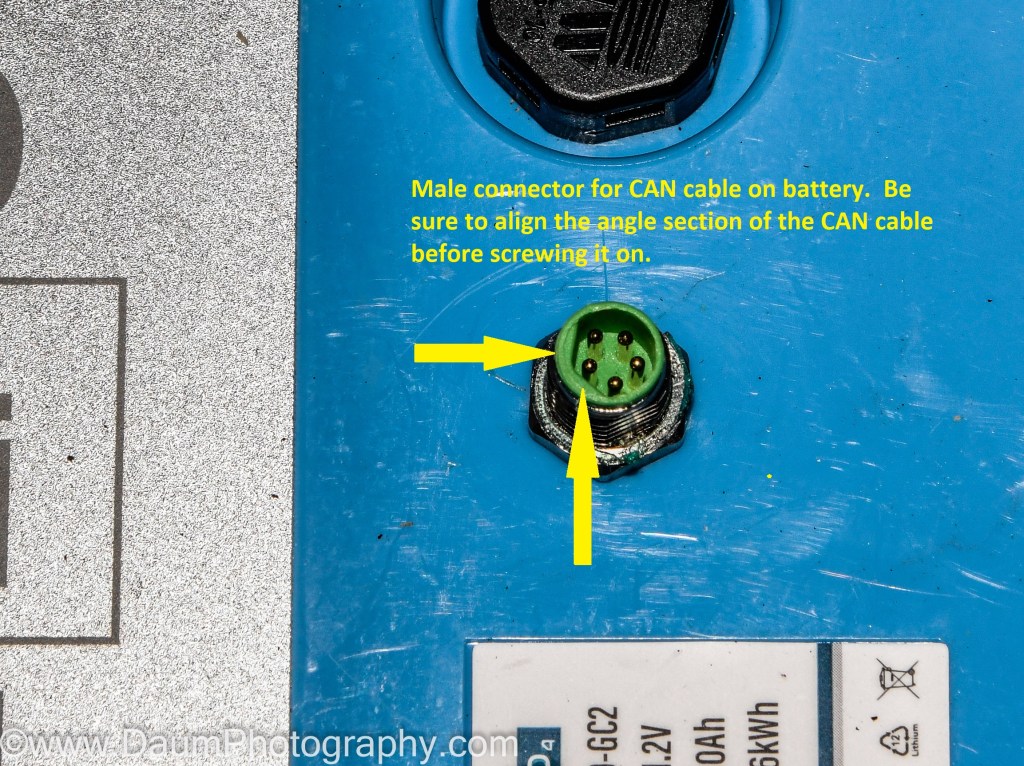
With all the battery cables now in place, it is time to connect the CAN cables. Before you connect them, take a close look at the end of one of the CAN cables as well as the CANbus ports on top of a battery. You will see that the female connector on the CAN cable has an angled section that must be aligned with the same section on the CANbus port on the battery per the following images.
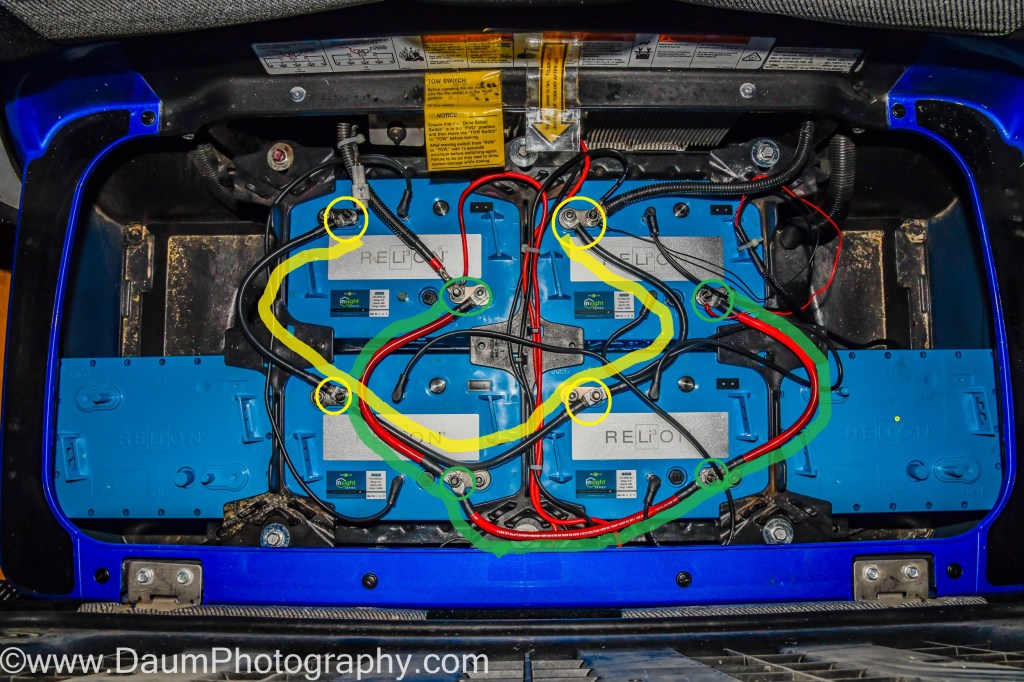
Now, begin with the ‘first’ battery (the one connected to the golf cart negative motor/controller cable). Connect the CAN cable to the Output CAN port, ensuring that you have it angled sections aligned. It is the one on the positive side of the battery (#3 in this image). Take the other end of this Can cable and connect it to the Input CAN port (the negative battery side, #2 in this image) of the second battery. Continue connecting the remaining CAN cables the same way for the rest of your batteries.
Properly wired in parallel (positive to positive, negative to negative)
When you are done, recheck all of your CAN cable connections. Your first battery should only have one CAN cable connected (at the Output port) and the Input port remains unused at this point. Similarly, the last battery should only have one CAN cable connected (at the Input port), and the Output port remains unused at this time.
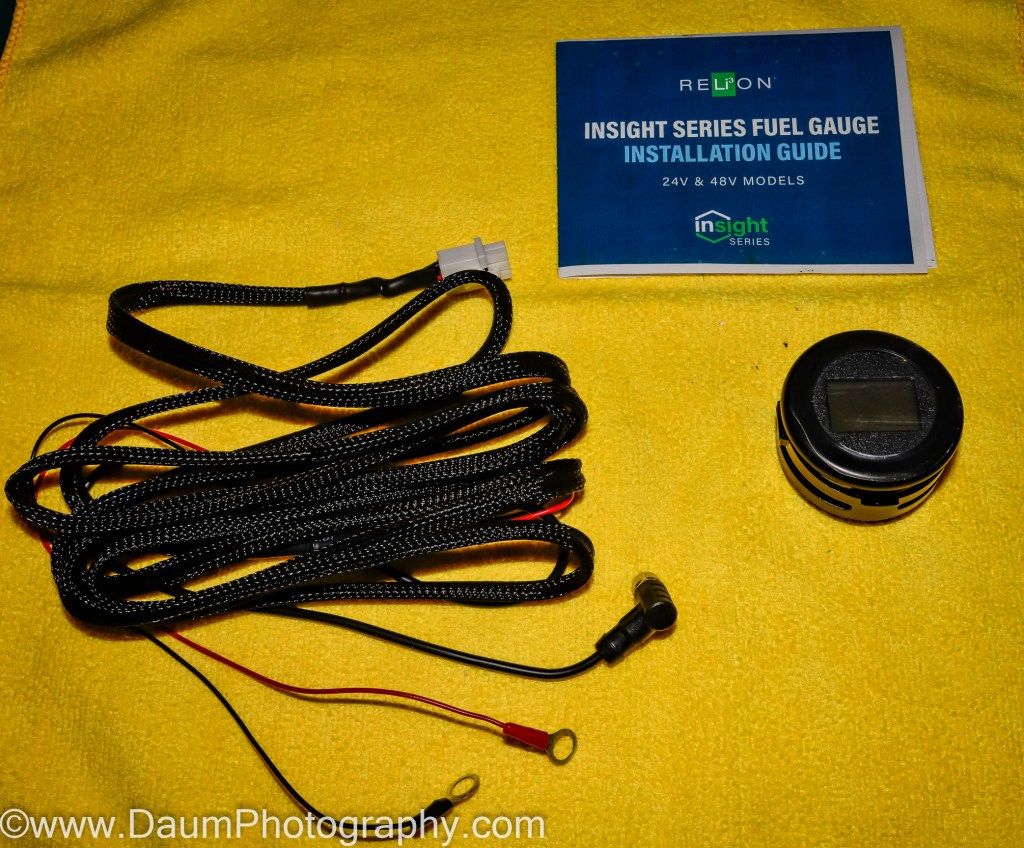
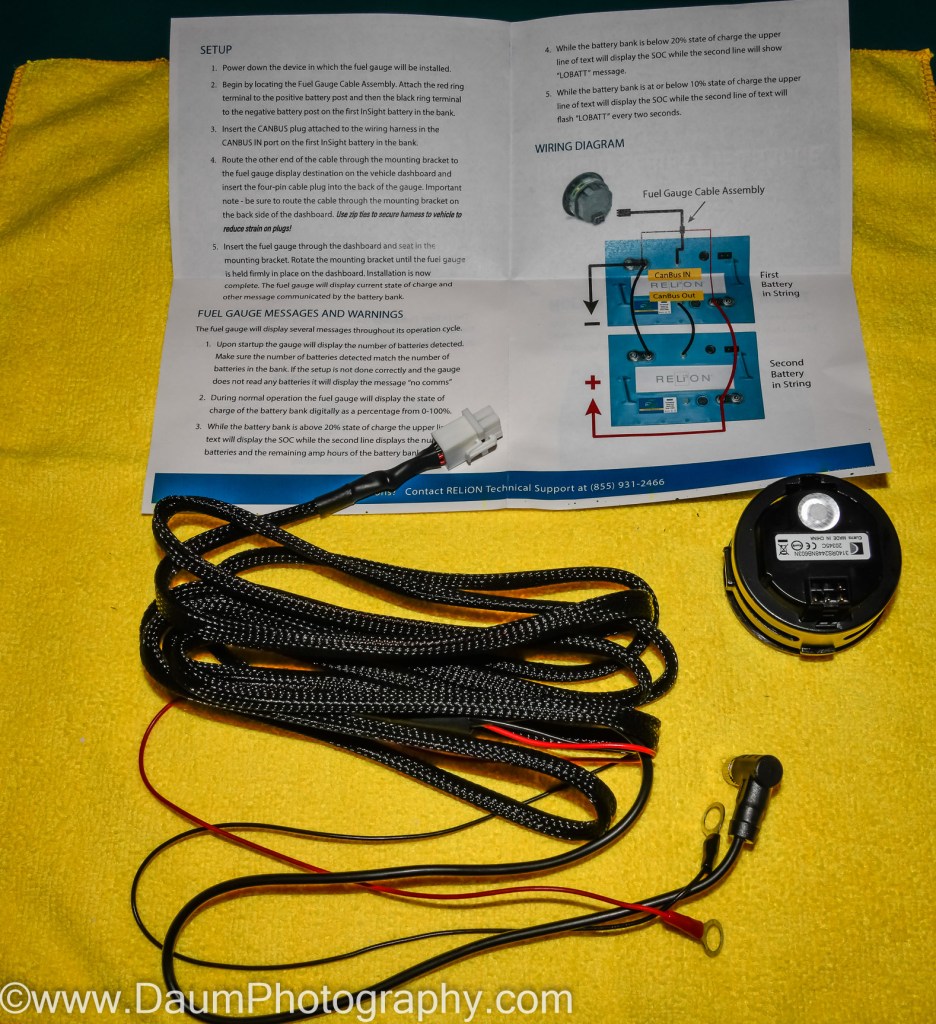
The final connection step is optional. If you ordered the InSight series ‘fuel’ gauge (list $175 but will shortly be priced in respective InSight battery bundles), you would need to connect it at this point.
The fuel or battery gauge is not required, but very useful. Each of the RELi3ON® InSight batteries have a state of charge set of LEDs on the top of the battery, that function to tell you the remaining charge, ranging from 0 to 100%. However, to see this, you would need to lift your cart seat. The InSight gauge can be used as a direct replacement for your cart’s original battery gauge, or as in my application, as an additional gauge. The odds are that your original gauge will not correctly tell you the state of charge because it is normally designed to measure voltage, rather than current. The InSight gauge provides you two continuous readouts, one displaying the % of charge remaining and the number of amp-hours remaining, the second display shows also the % of charge remaining along with the number of lithium batteries connected.
Connecting the InSight series gauge is very simple. At the end of the wiring harness supplied with the gauge, you’ll find a red wire with a ring terminal, a black wire with a ring terminal, and a CAN connector. Go to your ‘first’ battery, connect the red ring terminal to the positive pole, the black ring terminal to the negative pole, and the CAN connector to the unused CANbus Input port.
Now route the gauge harness up to the place you are mounting the meter, using zip ties to secure the harness along the cart frame. You can simply replace your cart’s existing meter if it is a standard round gauge or mount the InSight meter separately. In my case, I left the original meter since it also functions to display when my cart’s turn signals are on as well as when the headlights are on. I purchased an add on automotive gauge pod from Amazon (under $8 Etopars Carbon Fiber 2″ 52mm Universal One Hole Dash Dashboard Car Gauge Pod Mount Holder) and mounted the InSight gauge into it.
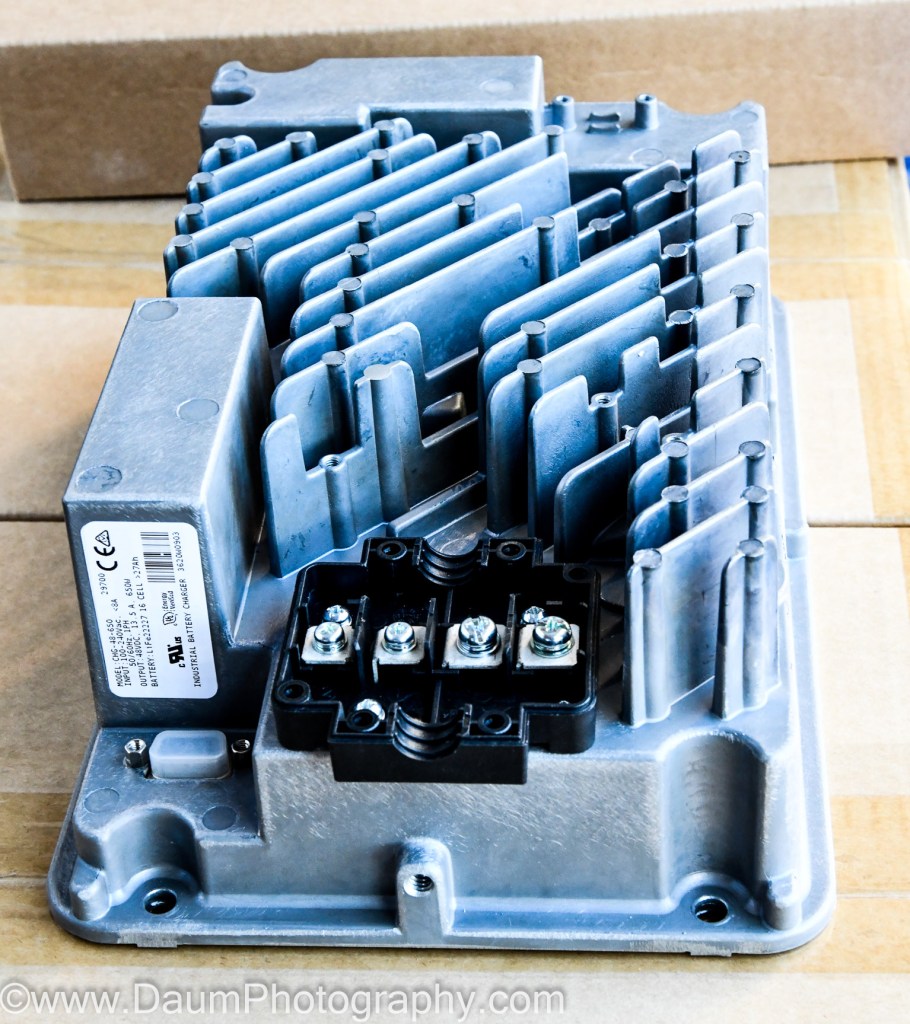
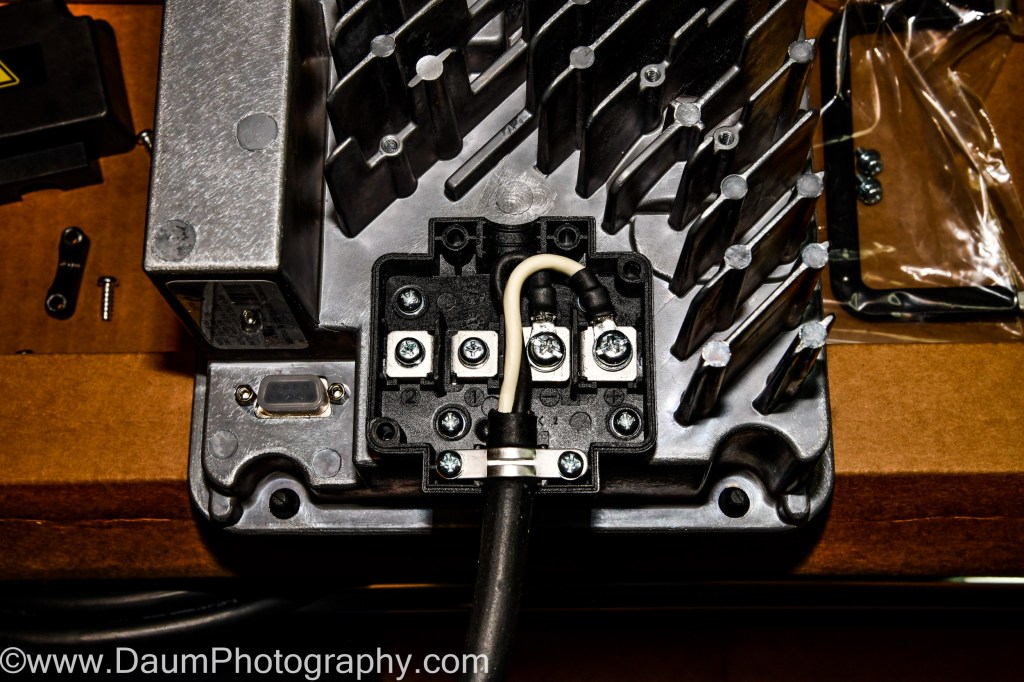
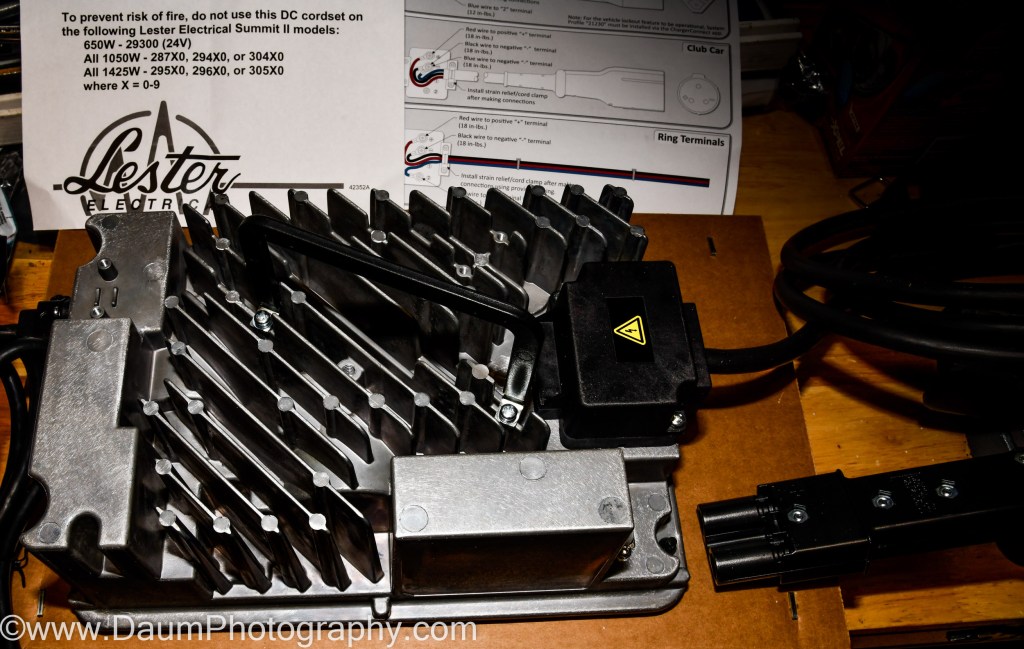
Lastly, you need to attach the charger to cart wiring harness to the RELi3ON® InSight supplied charger. Different OEM golf cart manufacturers use slightly different female connectors to their cart’s charging port. When you order your RELi3ON® InSight battery bundle, you identify the type of cart you have, and they include the correct charger harness. All you are required to do is attach the harness to the charger- basically connecting the harness ends via screws on the charger base and screwing on the protective cover. The Lester Summit II unit that RELi3ON® supplied for my bundle also has a Bluetooth smartphone app for monitoring charge cycle status.
Now you are finished. The whole installation process from start to finish will probably take you a couple of hours. It really is simple to do once you review and become familiar with the details.
Ready to Go (and go and go 😊 )
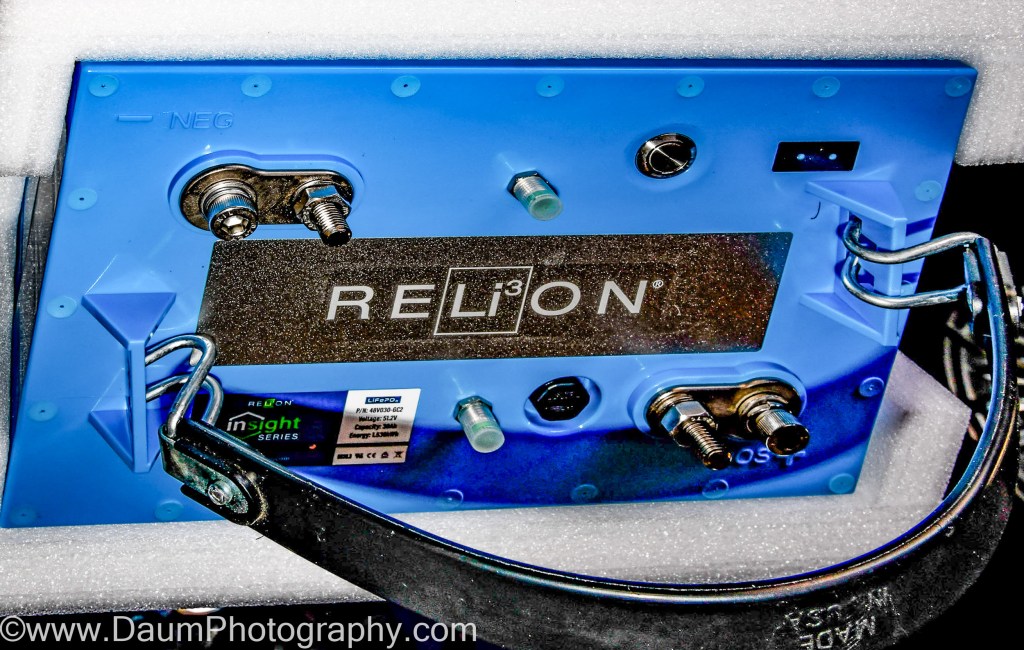
Now for the fun part. The first time you power on your new RELi3ON® InSight batteries you simply press and hold the Power button (see #4 in image) on the first battery until you see the first LED flash green. It will then continue to flash green every five seconds. Shortly thereafter, you will see the remaining batteries come to life; their respective first LED will similarly flash green.
Once all the batteries are ‘awake’ you can press and release the power button once on each battery, and then the two LEDs will tell you the state of charge. You are now ready to go! Along with the satisfaction of having done this conversion be prepared for the very noticeable ‘seat-of-the-pants’ feel of the quick acceleration and easier steering/handling of your golf cart.
After you have taken it out for its maiden spin, plug your new charger in. The recommendation is to plug your cart in after each use. The charger is a ‘smart’ charger/maintainer and can be left on without concern.
Preliminary Conclusions
After my first couple month’s use of the RELi3ON® InSight lithium batteries, I have found that they perform perfectly. No matter how hard the cart is pushed, they never even get warm to the touch. They charge back to 100% and 120-amp hours in just a few hours. Even after driving around and playing 36 holes on my very hilly courses, the remaining charge is still in the mid 60% range.
Handling and “zippiness” are superb due to the permanent weight reduction. Another bonus is not ever having to think about checking and adding distilled water to the batteries.
My only ‘nit’ (and it is a small one) is with regards to the CAN cable connection. I’d recommend RELi3ON® add a visible alignment line on both the cable and the battery port to make the proper connection simpler.
Other than that, the quality of all the components included in the RELi3ON® InSight battery package is outstanding. Customer Service/Technical Help was excellent. The ‘seat-of-the-pants’ feel brings a smile to my face every time I am in the cart, even if my golf game does not.
My rating: Clearly deserves a 5 out of possible 5 lightning bolts!
I hope you found this useful. Please let me know if you have any questions!
Recently a new style of solid-state drive has been used in computers and laptops called NVMe PCIe SSD. They differ in several ways from SSDs you possibly have in your computer or laptop. Instead of being similar in shape and size to a small cell phone (standard SATA SSD), the NVMe M.2 looks more like a memory stick.
They are designed to be significantly faster than regular SATA hard drives as well as faster than SSDs. To fully realize their speed, however, your motherboard needs to be a newer model that has native M.2 module slots built in. These M.2 modules have direct lanes to the CPU, unlike going through typical expansion slots first. It is possible to use the NVMe M.2 in either internal adaptor cards, or externally through a USB 3.1 C or Thunderbolt™ connection, but again, the resulting speeds will be less than you can achieve with a native M.2 module slot on your motherboard.[1]
This review is of the new Fledging Shell Slim, supplied with a 1TB NVMe 2280 SSD, by Fledging’s Brand Manager.
What’s In The Box
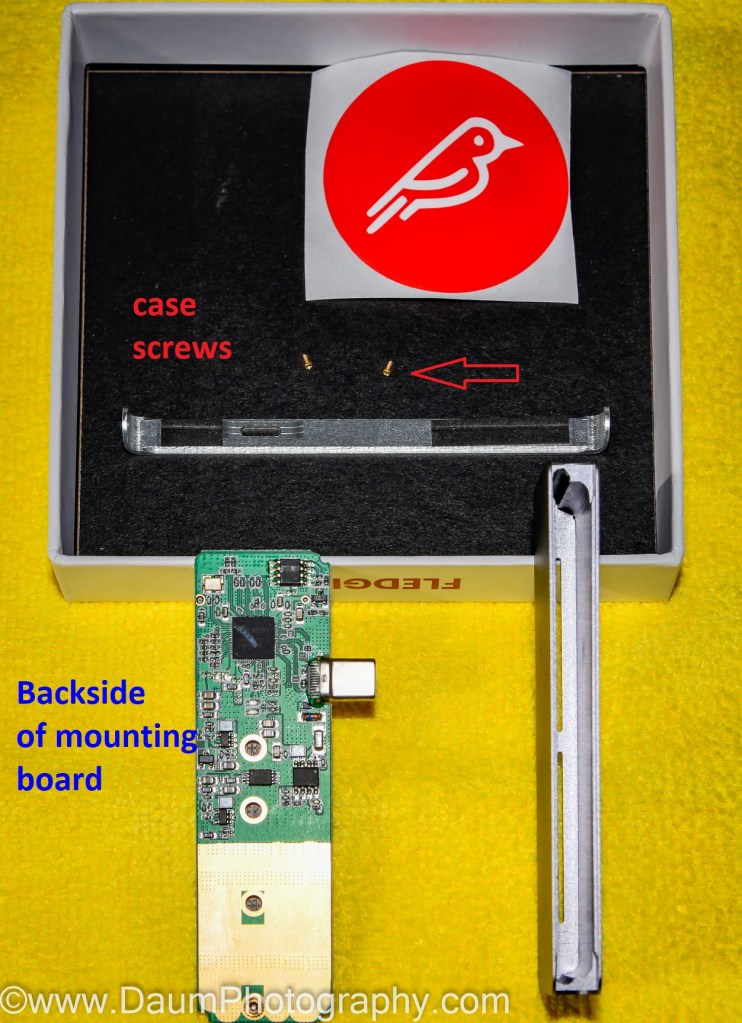
Along with the Fledging Shell Slim is a small screwdriver, package with two brass case replacement screws, a small soft carrying case for theShell Slim, and one fun Fledging icon sticker.
My unit had a 1TB NVMe PCIe SSD pre-installed, so it was ready to go. The Shell Slim can be ordered as just a case, or with 256GB to 2 TB SSDs.
The unit weighs 1.2 oz (34 gm) with the SSD installed. It is 3.79 long (9.63 cm) by 1.24 in. (3.15 cm) by 0.35 in thick (0.89 cm). The USB C connector on the case adds 0.25 in (0.64 cm).
The Shell Slim case by itself lists for US$45.99 and with the 1TB SSD as tested, US$179.99.[2]
Inserting your own NVMe PCIe SSD in the Shell Slim is easy. You unscrew the two brass screws, one on either end of the case, open the case and pull out the board by using the attached USB C connector. You then insert your SSD into the board and screw in the retainer screw per the following diagram (Courtesy of Fledging):
The only slightly challenging part is reinserting the two case screws once you have inserted the board back into the case. They are very tiny (and that is why Fledging probably provided the extras 😊).
Initial Field Test
I used a LG Gram laptop Z990 with an 8th Gen Intel® Core™ i7 processor, DDR4 dual-channel memory, 256GB M.2 2280 SSD, 16GB DDR4, Windows 10 with a native Thunderbolt™ 3 Interface port to run the performance analyses.
Two different types of ‘real data’ tests were conducted. The first was designed to replicate the post-shoot file transfers I do as a professional photographer.
For this test, 2 sets of files were loaded directly from an XQD card, one 6.14 GB (311 items) and one 47 GB (842 items), each containing a mix of images, videos, pdfs and text. For performance comparison four different drives were used:
Shell Slim
Thunder-Thunderbolt 3
The LG Gram motherboard mounted M.2 SSD
Micro SD SDXC card (in the SD port of the laptop)
Test 1 results:
6.14GB
47.0GB
Shell Slim
00:18.98
02:54.55
Thunder-Thunderbolt 3
00:29.99
03:40.57
LG Gram motherboard M.2 SSD
00:24.3
05:37.34
Micro SD SDXC card
01:36.6
11:36.03
The second test was based on directly writing from the LG Gram laptop 256GB M.2 2280 SSD to the two faster drives from Test 1, the Shell Slim and the Thunder-Thunderbolt 3. Both external drives were connected to the LG Gram Thunderbolt™ 3 Interface port. One 47 GB (842 items) and one 72.8 GB (8996 items) data set mix of images, videos, music, pdfs and text were used. The tests were run twice, reformatting the drives in between and letting their temperatures return to ambient before the second write. The table shows the average times from the two runs.
47.0 GB
72.8 GB*
Shell Slim
01:55.24
04:13.85
Thunder-Thunderbolt 3
03:06.14
07.73.89
*Temperature rise on writing to the respective drives: Thunder-Thunderbolt 3 15.5⁰F increase; Shell Slim 22.5⁰F increase.
Preliminary Results
As a photographer, anything that can speed up backup transfer while ensuring the integrity of the images, is always welcome. As can be seen in Test 1, replicating the options available to me when I normally transfer directly from my camera XQD card, the Shell Slim was the fastest for both the smaller 6.14GB and larger 47GB data write operations. In fact, it would have saved me nearly 9 minutes in the transfer of the large data set as compared to the SD SDXC card!
In Test 2, again the Shell Slim was considerably faster than the Thunder-Thunderbolt 3, when both were connected to the LG Gram Thunderbolt™ 3 Interface port. Note, the Shell Slim doesn’t have to be connected to a Thunderbolt 3 port but can work with any USB C port.
I think is worth reemphasizing the high functionality combination of the extreme speed of the Shell Slim packaged in such a small unit that directly connects to your Thunderbolt™ 3 Interface or USB C port. No cables to carry, no power supply needed.
In summary, this Fledging Shell Slim External NVMe PCIe SSD earns a solid 5 out of 5.
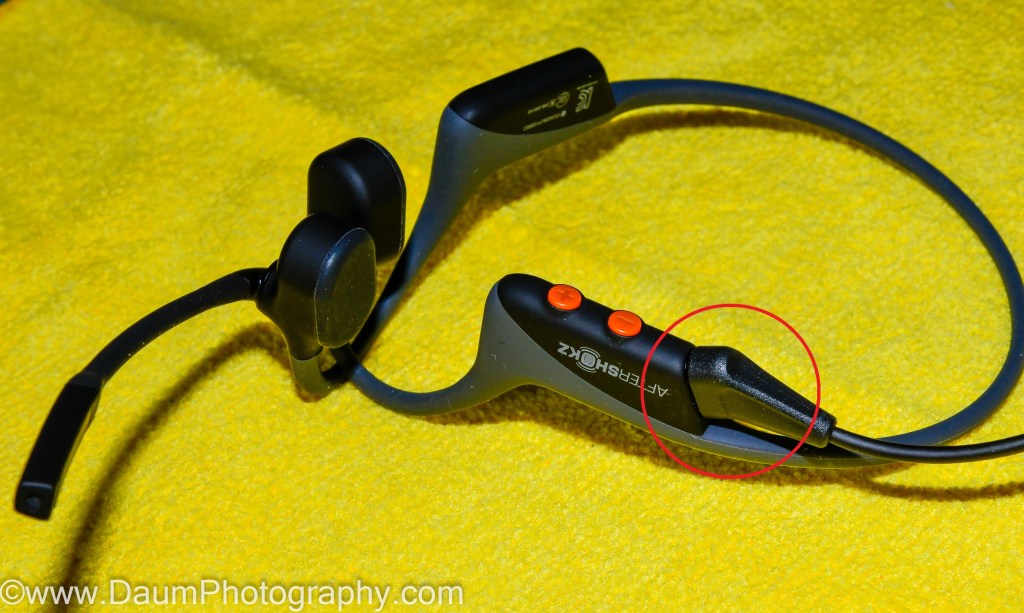
The following is a review of a different class of headsets, one based on bone conduction technology. The AFTERSHOKZ OPENCOMM headset was provided to me by the marketing director of AFTERSHOKZ, for review.
For those not familiar with bone conduction headsets, there are two key differences between them and the more familiar in-the-ear or over-the-ear headsets. (1) They do not sit in or on your ears. Bone conduction headsets are designed to rest on your cheekbones. (2) By design, they transmit the sound through your cheekbones directly to your cochlea, bypassing your inner ear and ear drum.
Because of this key difference, they result in a qualitative difference in the sound you hear and the experience of wearing headsets. But more on that shortly.
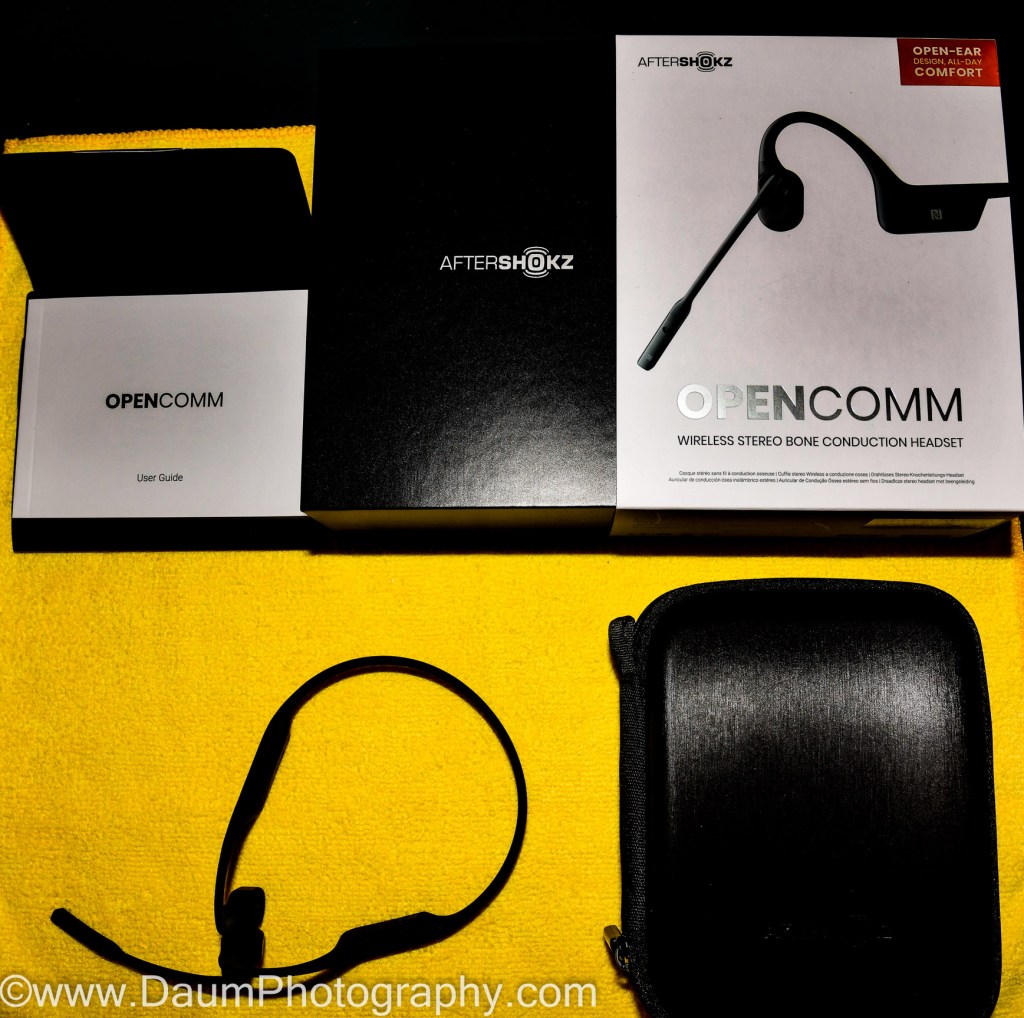
What is in the box:
The OPENCOMM headset arrives attractively boxed and includes the headset, a semi-hard travel case, the User Guide, and the magnetic charging cable.
Set Up and Specs
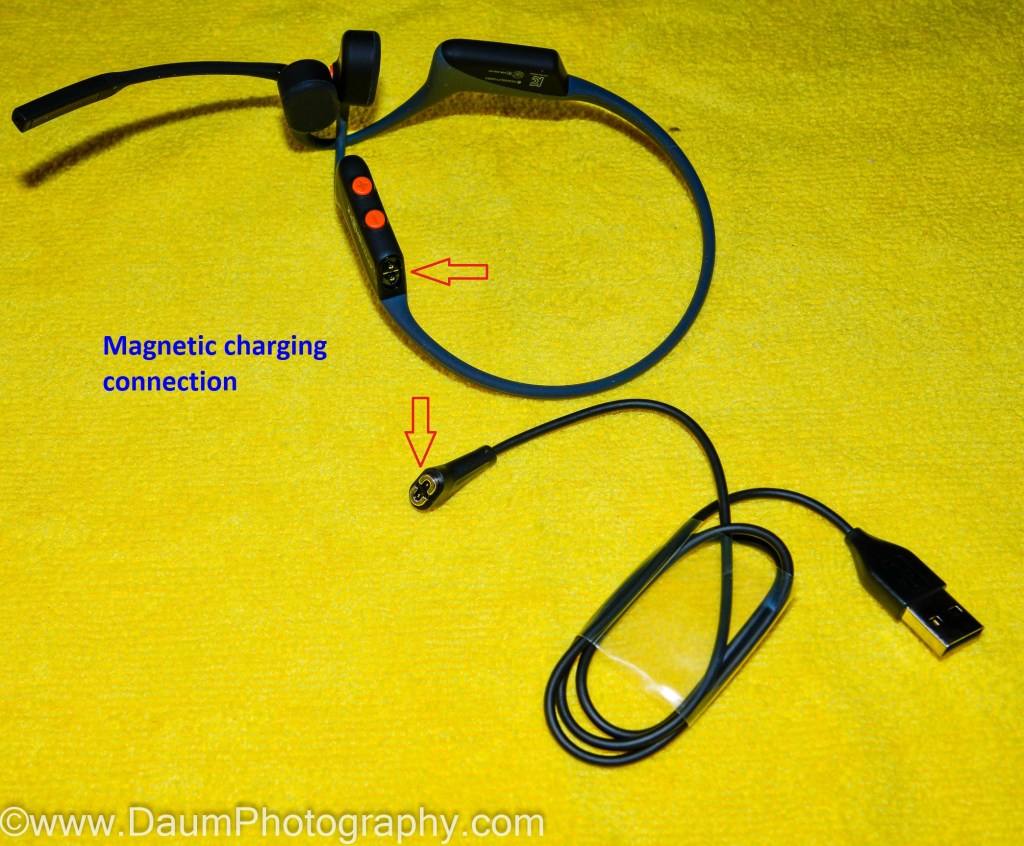
You charge the headset by connecting the magnetic charging cable to a USB port. The User Guide indicates it takes 60 minutes to full charge. According to AFTERSHOKZ webpage[1] a full charge will provide you with 16 hours talk time or 8 hours of listen time. Also, if your battery is running low, you can add 2 hours of talk time with just five minutes charge.
The Bluetooth 5.0 built in the set allows for very quick and easy pairing. Once you are paired, that is it- there is no app to download or further set up with the OPENCOMM headset.
One of the first things you will notice about the OPENCOMM headset is how light weight it is. A mere 33 grams or less than 1.2 oz! It is built on a titanium frame that is completely wrapped in a semi-soft rubber. The frame is not intended to be adjusted (bent) from its preformed shape. In fact, the only adjustable component is the boom mic, which you rotate down to be near your mouth.
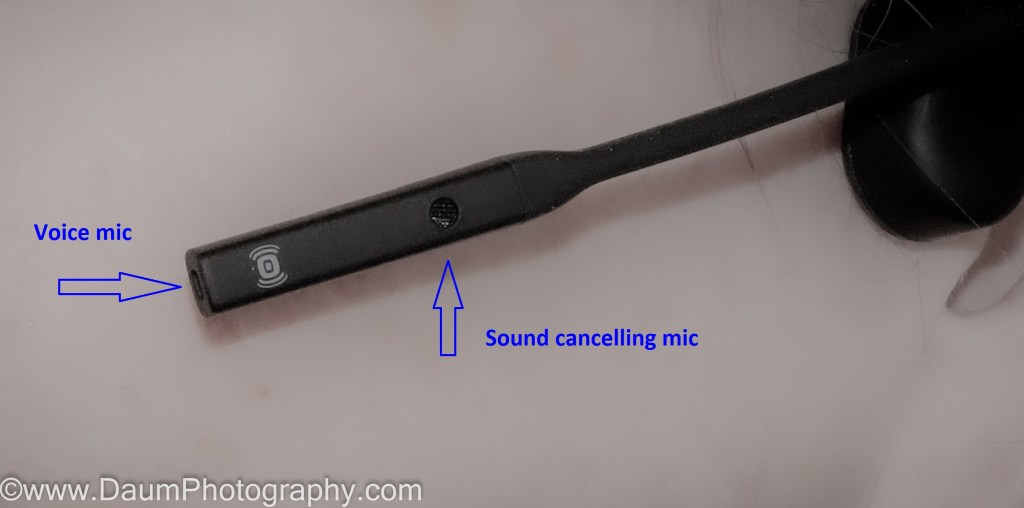
The boom appears to house two microphones, one for its noise cancelling software and one to pick up your voice.
The set is IP55 Water-Resistant. According to DSM&T[2] , that means it is “Protected from limited dust ingress” and “Protected from low pressure water jets from any direction.” In other words, it is fine for use in low dust environments and somewhat water resistant. It even has a built-in moisture protection alert.
The OPENCOMM headset retails for US$159.95 and is manufactured in China.
Sound Test and Actual Use
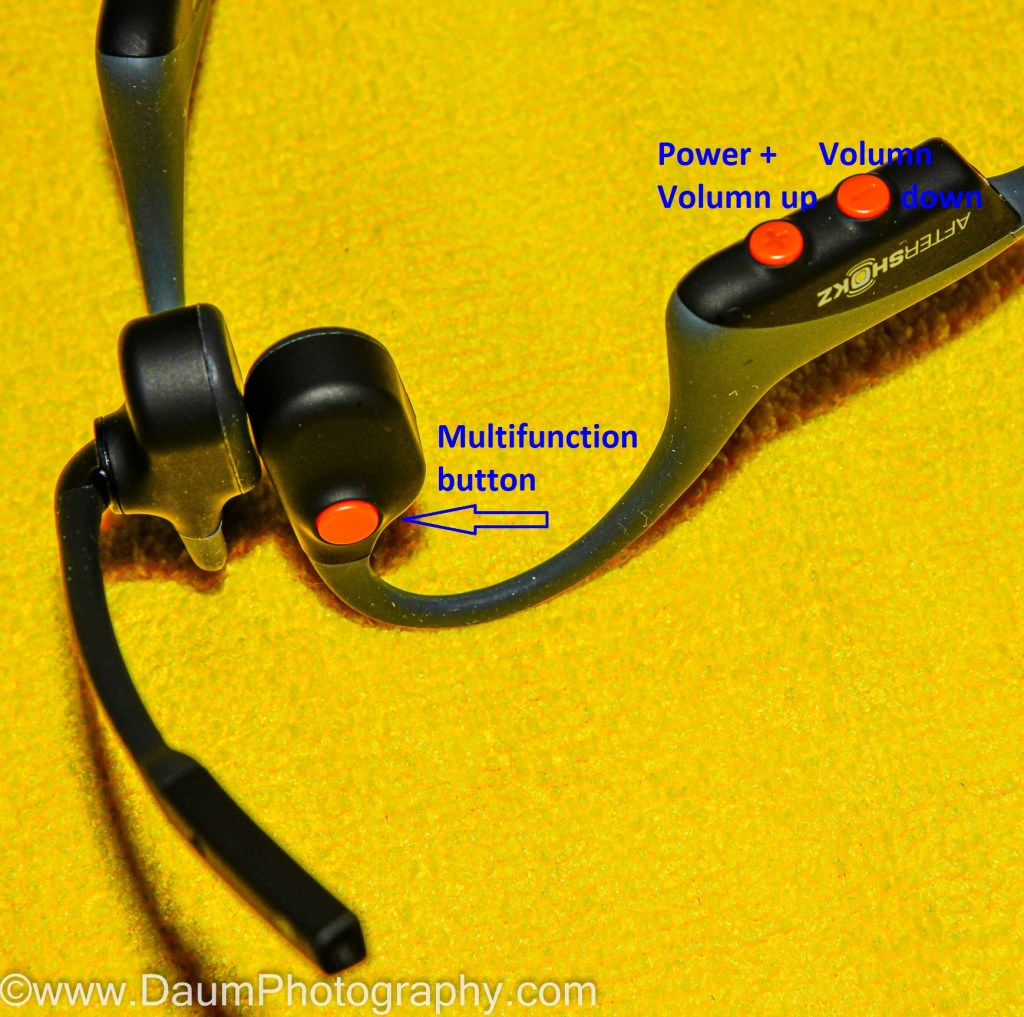
The unit can only be worn with the mic boom on the left side of the head because of the preformed arch that goes above each ear. It is not reversable. The OPENCOMM headset has three buttons on the unit. Two are on the lower part of the frame just behind the wearer’s right ear. In contrast to the matt black frame, the buttons are orange. One is marked + and one -. The + is used to turn on the headset as well as turn it off, and is used to increase the volume, while the – is used to decrease the volume, and pressing both will mute the call. The third button is located on the same side of the frame, but in front of the ear on the sound conduction component and is a multi-function button. It can be used for a variety of functions including answering incoming calls, hanging up, pausing music, etc. Most presses are accompanied by hearing a voice prompt from the set.
My voice sounded clear and of normal volume, the same as if I was on my cell or land line when talking with incoming or outgoing calls over the OPENCOMM headset, according to the individual I was talking with.
The noise cancelling technology was astounding. For example, the individual I was talking to heard me clearly with no other noise when I was standing right next to a running vacuum, or where I had music playing quite loudly in the room.
Even though these are not truly designed for listening to music because bone conduction can’t reproduce with the finesse that the inner ear can, I still ran a few tests similar to those I normally do with earbuds, for example with the Jabra ANC Elite 85c (see https://insight.daumphotography.com/2020/12/01/jabra-anc-elite-85t-big-sound-little-package/). I listened to Symphony No.1 in D minor ”Gothic’‘ – Havergal Brian. You could hear the vast range of instruments from tympanies to bells, but the separation was muddied and you did not feel like you were actually in a symphony hall. Another test was with Santana’s Evil Ways. In this case the stereophonic separation was faithfully reproduced, but again the distinction between instrumentation and vocals was not clean. Another sound test was with Rodrigo y Gabriela Satori. This is a complex recording with two acoustical guitars. The sound seemed to reproduce the range but lacked crispness.
Initial Conclusions:
The AFTERSHOKZ OPENCOMM headset is an extremely well made, light weight headset. The magnetic charging cable snaps smartly onto the headset and quickly recharges. However, since it is a unique adaptor cable (versus being able to use a more universal USB C) you will have to remember to take the magnetic cable with you (and not lose it). The nicely designed travel case will help in that regard.
The OPENCOMM headset is reasonably comfortable to wear for long periods of time, especially since it does not sit in or on your ears. The headset sound reproduction units rest directly on your cheek bones with a slight but continuous pressure. Some individuals may not find that comfortable, and you cannot adjust the titanium band to modify the pressure. Also, because of the way the titanium band goes behind the ears and around the lower back of your head, it would not be comfortable to sit or recline with your head against a chair back. The frame would be pushed forward as well as the loops going over and around your ears.
The active noise cancelling (ANC) technology is amongst the best I have found in any headset in terms of what the individual on the other end of the call hears. A caveat of the off-ear design, however, is that you still hear all the noise surrounding you. This can be very helpful or a hindrance. If you are on a call and someone or something nearby is trying to get your attention, they will succeed where that would not be the case with in-the-ear or over-the-ear headsets with ANC. But, if you are trying to hear over the OPENCOMM headset and there is a lot of ambient noise, the ANC will not help you at all on your end- it does not boost or compensate the incoming signal.
So, is the OPENCOMM for you? That depends on your intended use. These would be excellent for situations where you spend extended periods of time talking on your cell phone or over your computer, or on a Zoom video conference (and look a ton better than most over-the-ear headsets with a boom mic). They adequately handle music as well, but if your primary purpose is to listen to music and you enjoy hearing the nuances, then this would not be the best choice.
They would also be an ideal choice if you have any inner ear/ear drum damage impacting your hearing normally through the air.
The OPENCOMM headset would be very good as well for walking or jogging, since they stay put on your head. With the full open ear design, you will also remain aware of your surroundings.
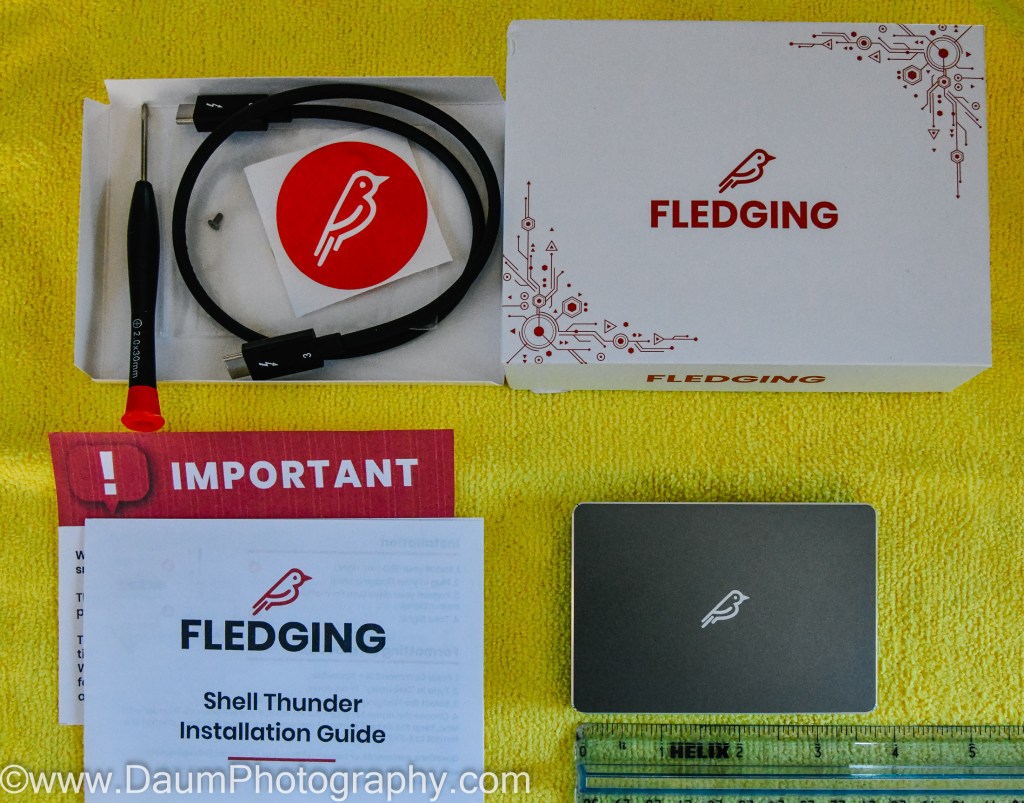
I was supplied a Fledging Shell Thunder-Thunderbolt 3 SSD Enclosure with a 1TB NVMe M.2 2280 SSD already installed, by Fledging’s Brand Manager for review.
Included with the unit is a Philips head screwdriver, a spare M.2 screw, an Installation Guide, and a (nifty 😊) Fledging sticker.
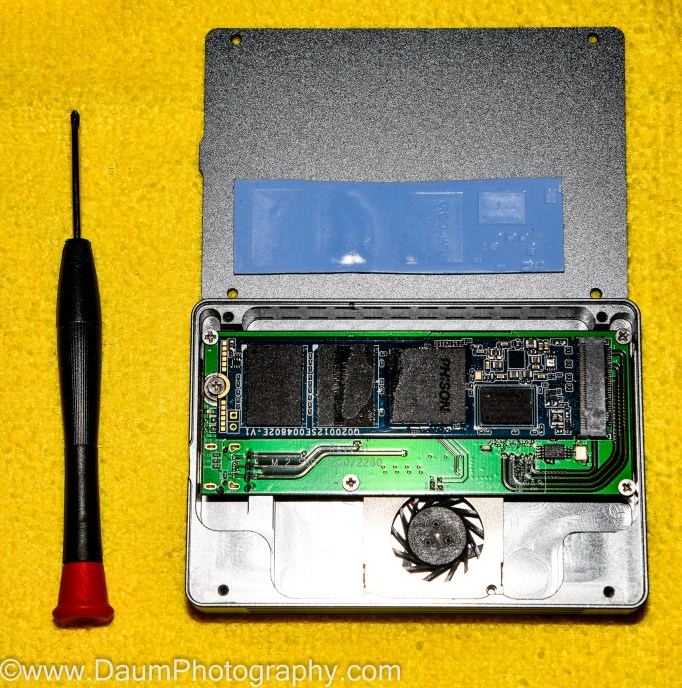
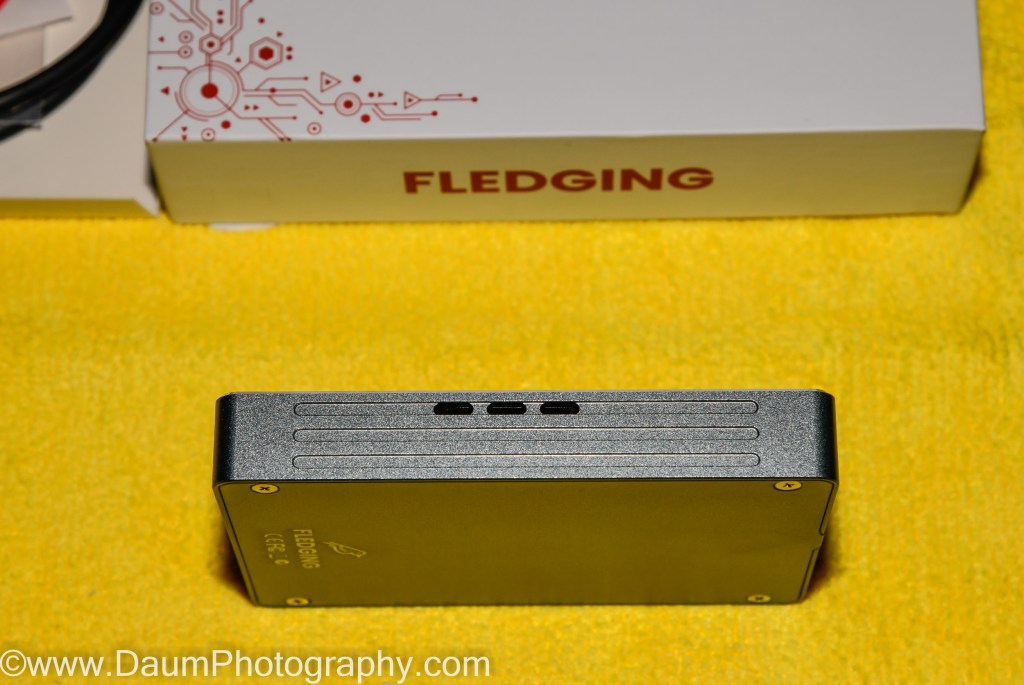
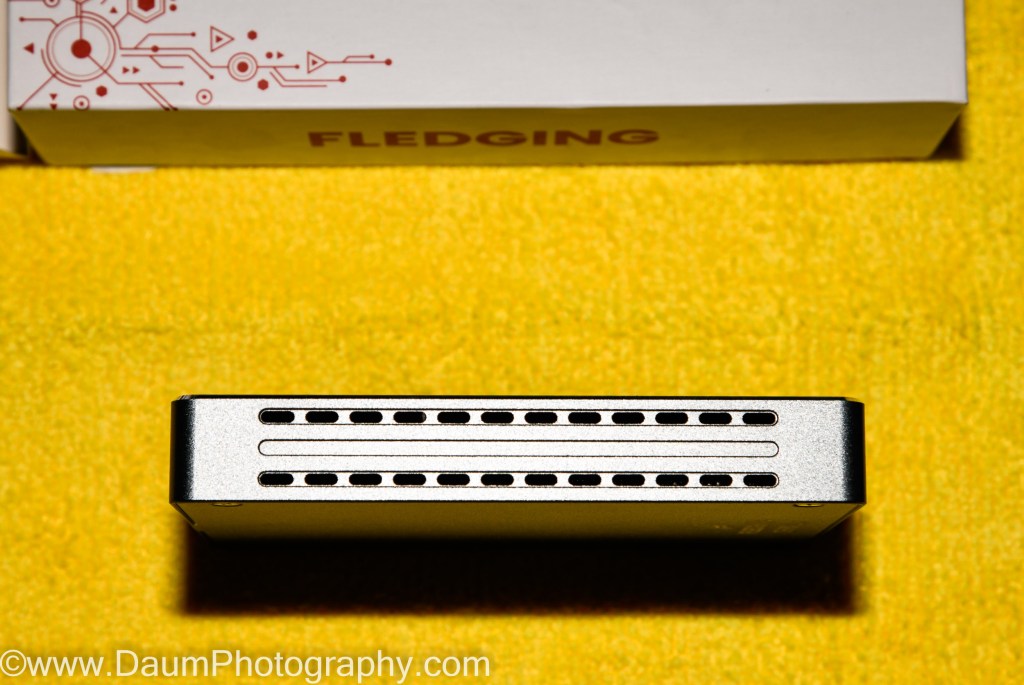
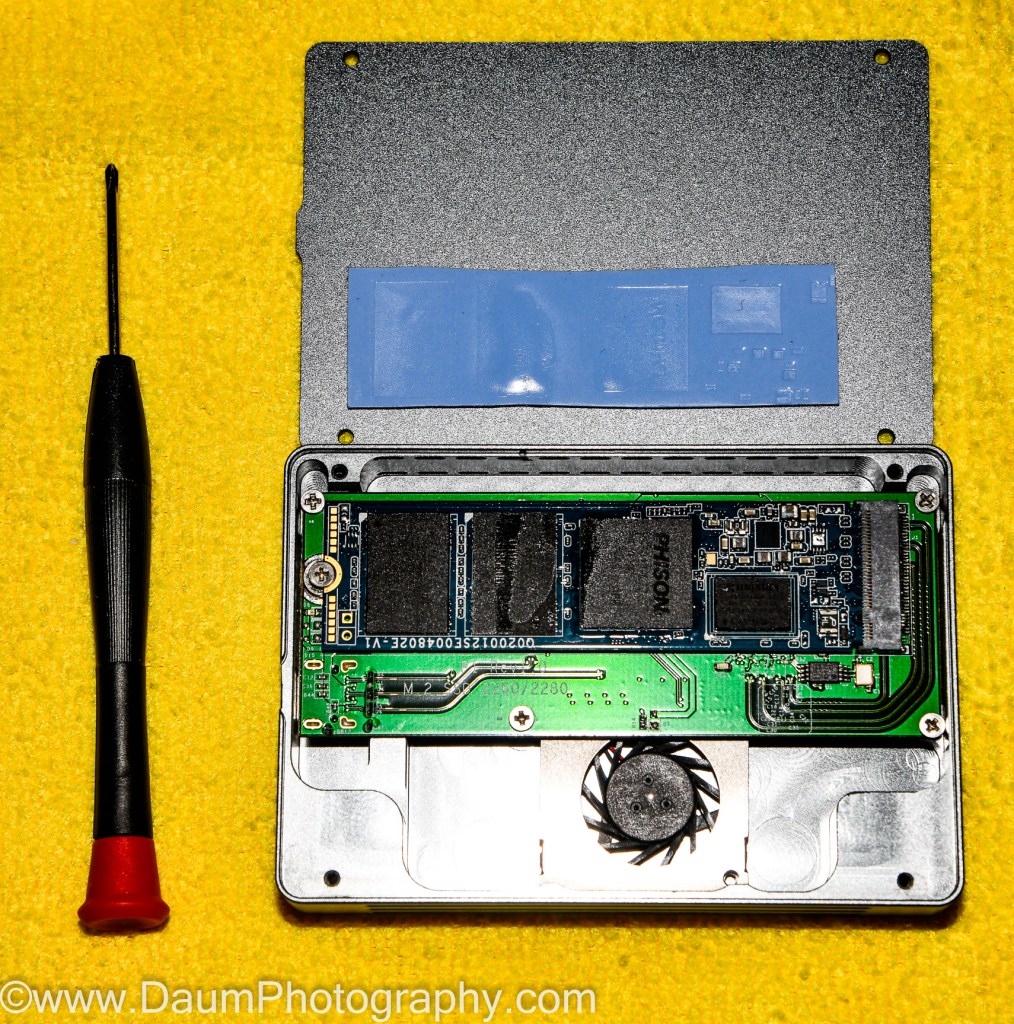
The unit weighs 4.4 oz (with the SSD installed), measures 3.77” x 2.62” x 0.58”. It is nicely finished and feels very sturdy. On one side of the case there are 3 small slots for the built-in fan to draw air, and 24 smaller slots on the opposite side for the exhaust of the heated air (as it blows across the M.2 SSD). On the underside are four Philips head screws (one at each corner) to allow access to the enclosure. Inside the enclosure is a small fan, and the board for inserting the M.2 2280 SSD, and a thermal cooling pad on the cover opposite the location of the SSD. This unit came with a 1TB Phison M.2 2280 TLC SSD (PS5012-E12-27) and what appears to be a Kingston NAND Flash chip.
Can be purchased as just the case, or with NVMe SSD 256GB, 512GB, 1TB and 2TB drives installed
MSRP with 1 TB US$299.99
Both macOS and Windows compatible
Has active cooling via a temperature sensing 4000 rpm fan
designed for 2280 and 2260 m.2 NVME and ACHI SSDs, not m.2 SATA SSDs, Apple OEM SSDs nor apparently Samsung EVO 970 Plus. The manufacturer recommends Western Digital Black SN750 NVMe SSDs (without the heat sink)
Thunder only works for true TB3 ports and will not cross-function with a USB-C port.
Initial Set-Up
To start I formatted the Phison SSD using Windows format. I ran both dynamic benchmarking and ‘field’ tests of the unit.
Benchmarking results:
I used a LG Gram laptop Z990 with an 8th Gen Intel® Core™ i7 processor and DDR4 dual-channel memory, 256GB M.2 2280 SSD, 16GB DDR4, Windows 10, and connected to its native USB-C 3.1 Thunderbolt™ 3 port with the Thunderbolt 3 cable supplied by Fledging.
I again used a LG Gram laptop Z990 with an 8th Gen Intel® Core™ i7 processor and DDR4 dual-channel memory, 256GB M.2 2280 SSD, 16GB DDR4, Windows 10, and connected to its USB-C 3.1 Thunderbolt™ 3 port with the Thunderbolt 3 cable supplied.
For comparison, the identical 21.2GBs was sent using the same laptop to a OWC Envoy Pro EX. The transfer took 01:34.51 minutes to complete. Accessing any of the transferred files, images, videos, and pdfs was instantaneous. The case showed a thermal increase of 4⁰F (using a Raytek MT6 infrared thermometer)
For comparison, the identical 72.8GB was transferred to the OWC Envoy Pro EX. Transfer took 06:22.20 minutes to complete. Accessing any of the transferred files, images, videos, and pdfs was instantaneous. The case showed a thermal increase of 8.5⁰F (using a Raytek MT6 infrared thermometer).
Preliminary conclusions:
This Fledging Shell Thunder-Thunderbolt 3 SSD Enclosure is a very portable and relatively fast solution for Thunderbolt 3 users. It is powered from the Thunderbolt 3 cable and remains very cool under normal use. The fan is so quite that the only way I knew it was working was to feel the very slight breeze at the case (or by removing the case back and viewing the fan directly).
Its speed results in reading and writing data was a mixed bag: Its Read of the Windows speed test data was 3 times faster than the next best time of the other drives, but its Write was the slowest of all and a whopping 18 times slower than the best.
The results using the ATTO Disk Benchmark were equally surprising, in that the Fledging Shell Thunder-Thunderbolt 3 performed very poorly in the Read component, at almost a multiple of 220 slower than the best, while its Write performance was almost on par with the best.
The read results were so surprising that I reran the test and got similar results. The only thing I can conclude is that the extreme differences between the two sets of results must be related to the algorithms used by Windows vs ATTO.
A third benchmarking tool, AS SSD Benchmark was used where the Fledging Shell Thunder was the fastest Read at nearly twice that of the OWC Envoy Pro EX, and very slightly faster in Write than the OWC Envoy Pro EX.
Of course, none of us really use a hard drive to run only standardized benchmarking tools (at least, most of us don’t 😊 ). We use them for storing and retrieving data.
Here the Fledging Shell Thunder-Thunderbolt 3 fared better when compared in a somewhat Apples to Apples comparison with the OWC Envoy Pro EX. In the 21.2GB mixed data file writing, the Fledging Shell Thunder was about 12 seconds faster, with no noticeable difference in the instantaneousness of the reading of the same file. It also remained cooler.
With the large 72.8GB mixed data file, the Fledging Shell Thunder-Thunderbolt 3 was slower by about 2 minutes and 20 seconds compared to the OWC Envoy Pro EX in writing, and had nearly the same temperature increase during the write. Again, no noticeable difference in the instantaneousness of the reading of the same file.
In summary, the Fledging Shell Thunder-Thunderbolt 3 SSD Enclosure offers a compact highly portable external drive for those who have a true Thunderbolt 3 port. Note: this unit will not work with non-Thunderbolt 3 ports even though it fits, for example, a USB 3 port. It has a built-in temperature sensitive very quiet fan. You can purchase the enclosure without any M.2 SSD for about US$140 and put your own NVMe M.2 2280 SSD in or buy it with up to 2TB NVMe M.2 2280 SSD from Fledging.
Its read/write performance varied depending on the size of the data sets. The fact that it incorporates a fan means that it is not dust or water resistant (as the OWC Envoy Pro EX is). So, depending on what your intended use is for an external drive and whether you have a true Thunderbolt 3 port, will determine whether this is the drive for you.
Oh, almost forgot: despite its name Fledging Shell Thunder-Thunderbolt, the unit makes absolutely no noise. 🙂