How To Convert Your Golf Cart to Run on Lithium Batteries
This product review focuses on a decision many golf cart owners face when the original lead acid batteries start failing: replace with the exact same or consider an alternative brand lead acid batteries. Until recently, these were the only viable options. You could call the shop you bought your cart from and have them order and replace the lead acid batteries, you could locate a supplier of similar sized lead acid batteries and do it yourself, or you could just buy a new golf cart. Ok, maybe that last option is a bit extreme, but I know owners who do just that.
A few years ago, some of the OEM golf cart manufacturers started selling their carts with the option of a single large lithium battery versus the traditional four (12-volt) or six (8-volt) lead acid batteries in 48-volt powered golf cars.
Around the same time that OEM golf cart manufactures began offering lithium batteries as an option, a few battery manufacturers started producing lithium batteries for replacement of lead acid batteries in existing golf carts. This opened a new alternative to consider and brings us to this review.
I have a 2017 Yamaha Drive2 PTV golf cart with Yamaha’s AC motor, and it came new with six 8-volt lead acid batteries. The cart gets used an average of three times per week on one of our two golf courses, both of which have sizeable elevation changes throughout the courses. After three and one-half years the original Trojan T-875 batteries were failing and barely able to make it through one round. Based on my research, I decided to go with RELi3ON® InSight lithium batteries, provided at cost by RELi3ON®.
This review focuses on the logic behind my decision, the replacement process, and the result.
The logic behind my decision
Lithium batteries offer several compelling advantages over lead acid batteries, including:
- Lighter weight
- No maintenance
- Faster charge
- Retains charge for longer
- Longevity
- Direct fit, no modification
The weight savings of lithium over wet lead acid batteries is one of the biggest advantages. A normal set of lead acid batteries tips the scales at 378 pounds. Lithium batteries pack more power than lead acid, and in the case of InSight batteries, each battery supplies 48 volts and 30-amp hours. You can comfortably replace the six lead acid batteries in your cart with just two lithium batteries. If you go with two lithium InSight batteries, your total weight will be 69 pounds or a savings of 309 pounds! Even if you go with four lithium batteries as I did because of the considerable elevation changes on our courses, your new total weight will be 138 pounds, or a savings of 240 pounds!
This weight savings is immediately noticeable in your cart’s moving from a full stop, in its steering and handling. Hauling a minimum of 240 pounds less each time you drive your cart will mean components like brakes, suspension and tires will last longer.
Another advantage of lithium batteries is that there is zero maintenance. You never have to check or add water for the life of the battery.
Because of the chemistry, the lithium batteries charge much faster than lead acid, typically coming up to full charge after a round in just a few hours. Also, unlike lead acid batteries that lose their capacity quickly over time (when not left on a charger/maintainer), lithium will still have 80% of their capacity after 60 days and will take two years to drop to 20% of their capacity.
Lead acid golf cart batteries normally last between three and five years, and usually have a 12-to-18-month warranty. Lithium batteries are rated to last eight to ten or more years. The RELi3ON® InSight lithium batteries reviewed here, carry a 7-year full warranty (and in the 8th, 9th and 10th year, a 10 percent discount on a replacement) and are rated for greater than 6,000 cycles @ 80% depth of discharge.
A consideration, especially for the DIY golf cart owner, is how difficult will be the conversion from wet lead acid to lithium batteries. As it turns out, not difficult at all since the RELi3ON® InSight batteries are a direct size replacement for the OEM lead acid batteries. More on that shortly.
With the advantages being so impressive, why wouldn’t everyone replace their lead acid batteries with lithiums when it is time? There are a couple of reasons I can think of. Many golf cart shops are still unfamiliar with, and have no experience with, lithium options for replacements. Similarly, since it is a relatively new technology, few golf cart owners have heard of lithium aftermarket batteries and therefore do not consider them when their batteries die. But the biggest reason is the initial cost outlay difference.
If you are in the market for a new golf cart, possibly your dealer has offered a lithium version as an option. Currently the lithium option adds between US$2200-$4000 to the regular cart price over traditional lead acid batteries. Returning to the focus here, replacing original lead acid batteries in the golf cart you already own, a set of six good lead acid batteries will cost about $1600 plus installation plus another $75 to $100 for a battery fill kit if you want/need one.
Depending on how you use your golf cart, and how hilly your golf course is, you can choose to replace the six eight-volt batteries (48-volt system) with either two, three or four 48-volt lithium batteries. A major difference between the lead acid batteries in a golf cart and lithium, is that lithium is scalable. That is, you can start with a two-lithium battery system, and if you find you need more range, you can simply add one or two more lithium batteries to your system later.
Two InSight batteries will provide 60-amp hours and 20-35 miles per charge, three will provide 90-amp hours and 30-50 miles per charge and four will go 40-65 miles per charge with 120- amp hours. The current price for the RELi3ON® InSight lithium 48-volt batteries is two for $2595, three for $3295 and four for $3995. This price includes free shipping to your door, spacer batteries to fill the empty battery slots, a RELiON approved charger (that works through your cart’s regular charge port), and CAN cables (allow each battery to ‘communicate’ data to the other batteries). [Note: check with RELiON’s web site to get the latest pricing and bundle options. The latest bundle includes their new fuel gauge, discussed towards the end of this review.]
Considering cost alone, for example, if instead of replacing the lead acid batteries twice over eight years you purchased two InSight lithium batteries, you would save $500 to $600. If you went with three InSight lithium batteries, you basically break even, and if you went with four you would spend an additional $700 to $800 over the lead acid batteries. When you consider the advantages of lithium discussed earlier, it could be a very good option for you.
Why RELi3ON® over other lithium options? I was impressed by several factors including the actual design of their InSight battery, their steps to ensure the safety of lithium technology for this application, and their customer service. Unlike some competitors, RELi3ON® did not modify existing lithium batteries and components to work in a golf cart environment, rather they designed the InSight from the proverbial Tabula Rasa or ‘clean sheet’ approach. In essence they laid out everything they wanted a lithium battery to be able to do in a golf cart and golf cart environment, and then designed the battery to do that. I encourage you to check out their website[1] to learn more detail about the battery’s chemistry, construction and impressive ‘unique SuperSmart BMS’- battery management system that is incorporated into each battery. They also have a number of very informative YouTube videos, for example, explaining the construction of the battery.[2]
Installation
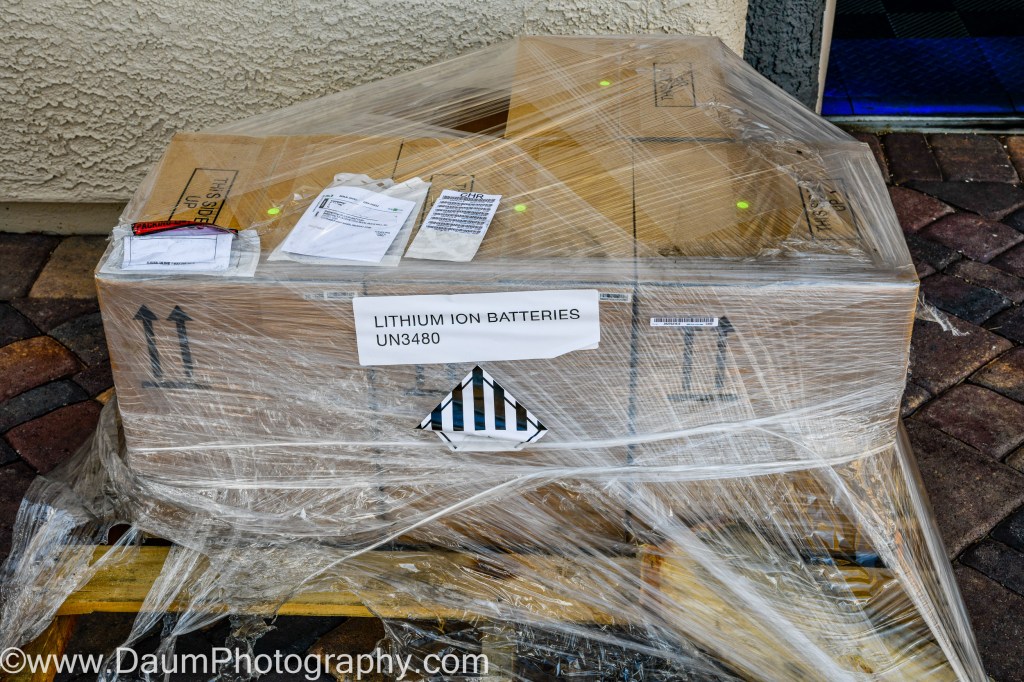
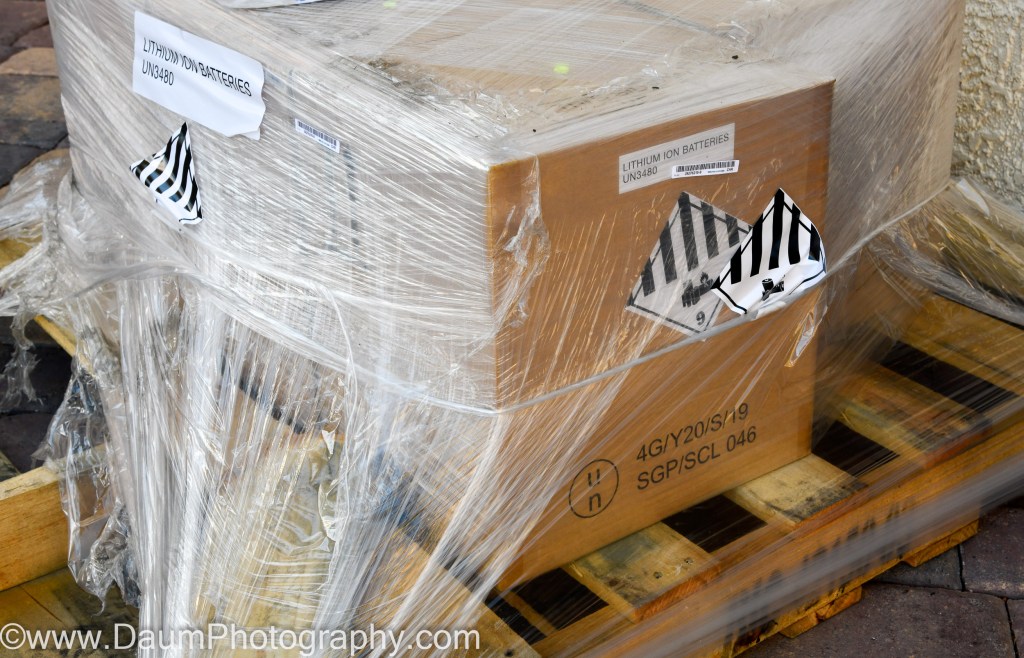
The four RELi3ON® InSight lithium 48-volt batteries along with the charger unit arrived within about a week of ordering and were delivered on a pallet.
The first step was to remove the six 8-volt Trojan T-875 lead acid batteries from my cart. To facilitate this, I removed the seat and switched the “Tow/Run” switch to tow to ensure that the cart motor and electronics were not inadvertently damaged by the removal and installation of the batteries.
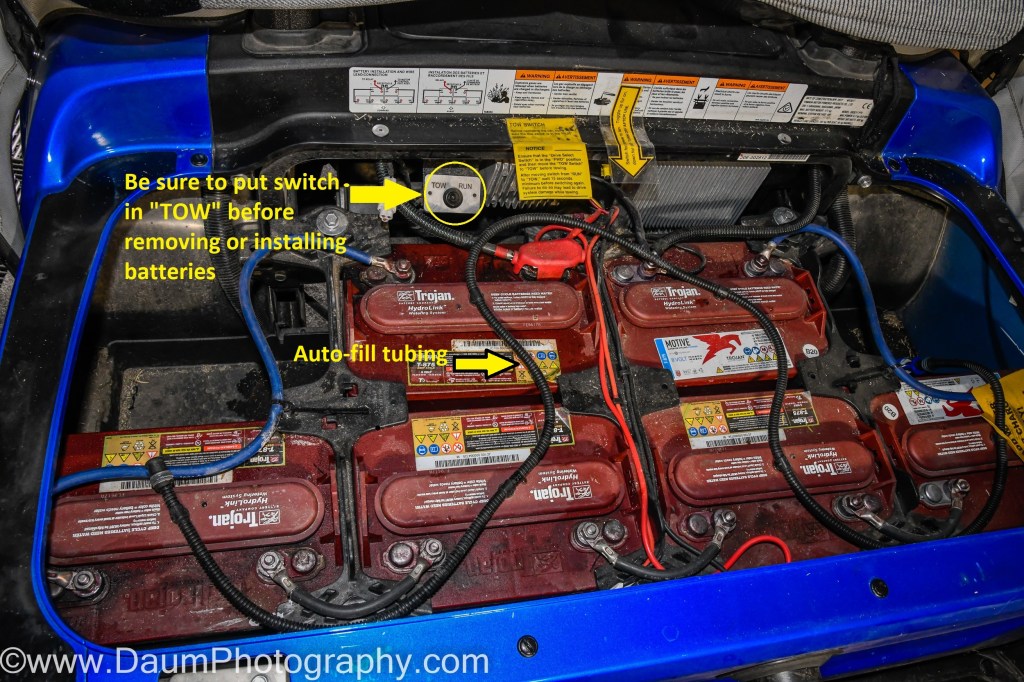
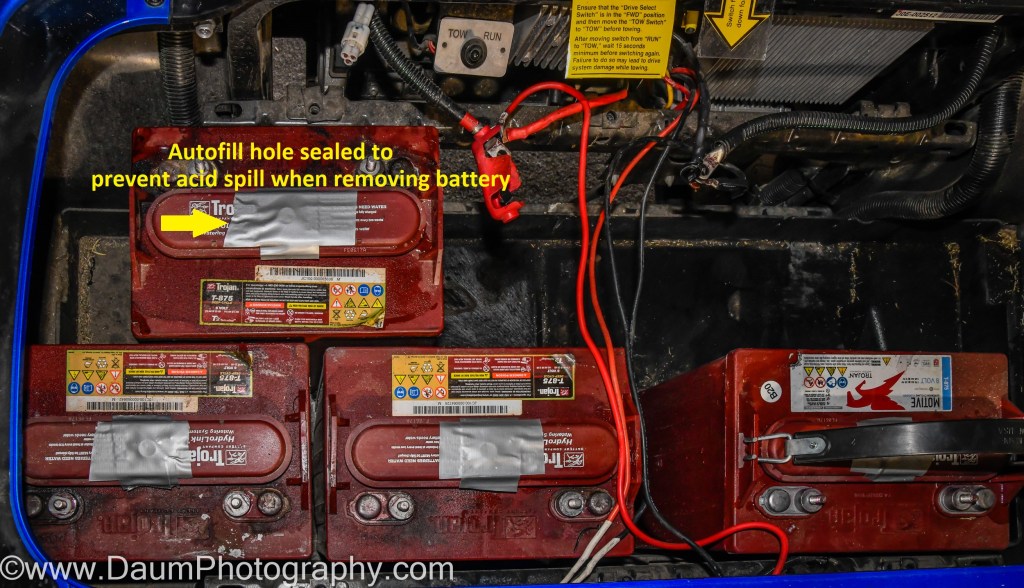
My cart had an auto-fill system attached to each of the Trojan batteries (this system makes it easier to maintain the correct fill level when adding distilled water for required battery maintenance). After I removed the hose connections, I put duct tape across the fill hole in each battery to ensure no acid sloshed out when I removed the battery.
Next, I used a 9/16 or a 14mm socket to remove the nuts securing the battery cables (be careful to not short across the terminals with your wrench). You can save and reuse the original cables; I discuss this shortly. Follow by removing the nuts on the battery retainer brackets. On my cart, these required a 12mm socket.
Now you are ready to lift the batteries out. The easiest way is to use a battery lifting strap (under $10 at an auto parts store or Amazon) that hooks onto the lift tabs at top of the batteries. Take care, as the batteries each weigh about 60+ pounds and you want to lift each up as straight as possible to avoid spilling out any of the battery acid. You can dispose of the lead acid batteries at most auto supply shops or battery shops (like Batteries Plus Bulbs) for free. If that is not convenient, call your local recycling facility.
After you remove the batteries, take a couple of minutes to clean out the battery tray of any debris that has accumulated. Also use some sandpaper to clean the cable ends from your cart that run from the batteries to the motor/controller and from the charging port.

As mentioned, you can reuse some of the battery cables you removed (you won’t need all of them), but it is best to use cables of equal length for the connections between your new lithium batteries. If your original cables are equal length and in good shape, go ahead and use them. If not, I recommend you order new 4 AWG cables. You will need one pair of new cables if you go with a two-lithium battery set up, two pairs for a three-lithium battery set up, and three pairs for a four-lithium battery set up like I did. The length that you need to order will depend on how your batteries sit in your battery tray. In my case, I ordered ($15 per pair from Amazon) three sets of Spartan Power 4 AGW one-foot-long cables with 5/16 ring terminals.


Now you are ready to install the RELi3ON® InSight lithium 48-volt batteries. This process is the same, whether you decided to go with two, three or four to power your cart. Place the lithium batteries onto the battery tray, using the positions closest to the negative and positive cables from your motor/controller. You will follow by putting in the spacer units that came with your batteries to enable the reuse of the battery retainer brackets. Finish by reattaching the battery retainer brackets.
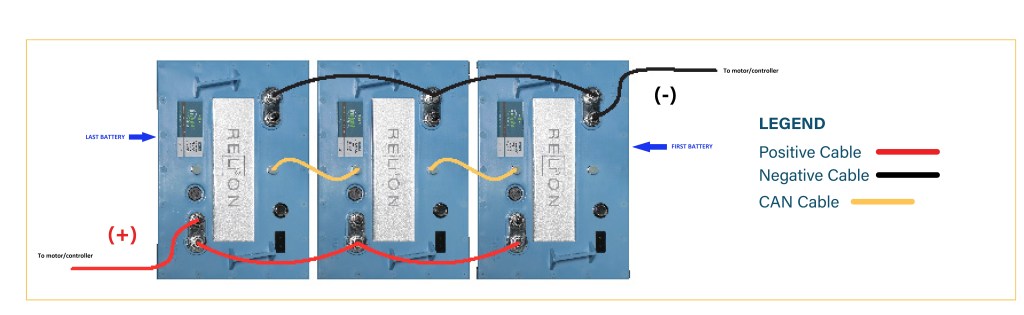
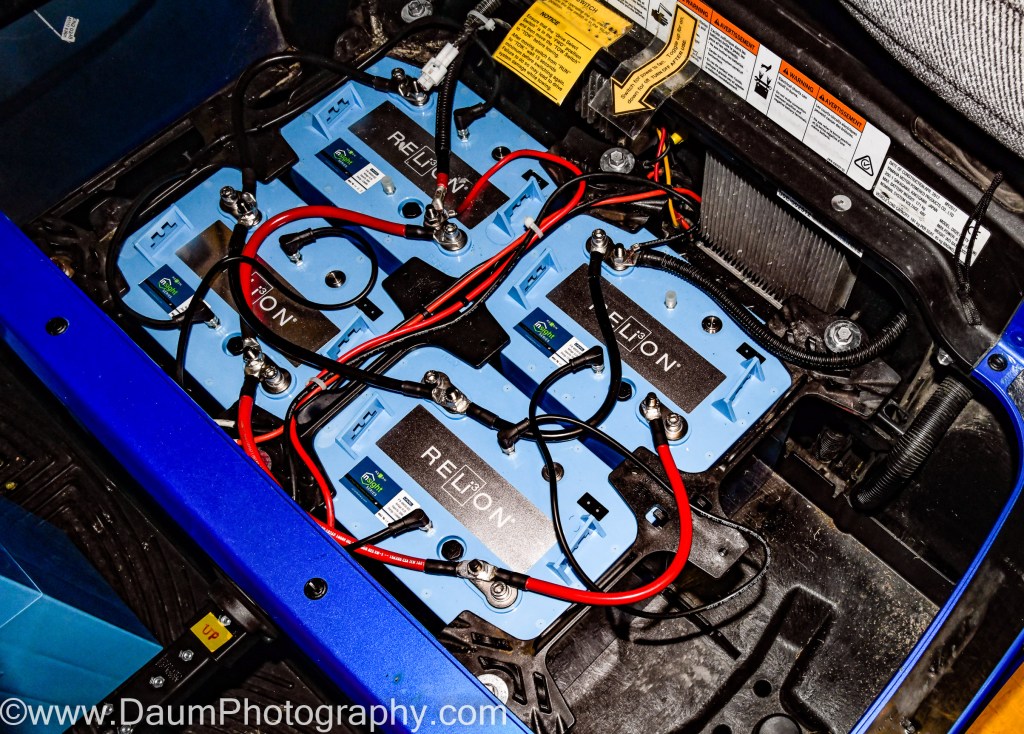
Next step is attaching the cables. Note: this is very different from how your lead acid batteries were connected. Your lithium batteries are connected in parallel. That means the cable from one battery’s positive terminal is connected to the next battery’s positive terminal. Similarly, the cable from one battery’s negative terminal is connected to the next battery’s negative terminal.
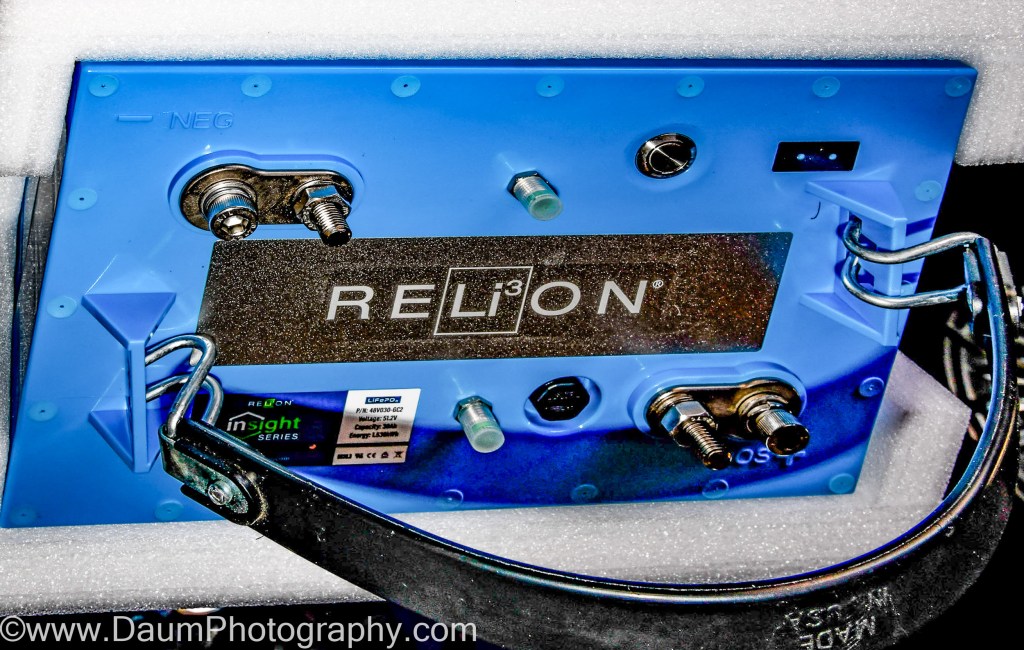
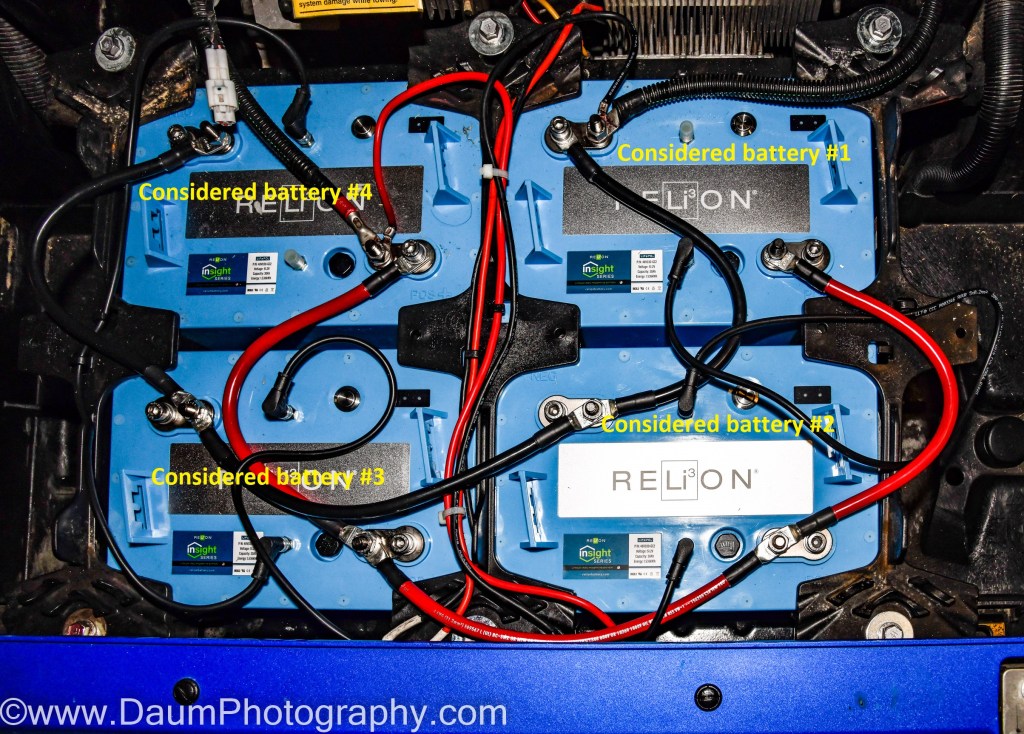
Start with your ‘first’ lithium battery in the group—that will be the lithium battery you are connecting the negative cable from your motor/controller (see above picture, first battery is labelled #1). On that battery, you connect the negative cable from your motor/controller and one connecting cable to the same negative post on the RELi3ON® InSight battery. You will also connect the negative cable from your cart’s charger port here. The nut on the RELi3ON® InSight battery post uses a 13mm socket (there is also a stud that uses an M8 Allen wrench that can be used). Tighten to 6.6 to 7.4 ft-lbs if you have a torque wrench. Otherwise, tighten firmly but do not over tighten. Now connect the other end of the cable attached to the first battery negative terminal to the next battery’s negative terminal. Continue connecting each of your battery negative terminals the same way.
Going back to the ‘first’ lithium battery, now connect its positive terminal to the second battery, again using either the 13mm nut or M8 stud. Continue to your last battery. Now connect the positive cable from your motor/controller to the last battery’s positive terminal. Also, connect the positive cable from your cart’s charger port here.
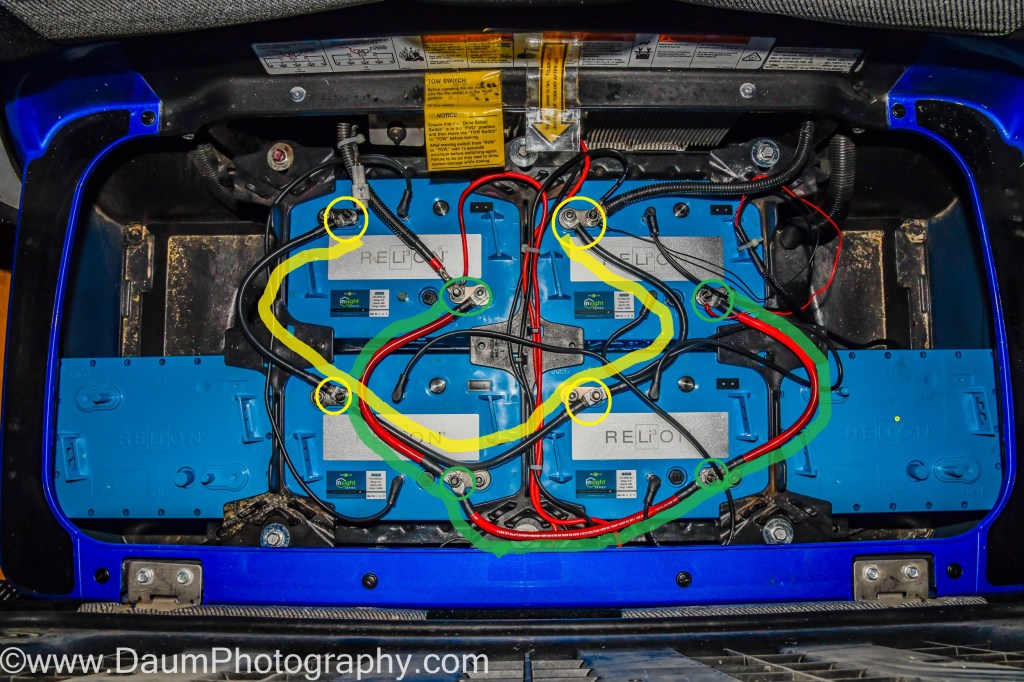
Recheck all of your cable connections. The first battery should have the negative cable from your motor/controller and be connected to the second battery negative terminal. The first battery does NOT connect to your motor/controller positive cable. Its positive terminal only connects to the second battery positive terminal. The last battery in your system should have the positive cable from the motor/controller connected to its positive terminal, as well as be connected to the positive terminal on the next battery in the parallel set up. The last battery does NOT have a connection from its negative terminal to the motor/controller negative cable. You can see this in the following image.
When you opened the boxes with your new RELi3ON® InSight batteries, on top was a CAN cable for interconnecting the batteries. This cable is used to enhance charge and discharge balancing between batteries.

With all the battery cables now in place, it is time to connect the CAN cables. Before you connect them, take a close look at the end of one of the CAN cables as well as the CANbus ports on top of a battery. You will see that the female connector on the CAN cable has an angled section that must be aligned with the same section on the CANbus port on the battery per the following images.

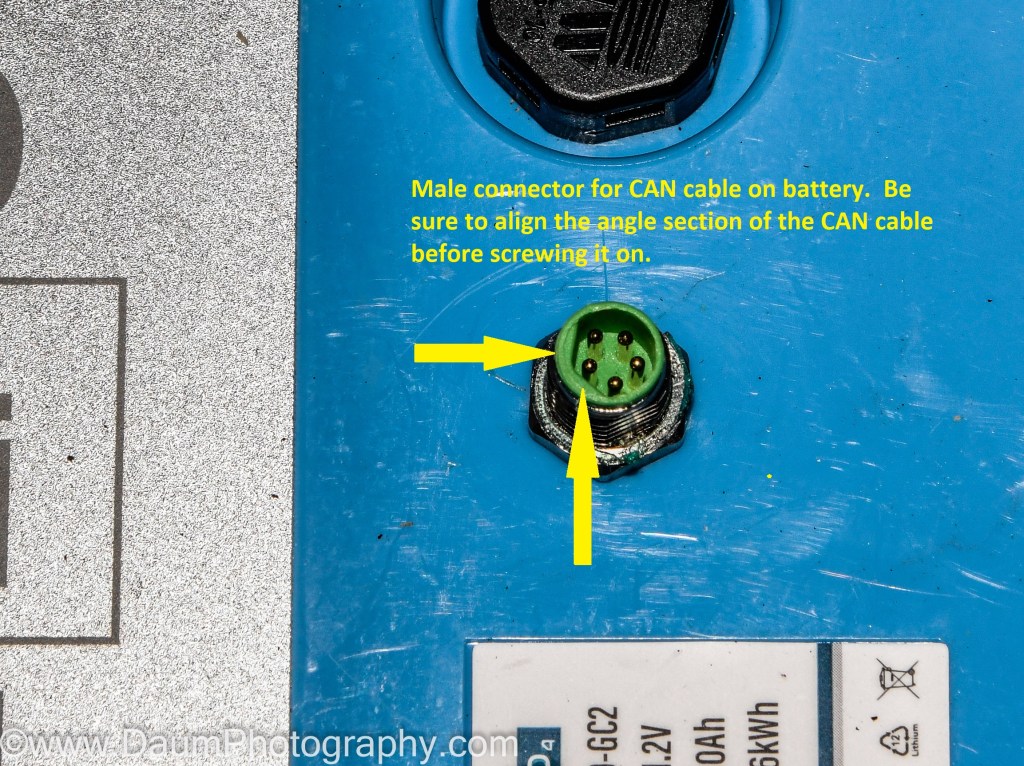
Now, begin with the ‘first’ battery (the one connected to the golf cart negative motor/controller cable). Connect the CAN cable to the Output CAN port, ensuring that you have it angled sections aligned. It is the one on the positive side of the battery (#3 in this image). Take the other end of this Can cable and connect it to the Input CAN port (the negative battery side, #2 in this image) of the second battery. Continue connecting the remaining CAN cables the same way for the rest of your batteries.

When you are done, recheck all of your CAN cable connections. Your first battery should only have one CAN cable connected (at the Output port) and the Input port remains unused at this point. Similarly, the last battery should only have one CAN cable connected (at the Input port), and the Output port remains unused at this time.

The final connection step is optional. If you ordered the InSight series ‘fuel’ gauge (list $175 but will shortly be priced in respective InSight battery bundles), you would need to connect it at this point.
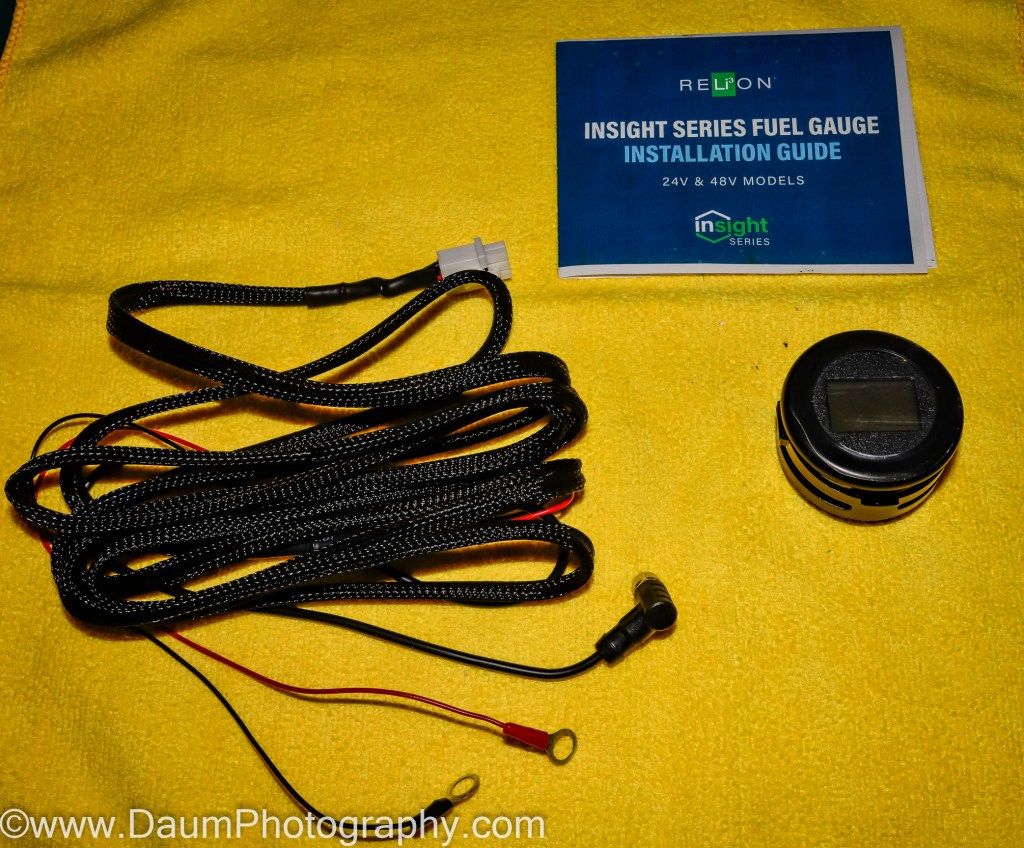
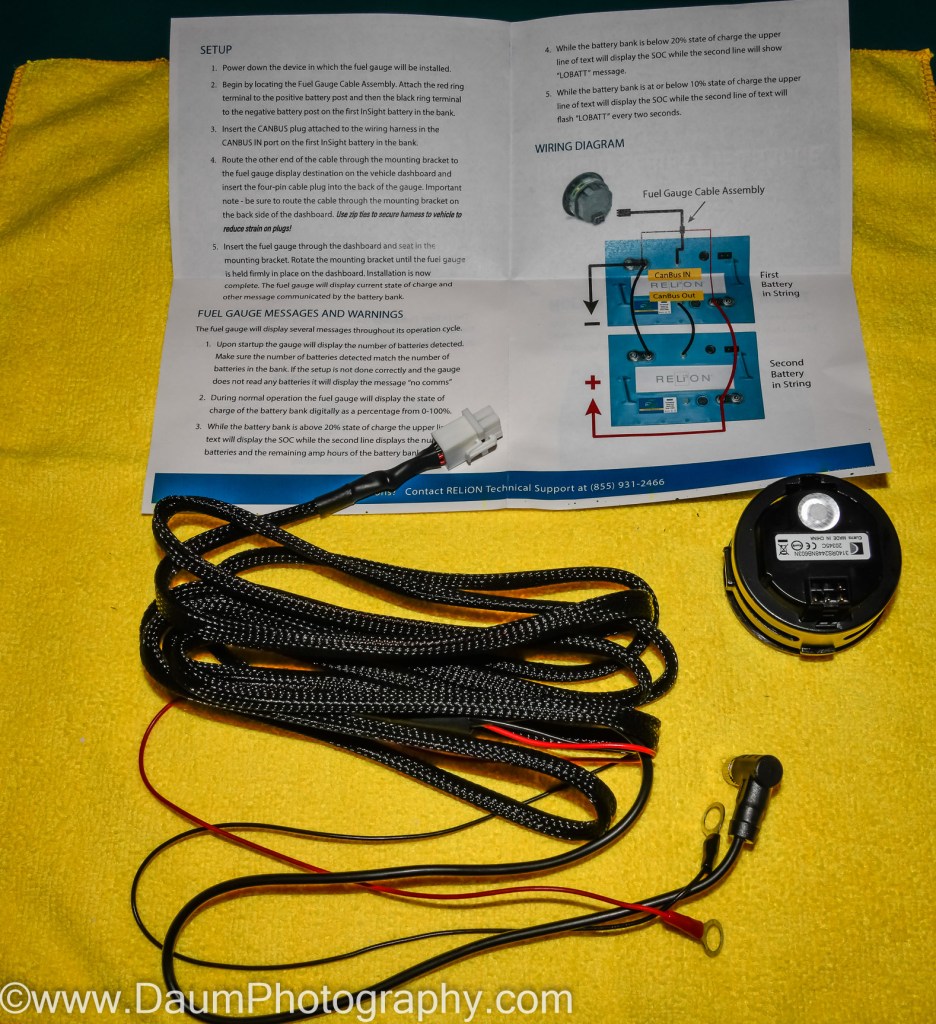
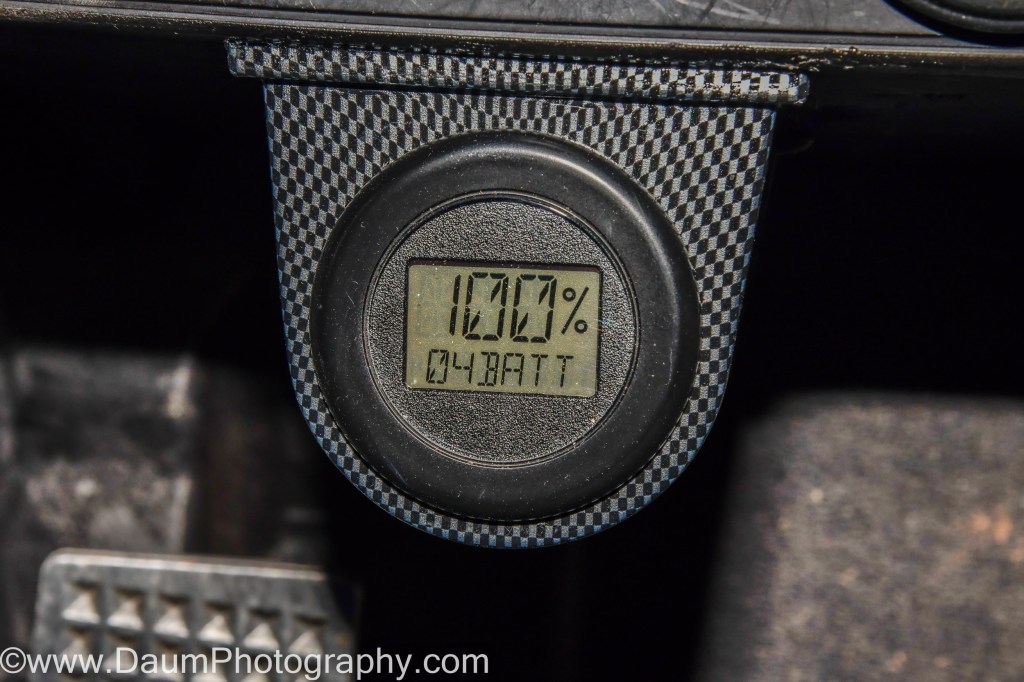
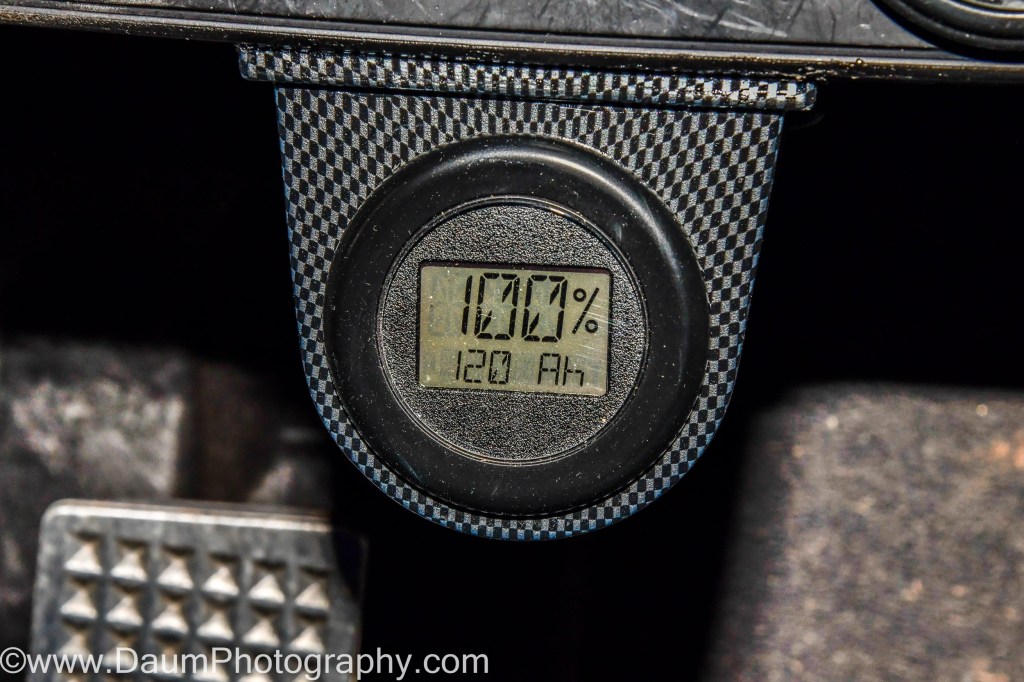
The fuel or battery gauge is not required, but very useful. Each of the RELi3ON® InSight batteries have a state of charge set of LEDs on the top of the battery, that function to tell you the remaining charge, ranging from 0 to 100%. However, to see this, you would need to lift your cart seat. The InSight gauge can be used as a direct replacement for your cart’s original battery gauge, or as in my application, as an additional gauge. The odds are that your original gauge will not correctly tell you the state of charge because it is normally designed to measure voltage, rather than current. The InSight gauge provides you two continuous readouts, one displaying the % of charge remaining and the number of amp-hours remaining, the second display shows also the % of charge remaining along with the number of lithium batteries connected.
Connecting the InSight series gauge is very simple. At the end of the wiring harness supplied with the gauge, you’ll find a red wire with a ring terminal, a black wire with a ring terminal, and a CAN connector. Go to your ‘first’ battery, connect the red ring terminal to the positive pole, the black ring terminal to the negative pole, and the CAN connector to the unused CANbus Input port.

Now route the gauge harness up to the place you are mounting the meter, using zip ties to secure the harness along the cart frame. You can simply replace your cart’s existing meter if it is a standard round gauge or mount the InSight meter separately. In my case, I left the original meter since it also functions to display when my cart’s turn signals are on as well as when the headlights are on. I purchased an add on automotive gauge pod from Amazon (under $8 Etopars Carbon Fiber 2″ 52mm Universal One Hole Dash Dashboard Car Gauge Pod Mount Holder) and mounted the InSight gauge into it.

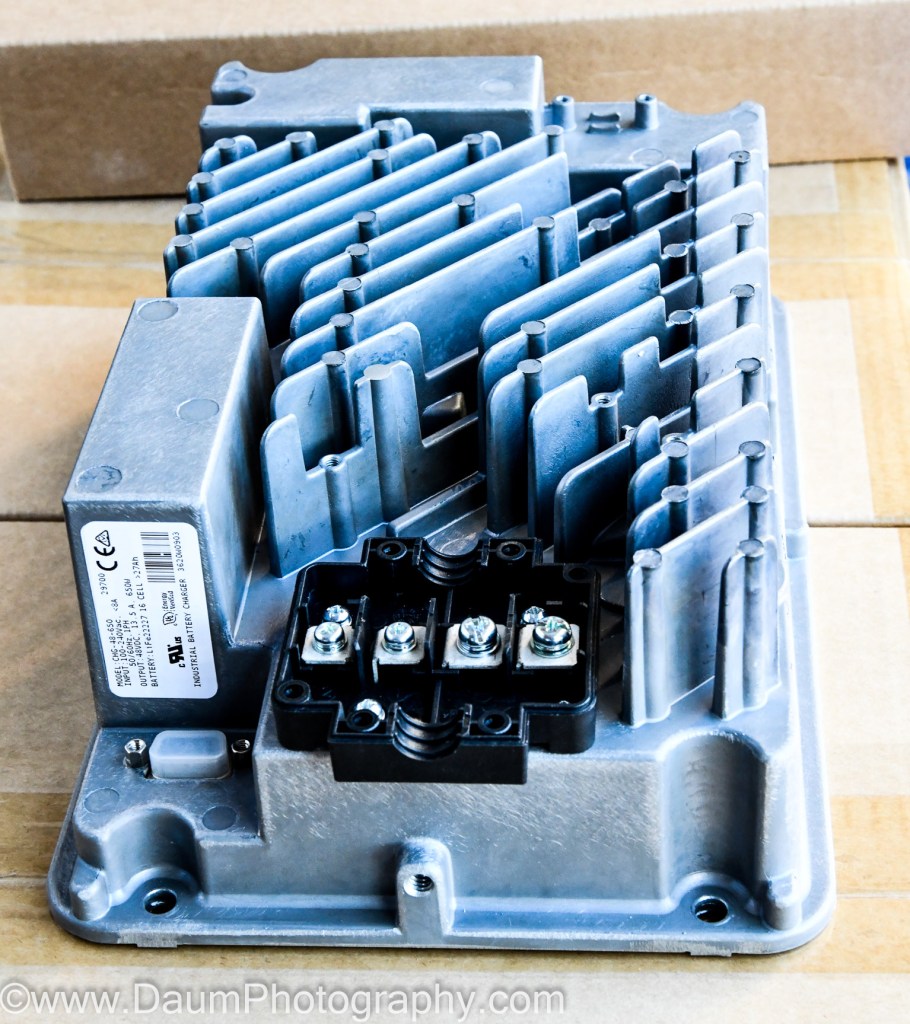
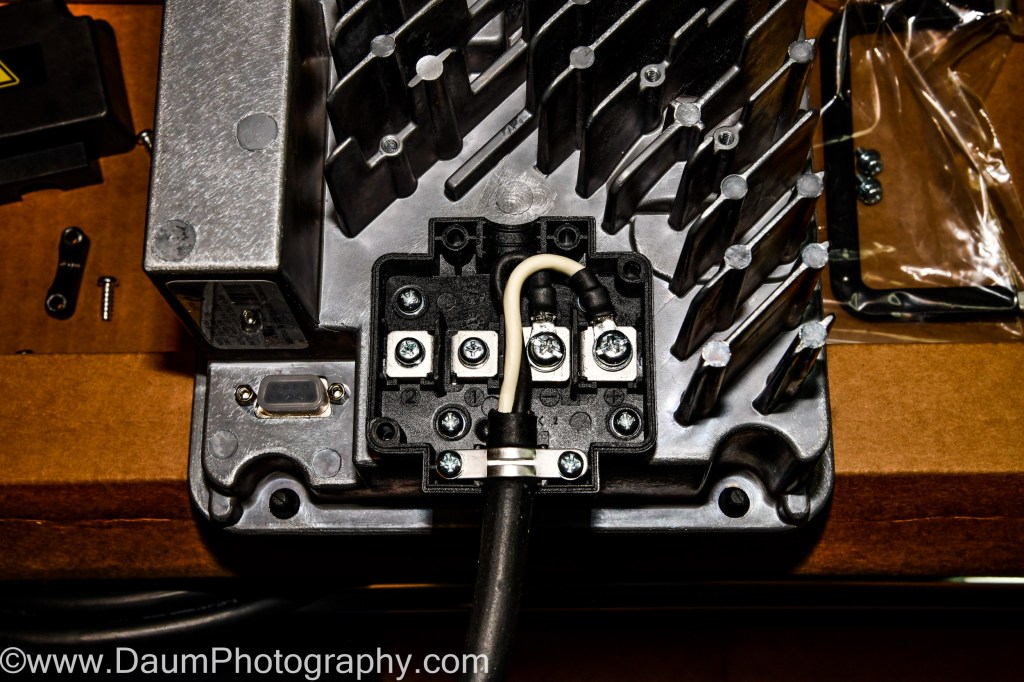
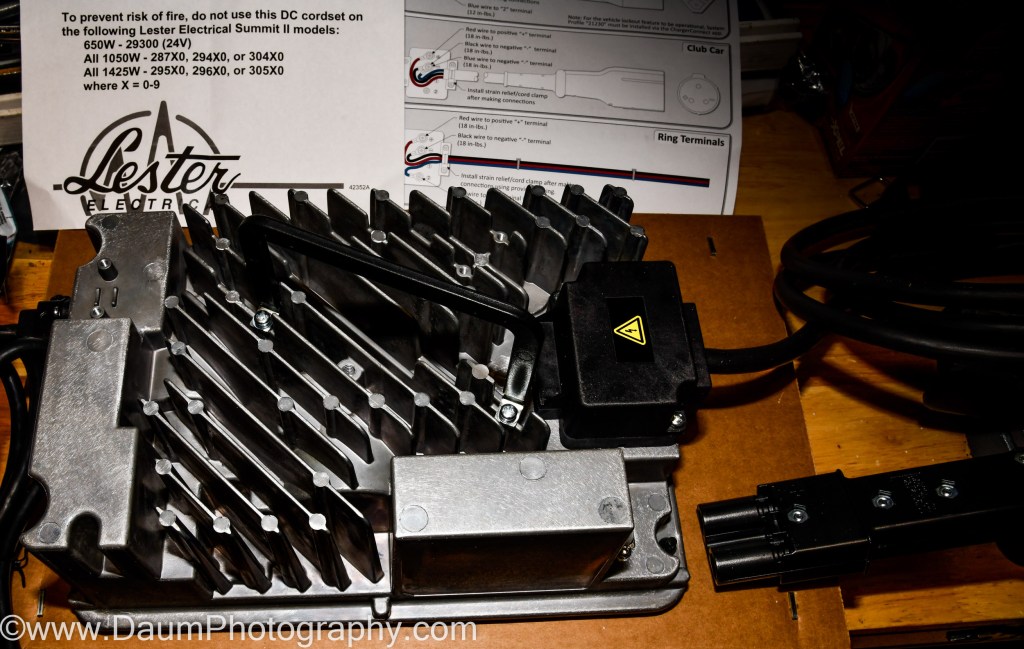
Lastly, you need to attach the charger to cart wiring harness to the RELi3ON® InSight supplied charger. Different OEM golf cart manufacturers use slightly different female connectors to their cart’s charging port. When you order your RELi3ON® InSight battery bundle, you identify the type of cart you have, and they include the correct charger harness. All you are required to do is attach the harness to the charger- basically connecting the harness ends via screws on the charger base and screwing on the protective cover. The Lester Summit II unit that RELi3ON® supplied for my bundle also has a Bluetooth smartphone app for monitoring charge cycle status.

Now you are finished. The whole installation process from start to finish will probably take you a couple of hours. It really is simple to do once you review and become familiar with the details.
Ready to Go (and go and go 😊 )
Now for the fun part. The first time you power on your new RELi3ON® InSight batteries you simply press and hold the Power button (see #4 in image) on the first battery until you see the first LED flash green. It will then continue to flash green every five seconds. Shortly thereafter, you will see the remaining batteries come to life; their respective first LED will similarly flash green.

Once all the batteries are ‘awake’ you can press and release the power button once on each battery, and then the two LEDs will tell you the state of charge. You are now ready to go! Along with the satisfaction of having done this conversion be prepared for the very noticeable ‘seat-of-the-pants’ feel of the quick acceleration and easier steering/handling of your golf cart.
After you have taken it out for its maiden spin, plug your new charger in. The recommendation is to plug your cart in after each use. The charger is a ‘smart’ charger/maintainer and can be left on without concern.
Preliminary Conclusions
After my first couple month’s use of the RELi3ON® InSight lithium batteries, I have found that they perform perfectly. No matter how hard the cart is pushed, they never even get warm to the touch. They charge back to 100% and 120-amp hours in just a few hours. Even after driving around and playing 36 holes on my very hilly courses, the remaining charge is still in the mid 60% range.
Handling and “zippiness” are superb due to the permanent weight reduction. Another bonus is not ever having to think about checking and adding distilled water to the batteries.
My only ‘nit’ (and it is a small one) is with regards to the CAN cable connection. I’d recommend RELi3ON® add a visible alignment line on both the cable and the battery port to make the proper connection simpler.
Other than that, the quality of all the components included in the RELi3ON® InSight battery package is outstanding. Customer Service/Technical Help was excellent. The ‘seat-of-the-pants’ feel brings a smile to my face every time I am in the cart, even if my golf game does not.
My rating: Clearly deserves a 5 out of possible 5 lightning bolts!


I hope you found this useful. Please let me know if you have any questions!
Cheers
[2] https://www.youtube.com/watch?v=EZpXBc5UzpU&ab_channel=RELiONBattery
