Background:
This is a step-by-step documentation of the BLACKVUE™ DR900S-2CH install on a 2019 BMW X3. It will be followed by a review of the image quality and a comparison to other dash cams. While this has some steps that are specific to the install in the BMW X3, in general, the process will be very similar for any vehicle application of the BLACKVUE™ DR900S-2CH system. It also includes the install of the BLACKVUE™ Power Magic Pro, to allow for 24/7 coverage.
The BLACKVUE™ system was supplied to me by Pittasoft (distributers of the BLACKVUE™) for independent long-term evaluation. Please note: This write-up is for information and explanation purposes; if you are going to install the BLACKVUE™ DR900S-2CH you are strongly encouraged to carefully review their installation guidelines and respective manuals. All information and opinions expressed are my own and not that of Pittasoft. I anticipate there are other ways to accomplish this install. If my steps aid you when you do your own, all the better.
The BLACKVUE™ DR900S-2CH is a high-end dash cam system that includes (all specs as provided by manufacturer):
- Front 8-megapixel CMOS sensor camera and rear facing 2.1-megapixel Sony STARVIS CMOS sensor camera
- Front viewing angle: diagonal 162º, horizontal 136º and vertical 77º
- Rear viewing angle: diagonal 139º, horizontal 114º and vertical 59º
- Resolution: max of 4k UHD (3840×2160) @30mfps front, Full HD (1920×1080) @ 30 fps rear
- Video Codex H.265 (HEVC), H.264 (AVC)
- MP4
- Built in Wi-Fi and GPS
- Built in microphone and speaker
- 3-Axis acceleration sensor
- Built in super capacitor
- Operating temperatures -20ºC +70ºC / -4ºF to 158ºF
Additionally, there are free apps for the phone and computer.
If you want to record while driving (engine running), then after the install all you need to do is plug in the provided cord to your accessory outlet. If you are also interested in recording any incidents while your vehicle is parked, you will need to add either the BLACKVUE™ Power Magic Battery Pack or the Power Magic Pro. I decided to go with the hardwire Power Magic Pro, allowing the option of recording both while driving and while parked.
Most vehicles shut off the cabin accessory outlets either when the engine is turned off or within a preset time frame of 5 to 10 minutes after the engine is shut off. Because of this, if you have your dash cam powered by plugging into the accessory outlet, it will stop recording shortly after the vehicle is shut down. Conversely, if your vehicle has an accessory outlet that stays on even with the engine off (more common on older vehicles), if you have your dash cam plugged into the accessory outlet, it will continue to record even with the engine turned off. The problem with doing it that way, while certainly simple, is that if you leave your vehicle parked for extended periods of time, the dash cam can eventually drain your battery and you won’t be able to start.
The BLACKVUE™ Power Magic Battery Pack or the Power Magic Pro gets around that problem by either relying on its on external battery (Power Magic Battery Pack) or using its micro-processor (Power Magic Pro) to shut off the camera at a predetermined voltage level of your vehicle battery or a predetermined amount of time.
Install:
What you need-
As can be seen from the accompanying images, the BLACKVUE™ DR900S-2CH and Power Magic Pro come with just about everything you need to do the install.

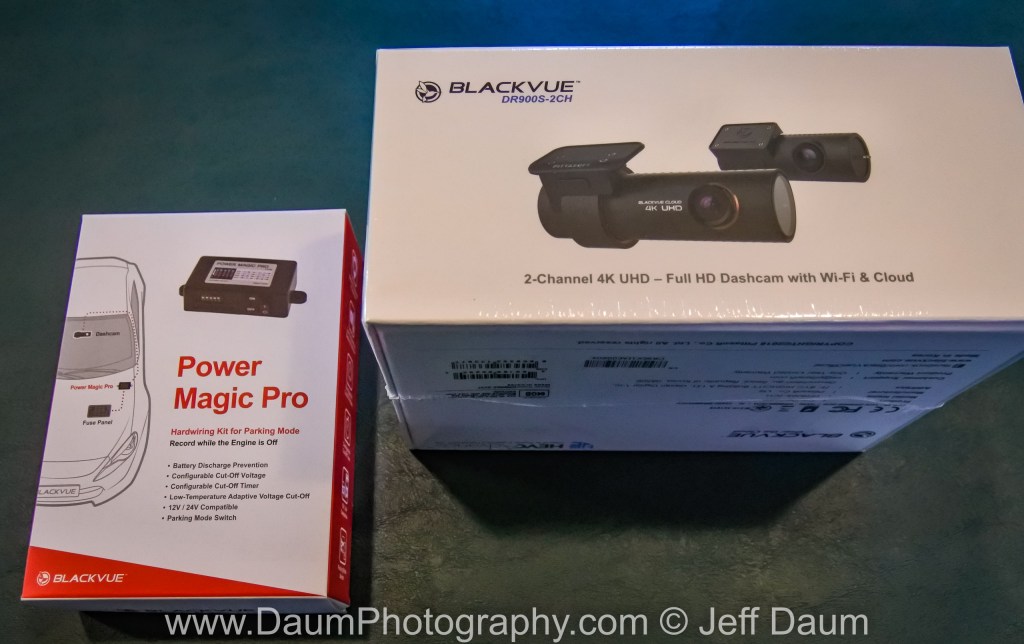


Basically, the only addition items you will need include a role of electrical tape, a microfiber towel and isopropyl (rubbing) alcohol (to clean the windshield before affixing the cameras with the supplied 3M tape), and if you are doing the hardwire install: the fuse layout of your vehicle, a fuse puller (or long needle nose plyers), and a pair of fuse taps adaptors (aka add-a-circuit) and appropriate fuses.
Installing the Power Magic Pro [Note: you skip this section if you are going to plug the BLACKVUE™ DR900S-2CH directly into your vehicle’s 12-volt accessory outlet]
First step is to locate your nearest fuse block to the dash. [Some vehicles have multiple fuse blocks. If you don’t know where yours is located, first check your Owner Manual and/or search on the web for its location.] Depending on your vehicle, the fuses are either labeled on the fuse block cover, or in your Manual. In the case of the (US version) BMW X3, there are two fuse blocks inside the vehicle- one on the right (passenger side) interior rear behind a compartment door and behind sound insulation. As it turns out, BMW doesn’t include a fuse diagram in the Manual, but rather has one printed on a sheet of paper that is folded up and placed in clips in this rear fuse block. It also contains the fuse puller. The other fuse block is located in the front passenger seat foot well. To get to it you first need to turn two plastic ‘locks’ in the cover located up under the glove box. The cover actually contains the footwell light. Here is what the lock on the left of the cover looks like:
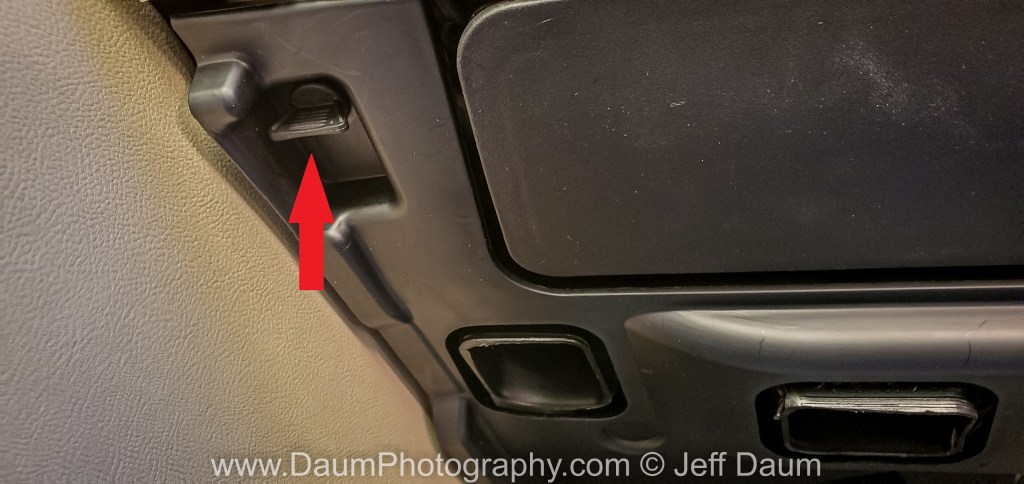
Here is what the cover looks like once you release and remove it.

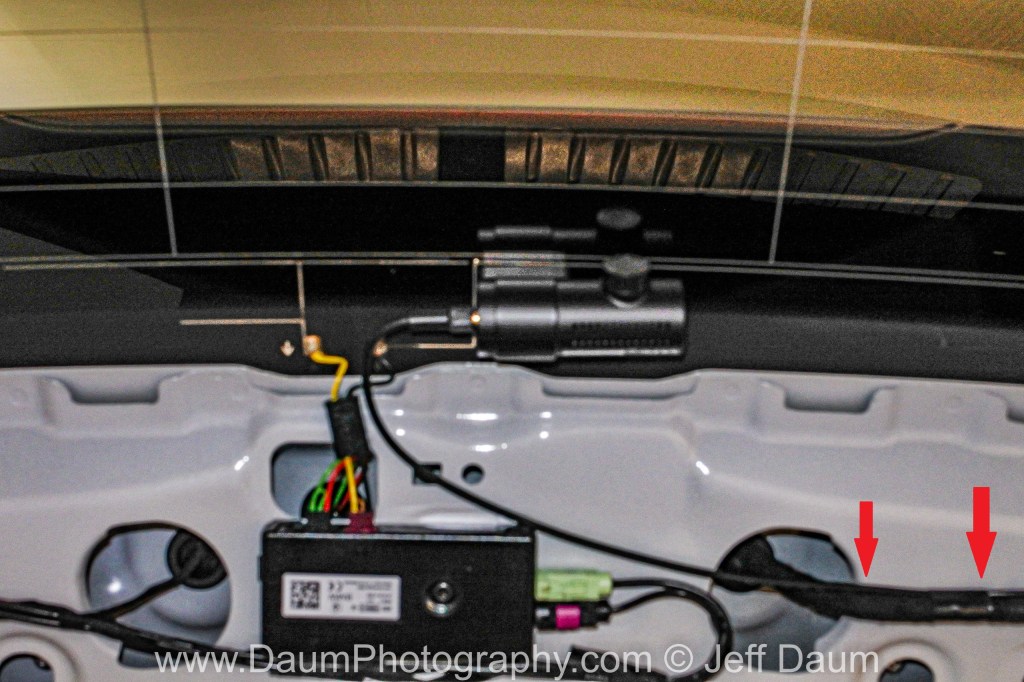
In this picture you see 3 red arrows- you will need to uncouple the power to the cover light, and pop out the 2 cord holders so that you can get the cover out of the way as you access the fuse block.
Here is what the BMW X3 fuse block and labels looks like. Note, the diagram reflects what you are seeing if you were lying on your back, feet toward the engine, and looking up at the fuse block.
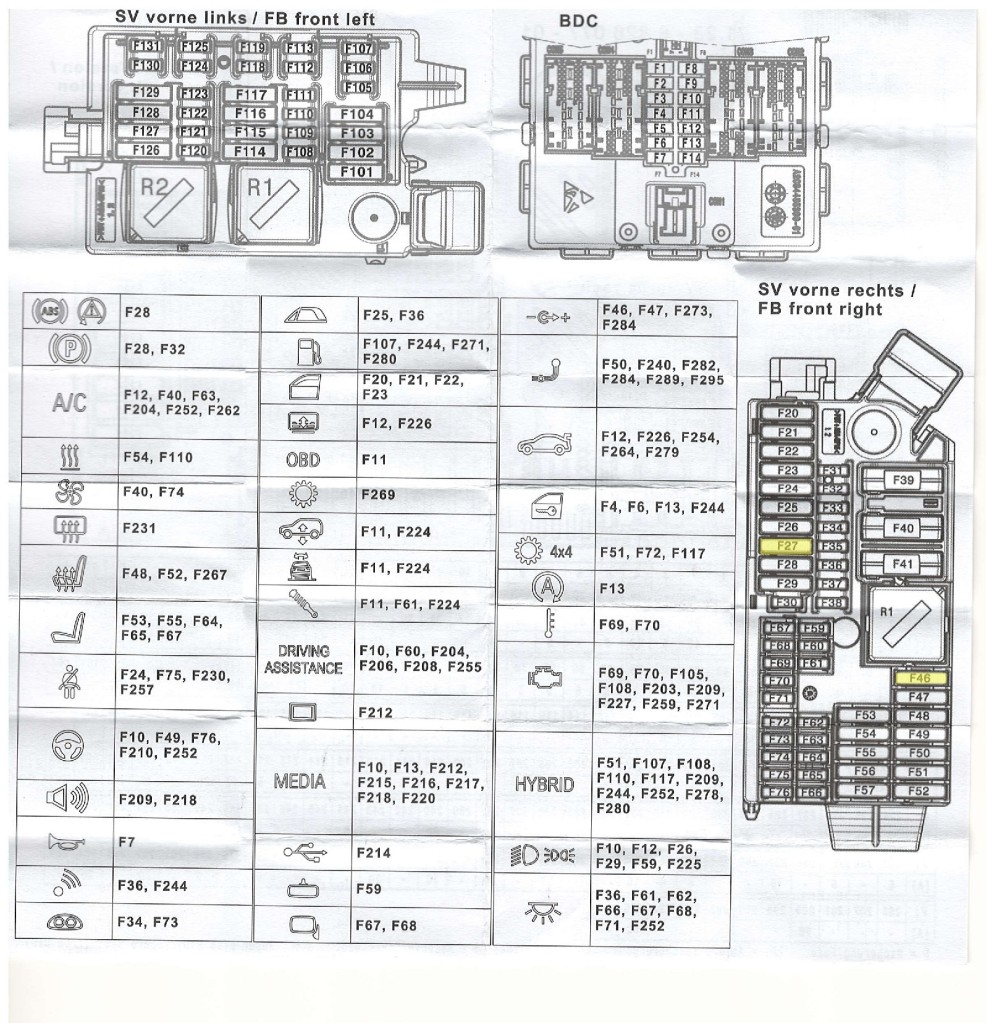
You are going to want to use fuse taps adaptors on slot F27, constant power, and slot F46, accessory power (only on when the engine is on). If you are installing on another vehicle, you similarly need to identify a fuse slot that has constant power and one that is powered only when the engine is running. If you haven’t used the add-a-circuit tap before, it is really easy to do. It is much better, in my opinion, than wrapping the wire you want to power around the existing fuse. You simply pull the fuse from the existing slot (using a fuse puller or needle nose plyers), insert the fuse you pull into the fuse tap ‘front’ slot (the one that does not have the new wire coming from it), and add a new fuse for your dash cam to the other slot (the one that does have a wire next to it. By using this add-a-circuit fuse tap, you maintain the exact same circuit integrity for the original slot and application, and your new circuit is protected by the new fuse you put in. Then you simply push the add-a-circuit fuse tap back firmly into the same slot you pulled the fuse from.
Most add-a-circuit fuse taps include a crimp or crush connector to wire your dash cam line to. I prefer to cut that off and solder the two lines together, finishing with heat shrink tube around the solder joint. This results in a permanent connect between the two lines; sometimes crimped connections do not fully capture the second wire, and ultimately fail due to vibration.
Here is what the add-a-circuit fuse taps look like added to the X3 fuse block.

In this case, I used slot F46 for the accessory tap (power only when the engine is running) and the empty slot F27 for the constant power tap. If you look closely at the picture, you will see that the one I have labelled ACC has two fuses in the tap- the original fuse from F46 and the new fuse for the dash cam. The tap in F27 only has one fuse inserted for the dash cam, since the slot F27 was empty. At this point you also will attach the ground line from the dash cam Power Magic Pro wiring harness, to a grounded nut. There is one just above the fuse block that I used. Back off the nut and slip the metal connector from the Power Magic Pro black line under the nut while retightening it.
At this point I suggest verifying that your connections work as intended. I use a volt meter and first checked the tap at F27 to confirm power with the engine off. Then I checked the F46 connection to ensure no power with the engine off, and power when the engine is on. It also makes sense to check that your ground connect in fact is grounded.
Next you set you desired low voltage cut and time setting on the Power Magic Pro by moving the respective switch ‘fingers’ on the unit. Initially I set the low voltage cut to 12.5 volts and the time setting to Infinity. As it turns out, the 12.5 volt was too high for the BMW, which apparently has a normal non-running voltage of slightly less than 12.5 volts. So, I changed it to 12 volts and it works perfectly.
Installing the front and rear dash cams
I started with the rear dash cam, since in the BMW X3, it required the removal of some trim pieces and a bit more finesse in routing the wiring, than does the front dash cam. To begin with, you need to remove the center trim piece that runs across the back inside of the rear trunk door.
This trim piece comes off using a plastic trim ‘pry’ tool (one is supplied with the BLACKVUE™ system), but I have several around. Carefully insert the plastic pry tool between the trim and body, and then use your fingers to gently pull the trim from the body as the plastic attachments release.

You will also need to remove the trim piece on the right side to give you easier access to the back side of the hinge, where you will be feeding the wire through.

Decide where you are going to mount the rear camera. Close to the center top of the window will work perfectly. Clean the window with the isopropyl alcohol and microfiber towel to ensure good adhesion of the 3M pad already attached to the rear camera mount. Note the camera direction before you mount it- when you are facing the camera and your vehicle from the back looking towards the front, the mount goes on your left-hand side and lens on the right-hand side, with the cord plugging in from the left side. You can see this here:
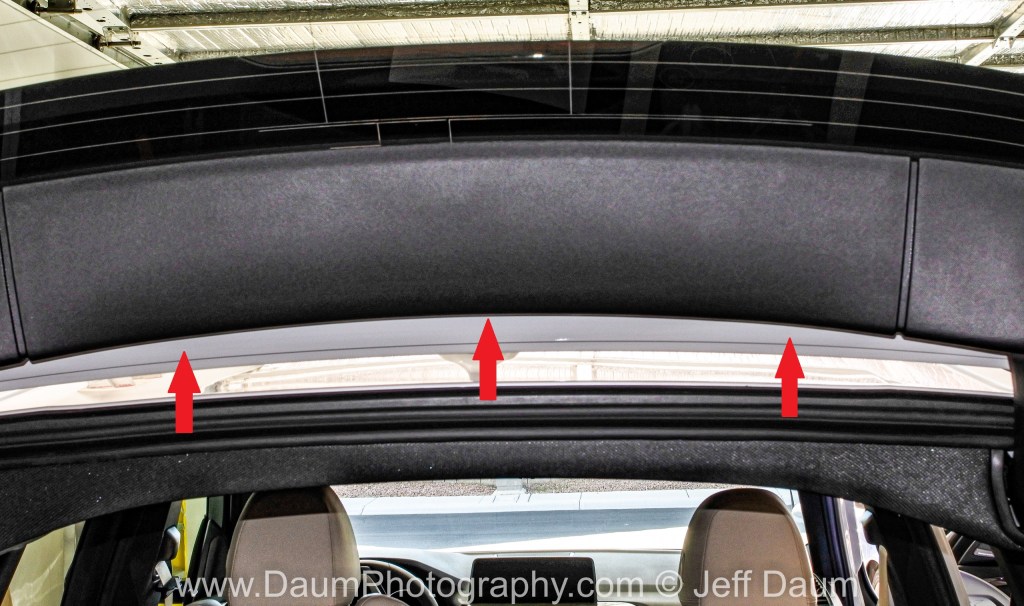
Start to route the cable horizontally across the rear window, following the existing power cable, as shown by the two red arrows in the above picture.
I recommend using several small pieces of electrical tape to secure the dash cam cable to the existing cable. Next you will be sliding the cable down the back side of the hinge (where there are already cables running). To be on the safe side, I recommend using electrical tape and making a protective wrap for about a foot along the dash cam cable, where it will be going down the backside of the hinge. If possible, secure the dash cam cable to the plastic sleeve in the inside channel of the hinge. Next, fish the cable out between the liner and the hinge and begin to use the plastic pry tool to ease the cable to the right front of the vehicle. You’ll find that you can use the pry tool to spread the opening between any hard-plastic liners and ease the cable into that opening, and along the roof line where there is rubber weather stripping into which you can easily slip the cable. Use this technique to bring the cable up to the right edge of the front windshield.
Next, install the front camera. Again, you want to get reasonably close to the center top of the windshield. Since the BMW X3 already has the actual center taken up with its monitors and cameras, I choose a location slightly to the right. Remember, you need to leave room for the camera to slide out of its mounting bracket, and that can only be done to the left of the bracket (facing the windshield from the interior). Again, be sure to clean the windshield with the isopropyl alcohol and microfiber towel to ensure good adhesion of the 3M pad already attached to the front camera mount.

Once you have attached the mount for the front camera, you will need to run the cable from the rear camera to it from where you stopped at the right side of the windshield, and the power cable that attaches to the front camera. It is very easy to push these two cables up under the header at the top of the windshield. Remember to leave enough line of the cables exposed near the front camera, so that you can comfortably attach them to the camera when you are ready.
Next bring the power cable down from the windshield down along the weather stripping between the door frame and body, down towards the fuse block. Also, if you have excess cable from the rear camera, you can easily bring that down at the same time as the power cable.
Continue to bring the power cable down to the fuse block area. [If you are not going to use the Power Magic Battery Pack or the Power Magic Pro, continue to tuck the power cord up behind the area above the carpeting in the passenger foot well and bring it to your center compartment accessory outlet.] Now attach the wiring harness that you connected via the add-a-circuit fuse taps and grounded to a grounding nut, to the Power Magic Pro. Connect the accessory plug to the Power Magic Pro receptacle. I suggest you use some electric tape to wrap and secure the plugged accessory connection.
Next, tidy up your excess cable and place it in the area behind or above the footwell carpeting. Also, place your Power Magic Pro where you would like it. As you can see, I placed it in the same general area, since I don’t anticipate I will be needing to turn the unit off.

At this point, your Power Magic Pro should show power on (LED lit) and your front and back dash cams should be powered up. Be sure to remember to remove the plastic lens cover from both the front and rear camera lens. If everything is working, now go and replace the trim pieces on the back window. Reconnect the power cable to the passenger footwell cover and then slide that back on, engaging the catches on the frame with the back right and left of the cover. Relock the plastic locks.
Now you are ready to download the BLACKVUE™ app for your phone and app for your PC or iPad. Though these you can adjust the respective setting, ensure your software is up to date, etc.
Here is what the rear camera looks like from outside the vehicle
And what the front camera looks like looking into the windshield

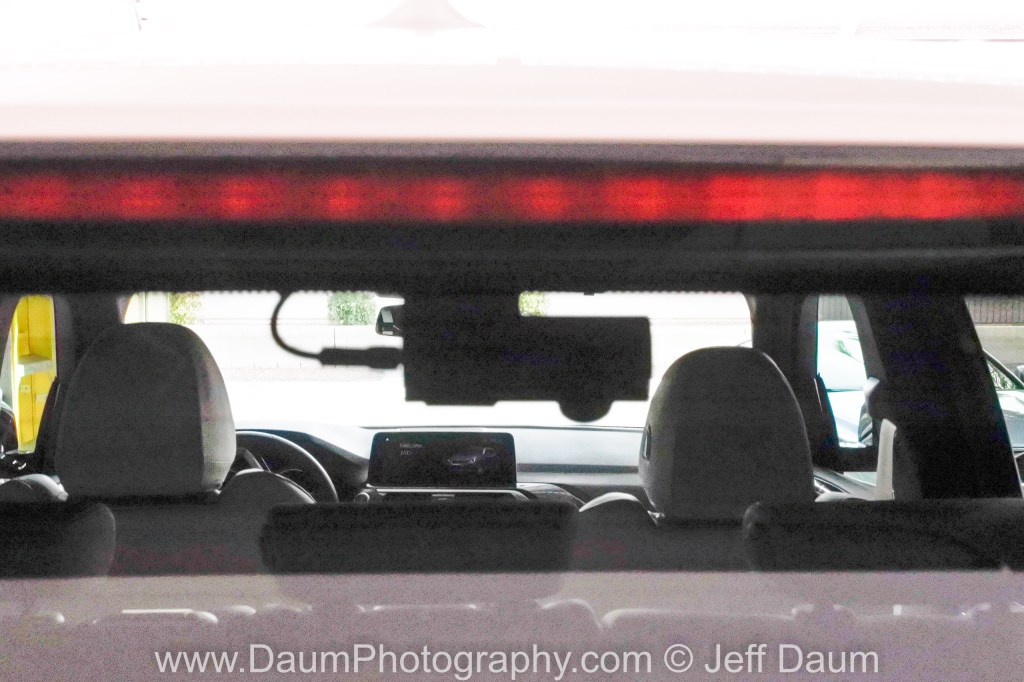
Finally, here is a view from the driver seat showing the rear-view camera visible in the rearview mirror (red circle), and the front camera to the right of the mirror.

Note: Once I got the Power Magic Pro functioning properly, I ran into an unexpected issue. The CPU battery management software on the BMW is designed to detect unknown power draws once the vehicle is parked. As a result, while it (the BMW) allowed the Power Magic Pro to fully power the dash cams in ‘parking mode,’ it twice documented electrical problems and to preserve the battery, began to shut down non-essential functions in its control (like remote key FOB control) after about 24 hours of the BlackVue power draw. This means that even though the Power Magic Pro enables the BlackVue DR900S- 2 ch system to operate in parking mode correctly, it is incompatible with the BMW because of the continuous power draw for parked periods of several days or more. This unfortunately defeats the purpose/value of using the Power Magic Pro for anything other than shorter parked periods.
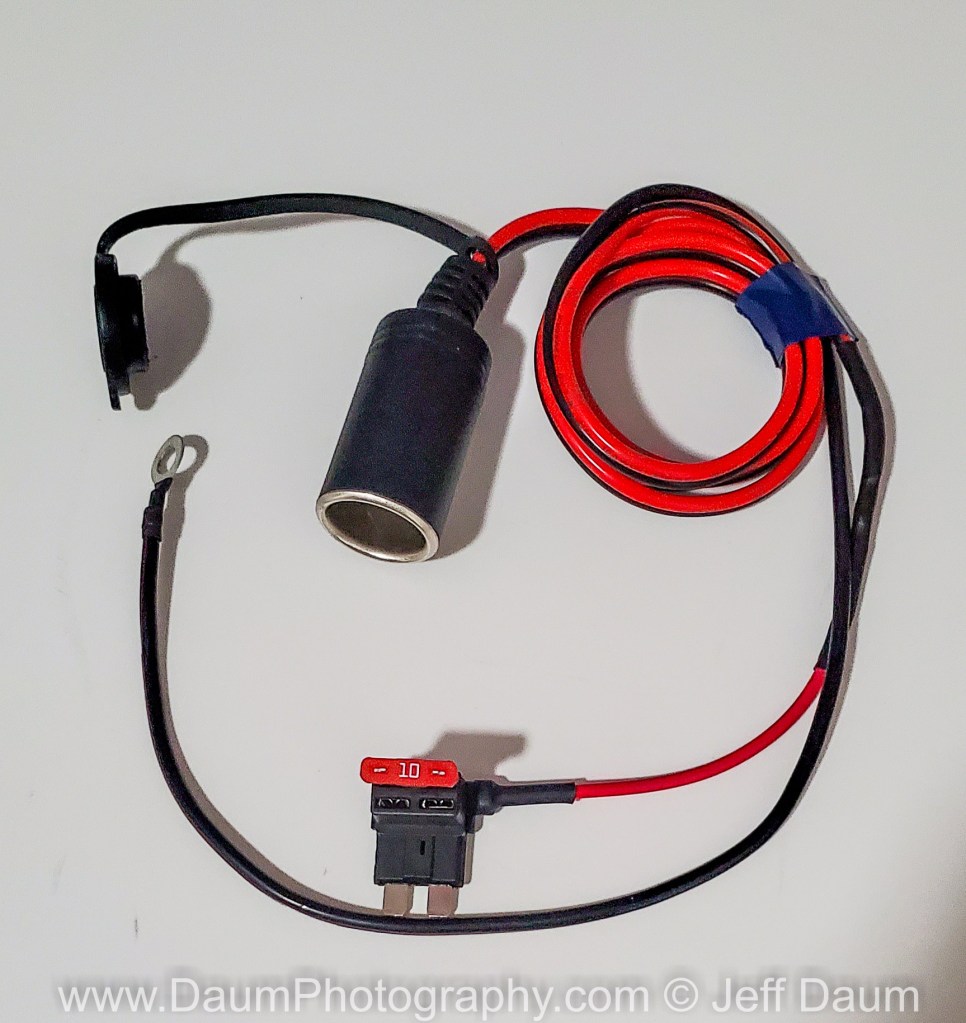
Update: As I discussed in my install write-up, the Magic Pro is basically incompatible with our BMWs because of the ‘unknown’ power drain. Until I find a viable independent power source solution that could power the BlackVue dual cameras in parking mode for periods of a week or more, I decided to hard wire the BlackVue system to one of the accessory circuits.
I chose to use an add-a-circuit fuse tap to F46 in the fuse block (accessory). I purchased a female cigarette lighter outlet (accessory outlet) which came with 16awg wires, one terminating in a grounding eyelet, and one in a fused power line. I cut off the end of the fused power line, and soldered it to the hot-line on the add-a-circuit fuse tap, and then heat shrink sealed the solder joint. I connected the ground eyelet to the existing stud and nut near the fuse block (removed the nut, put the eyelet on, reinstalled the nut).
Then I connected the accessory plug from the BlackVue cameras to the new accessory outlet and used electrical tape to ensure the plug remained properly connected. Finally I placed the excess wire up by the top of the passenger foot-well near the fuse block.
Now the BlackVue front and rear dash cams start recording as soon as the engine is turned on, and stops after the engine is turned off and the power to the accessory circuit is cut.
I hope this write-up makes your install go smoothly. I will add a link in the near future to my review of the image quality of the BLACKVUE™ along with comparison to other dash cams.

[…] Here is a review of the step-by-step installation of the BlackVue DR900S-2CH install https://insight.daumphotography.com/?p=989 […]
LikeLike
Thank you for posting this. I’m going to have the DR900S-2CH installed in my 2019 x3 M40i but will go with the battery option for Parking Mode. Because I am not brave, I will plan to have professional installation but will make certain they read your detailed and well-crafted description of the process beforehand. It would have been nice to see if you’ve otherwise been satisfied with the product but there seems to be enough (on the balance) positive feedback elsewhere on the internet .
LikeLike
Thank you Bob. Sorry that I have not had a chance to post the follow-up with my detailed evaluation of the DR900S-2CH. Covid 19 has backed up my in-field testing and comparisons.
However, I can say that the system has performed flawlessly since installation. The images/recordings from both the front and back cameras are very good quality. I have no reservations recommending this Blackvue system.
My comparison analysis hopefully will be conducted this coming month. In the interim, please let me know if you have any questions.
LikeLike
Thanks again Bob. Here is a review after six months: https://insight.daumphotography.com/2020/07/11/product-review-blackvue-dr900s-2ch-field-test/
LikeLike
[…] The Blackvue is permanently mounted in my BMW X3, while the Papago was placed along side it, using its suction cup mount. For those interested in the installation of the Blackvue, please see the detailed write-up at https://insight.daumphotography.com/2020/02/19/blackvue-dr900s-2ch-dash-cameras-install/ […]
LikeLike
[…] OEM and type of your vehicle. For an example you can check out my install in a BMW X3 here https://insight.daumphotography.com/2020/02/19/blackvue-dr900s-2ch-dash-cameras-install/ . I will be doing a hardwire installation within a few months in a couple of different […]
LikeLike