By Jeff Daum, Ph.D., PPA
Simply put, a gimbal stabilizer is intended to help take videos minimizing movement created by the way you hold the camera while shooting. If you have looked at adding a gimbal stabilizer to your equipment, you found an abundance of options out there.
This review is of the new Weebill 3S and how ZHIYUN designed it to stand out from the rest of gimbal stabilizers. The unit was provided to me by ZHIYUN and GlobalPR.
What Is In The Box

When you order the Weebill 3S it is shipped directly from Hong Kong to you and the price includes free shipping and no additional custom’s duty and import taxes. In my case it arrived quickly and in excellent shape. All components are well packed.
There are two options when you place your order: the basic Weebill 3S at US$319 or the Weebill 3S Combo at US$439. ZHIYUN is offering a 10% off discount code for my readers. Links are provided in footnote at the bottom for orders from their site or Amazon.1 I recommend the combo over the base since it includes the extension handle and wrist support which make the unit much more manageable. Both come with the same warranty: free replacement or repair for quality defects within 15 days of receipt of product. Free repair from ZHIYUN for defective material or workmanship that results in product failure for 12 months from date of selling.

Included in the box is a heavy duty nicely designed case that can hold the Weebill 3S and all of its components as well as your camera and lens. Though, if you are like me, you already have multiple camera cases and probably won’t end up using the ZHIYUN case.

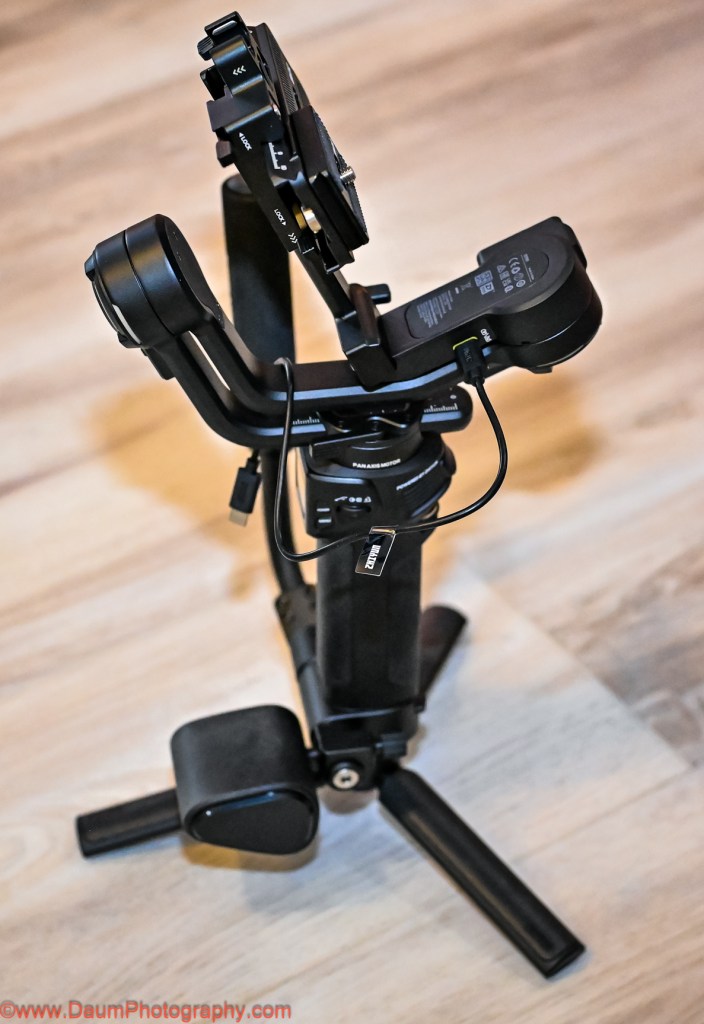
The components (image above) include #1 the Weebill 3S, #2 the extendable Sling Grip and Trans Mount Wrist Rest, #3 assorted cables for direct connection to different OEM cameras, #4 the Quick Release plate, Camera Backing Base, M4 wrench and ¼” screws, #5 Tripod base and Quick Start Guide.
The first step was to download the user manual from ZHIYUN ( https://www.zhiyun-tech.com/en/download/instruction/617?type=website&page=download_software&source=instruction ) and charge up the Weebill 3S (NOTE: as with many electronics today, no USB charger was included with the Combo. Any USB C phone charger 14 W PD or less will do). It takes about two hours from empty to full charge, with the state of charge showing on the small built-in screen. Based on how you use the unit, the charge can last up to 11 hours.
Putting the components together was fairly straightforward. NOTE: When assembling the quick release plate to the camera, the provided ¼” screw will only fit into the end of the center slot on one side- the end which has ZHIYUN printed on the underside. It takes a few tries to get the screw to perfectly match the threads in the plate. The same is true when putting the screws into the camera backing base. The screws will only thread into the end of the backing base which has ZHIYUN printed on the underside. You’ll use the provided M4 wrench to tighten the screws.
The main unit weighs 2 lb. 4.2 oz (1.026 kilograms), adding on the extension handle, tripod and mounting plate brings it to 3 lb. 13.8 oz (1.752 kilograms).
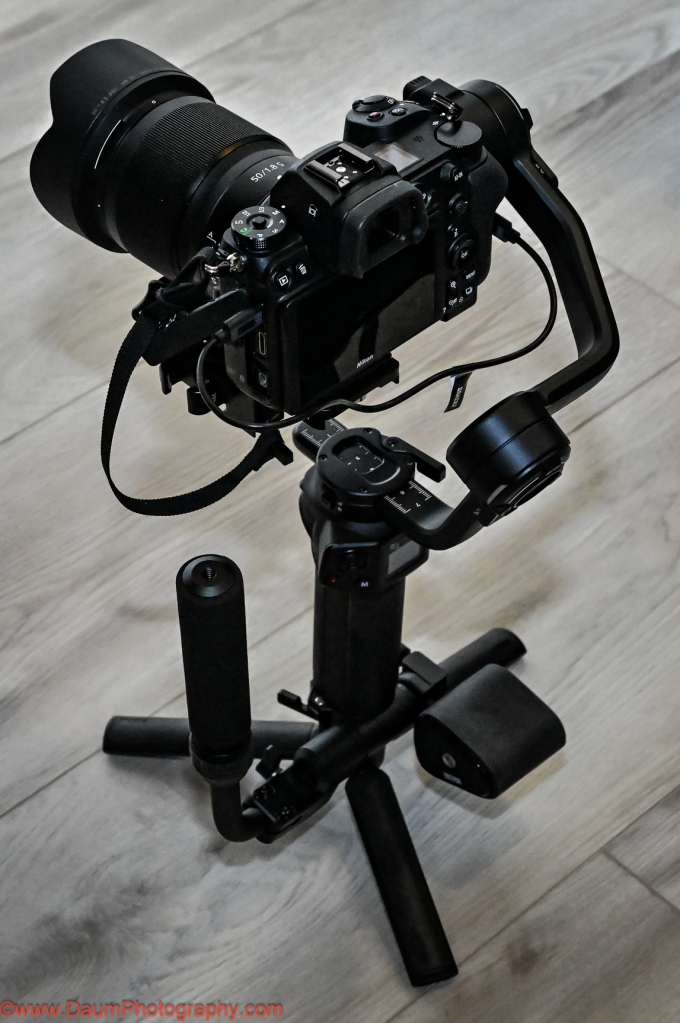
For my testing, I used a Nikon Z7 mirrorless digital camera and a Nikkor 50 mm 1.8 S lens. This camera and lens were listed on ZHIYUN’s compatibility chart. The actual weight of the Nikon with lens came to 2 lbs. 7.6 oz (1.1226 kilograms).
Once you get the Weebill 3S fully assembled and your camera and lens mounted, connect your camera to the Weebill 3S using one of the supplied USB cables. Later you can potentially use a Bluetooth connection. In my case, the Bluetooth connection would not work.

Next you will need to go through the balancing steps for each of the gimbal’s three axes. Especially If you are new to gimbals know this is a critical step that must be completed carefully to ensure that the gimbal will work properly.
NOTE; If you are new to using gimbals, I encourage you to watch some ZHIYUN’s videos https://www.zhiyun-tech.com/en/service/support/617/3/show?type=website&page=second_nav&source=service2#/pages/index/support/videoPage Here is another one that is particularly helpful: https://www.youtube.com/watch?v=BzmKhXDjf2k&ab_channel=MamoAir
The above-mentioned videos will walk you through the process including how to update the Weebill 3S software. If you haven’t balanced another gimble in the past, you may find it frustrating the first time, but it gets easier after just a few attempts.
NOTE: the Weebill 3S is very sensitive to the slightest change in camera/lens combinations, so be sure to remove your lens cover, and have your battery and memory card inserted before doing the balancing.
After getting your camera and lens balanced, you need to allow the Weebill motor software to make final adjustments (again as mentioned in the ZHIYUN videos above). Now you are ready to go.
INITIAL FIELD TESTS
My first test was to shoot a static object while moving around it. For comparison I shot the scene twice, once using the Nikon on the Weebill 3S and a second time hand holding the Nikon, trying to shoot the scene as close as possible to the first time. This would attempt to partially answer “is a gimbal set up worth it for simple videos?”
In this and the following videos, the top frame video is always the one taken using the Weebill 3S and the bottom frame video is the handheld without the use of the gimbal. Physically for this the camera and lens are sitting on top of the Weebill 3S in the three axes gimbal set up, and you are holding it with two hands by a combination of the Weebill 3S body and either the tripod or sling grip.
As can be seen there is movement generated by the camera in both versions, but the top frame one which used the Weebill 3S has noticeably less camera induced movement.
Next test was replicating shooting a video while both you and the target are moving.
Again, there is movement generated by my moving in both versions, but the top frame one which used the Weebill 3S has less movement caused by my walking while videoing.
This next test was of the Sling Mode, where the Sling Grip is moved so that the camera and Weebill 3S are under the Sling Grip. This setup allows for capturing images/video from a perspective starting at or near the ground/floor. The Weebill 3S and camera are actually more easily supported by just one hand lightly on the Sling Grip.
This Sling setup resulted in very little camera movement and a perspective that would have been difficult to duplicate without the Weebill 3S unless you were lying down on the floor holding the camera.
The Weebill 3S comes programmed with several cinematic features to enable creative shots. It can be easily set to PF or pan follow, POV point of view, F follow, L gimbals locked, and V vortex mode. Each mode locks or unlocks individually one, two or all three axis. You can also remotely control its movement via the ZYPlay app. Here is a brief example of Vortex mode:
A fun effect that would be very difficult to duplicate without the Weebill 3S!
PRELIMINARY CONCLUSIONS
Some thoughts/suggestions:
- ZY Play app requires your scrolling through and agreeing to a User Agreement that ran on for about a dozen screens on Android and second agreement of about ten more screens. This one appears to be written by a legal team that never had to read it on a phone screen. Why not have a simplified agreement?
Here is just one of the extensive sets of screens.

- Earlier production units included a magnetic key that was attached to the underside of the camera mounting bracket and could be used for tightening the attachment screws. That is no longer provided. However, an Allen wrench is provided to serve the same purpose. Either go back to the magnetic key or have an attachment place on the Weebill 3S body for the wrench so it is at the ready in the field.
- A more significant change at this stage of production occurred with the Camera Backing Base. This used to be a Quick Release Base. Now the Camera Backing Base attaches to the camera body with one ¼” screw and the use of the M4 wrench. In turn, the Camera Backing Base attaches to the larger Quick Release Base using two ¼” screws and the M4 wrench. What this means is that you can’t just release the Camera Backing Base as with previous versions but must either unscrew the base from the Quick Release Base or release and slide out the Quick Release Base to remove the camera. When you go to replace the camera, this ends up resulting in it being in a slightly different balance point and requires the rebalancing of the Weebill 3S before proceeding. Fortunately, I found that it normally only required the rebalancing of one of the axes.
- At least for use with the Nikon Z7, you have to remove the camera still attached to the quick release plate to change the battery and/or the memory card. Consider a raised camera base plate that will allow changing the battery without having to remove the camera.
- Suggest getting a spare M4 wrench if you don’t have one handy.
Positives:
- The Weebill 3S appears to be very well constructed and feels solid. I had no concerns about my camera suddenly dropping off or swinging wildly out of control.
- The Weebill 3S has a built-in LED light that you can adjust in terms of intensity from 1000 lux down, and color temperature ranging from 2600k to 5500k. It is a very handy fill light when needed.
- It is ergonomically designed to allow easy access to the menu options (visible on its building screen), change operating modes, turning on and off the built-in LED light, starting and stopping your camera’s recording, etc. The front rotary switch also can be user programmed.
- Tripod extension is very useful as both an extension of the grip and to set the Weebill 3S and attached camera down on a flat surface without it tipping over. It can also be used to perform super smooth panorama shots either manually or through the ZY Play app automatically.
- The quick release allows for easy change from landscape to portrait orientation with minimal or no rebalancing needed.
In Summary
I think that ZHIYUN has done an admirable job of setting this Weebill 3S three axes gimbal apart from its competition. It is very well made, compact and reasonably lightweight. The Weebill 3S comes loaded with usable features that will enhance your videos along with reducing shake caused by how you hold your camera and move. Just be sure that your intended camera and lens are on the ZHIYUN compatibility chart. Based on how sensitive I found the Weebill 3S to the positioning of my Nikon and lens, I think even though it is on the compatibility chart it was near the top limit of the Weebill’s motors.
I hope you found this useful. Please let me know if you have any questions!
Cheers
1 To obtain the 10% discount use the code DaumWB3S.
And one of these purchase links:
ZHIYUN official store: https://geni.us/wb3s_str_dp
ZHIYUN Amazon: https://geni.us/AMZ-WB3S-PR-Daum


 I just returned from a Silverback Gorilla trek and a Mountain Chimpanzee trek in different parts of Uganda. After a friend reviewed the images, she reminded me of Ansel Adams statement that “There are always two people in every picture: the photographer and the viewer.”
Whenever I record an image I wonder about how my presence impacts the outcome… In this case, the Great Ape across from my lens.
The image above and these directly below, are Silverback Mountain Gorillas. They live in the Bwindi Impenetrable Forest in Uganda. It is a UNDESCO World Heritage Site. [Each image can be clicked on and enlarged- if you click it twice, it will go to full size.]
I just returned from a Silverback Gorilla trek and a Mountain Chimpanzee trek in different parts of Uganda. After a friend reviewed the images, she reminded me of Ansel Adams statement that “There are always two people in every picture: the photographer and the viewer.”
Whenever I record an image I wonder about how my presence impacts the outcome… In this case, the Great Ape across from my lens.
The image above and these directly below, are Silverback Mountain Gorillas. They live in the Bwindi Impenetrable Forest in Uganda. It is a UNDESCO World Heritage Site. [Each image can be clicked on and enlarged- if you click it twice, it will go to full size.]
")
")
")
")
")
")
")
")
")

")
")
")
")
")
")
")
")
")
")
")
")
")
")
")
")
")
")
")
")
")
")
")
")
")
")
")
")
")
")
")
")
")
")
")
")
")
")
")
")
")
")
")
")
")
")
")
")
")