by Jeff Daum, Ph.D., PPA Technology & Product Analyst
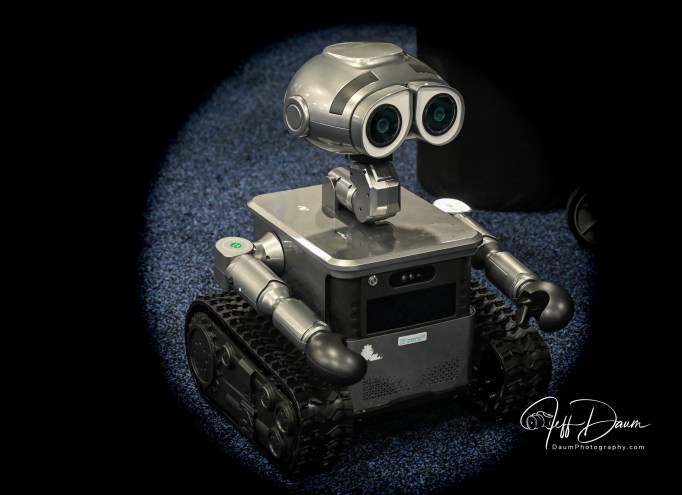
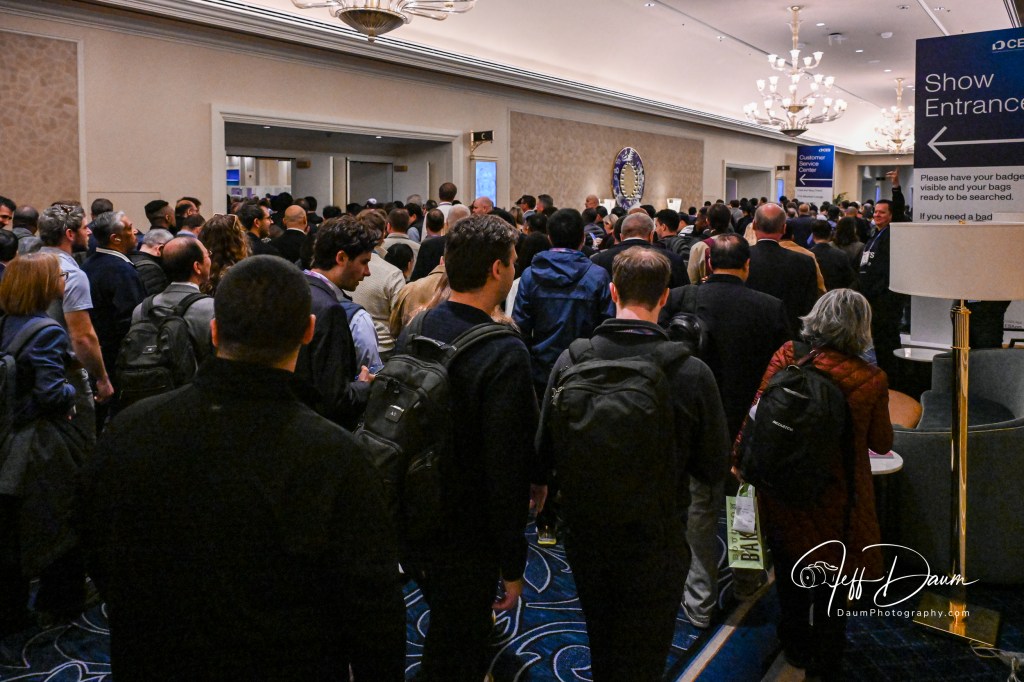
CES 2026 wrapped the end of last week. As the largest Consumer Electronics Show of its kind and the largest convention held in Las Vegas (at the LV Convention Center plus several of the Resorts), it tends to be both encompassing and overwhelming. [I averaged 12 to 13,000 steps each day with my equipment.] According to the Consumer Technology Association (who runs CES) there were 148K+ attendees, 4100+ exhibitors and 6900+ media and industry analysts this year.
Not surprisingly, AI was incorporated into just about every imaginable application (whether it was needed, added true value or not) from clothing, shoes, bracelets and rings that tracked multiple health indicators, to vehicle components (attention tracking, HVAC, accident avoidance, etc.), drone flight control, cleaning robots (house floors, windows, pools), kitchen and laundry appliances, surveillance systems, pet liter boxes, and the smart home.
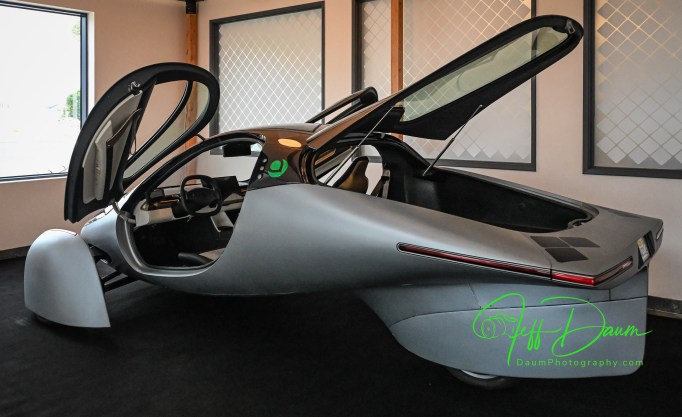
Everything that is electronic can be found at CES from supersized TVs, to cooking/food preparation appliances, to solar systems, power walls and generators, to vehicles of all sizes and shapes (giant John Deere harvester, fire trucks, regular cars, prototype cars, flying cars), powered wheel chairs, workout equipment, to cell phones and accessories, speakers to ear buds, toilets and faucets, and robots of every type and size.
CES is not open to the public, only manufacturers, buyers, sellers, investors, and the press. The first couple of days are restricted to the press and an opportunity to preview the ‘latest and greatest’ new technology of the show, along with many Keynote and PR presentations (like the impressive one by Nvidia’s CEO Jensen Huang). This is followed by four days of the exhibits being open across all the venues.
In addition to major players (LG, Samsung, Bosch, Nvidia, Amazon, etc.) there are many very small, often start-up companies there. It is usual to see, for example, an item by a known manufacturer like LG and BeatBot (pool robots) and then half a dozen or more unknown companies displaying very similar looking products with similar performance claims but sometimes of dubious quality. Products displayed range from actual production units to beta versions or even mock-ups.
What I like about CES is not only the opportunity to see (and handle or interact with) the newest technology, but also the chance to talk directly with respective CEOs, innovators, and technical gurus.
It seemed like there were fewer vehicles this year compared to previous years, but more exhibitors displaying advances in specific vehicle components (like lidar, dash displays, audio, EV motors and batteries).
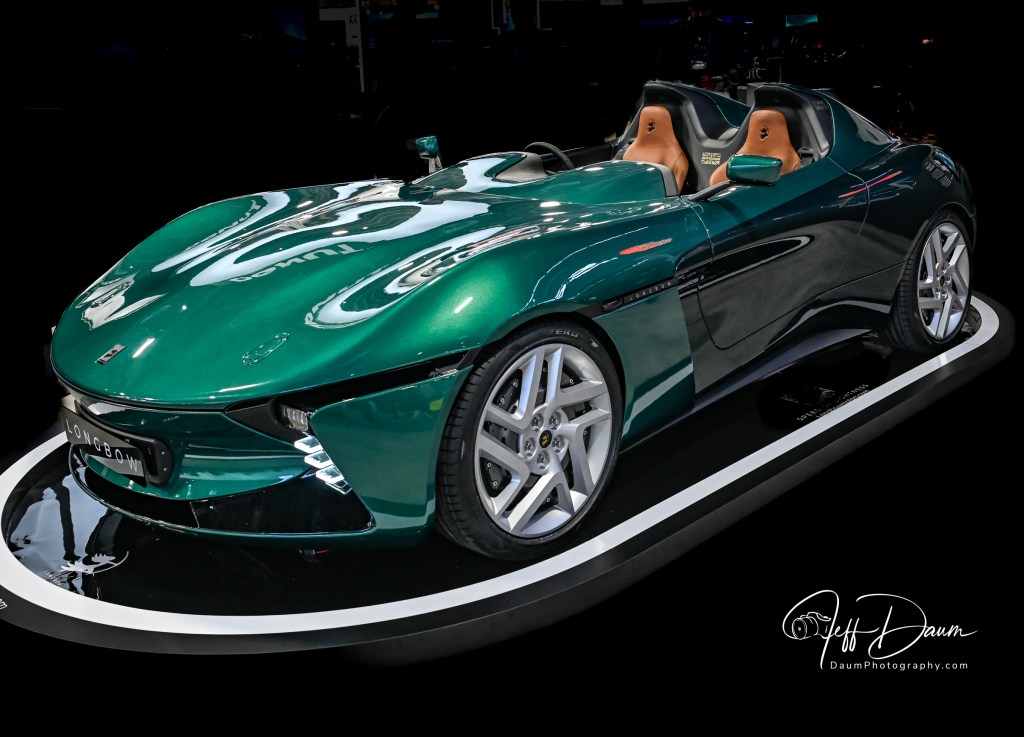
It is hard to pick THE one product or technology that truly impressed me, because of the scope of CES, but several standouts are:
All solid-state battery for vehicle applications by Donut Labs
Status Pro X ear buds with Knowles balanced armatures
SwipeVideo immersive video streaming technology that lets users seamlessly switch perspectives by swiping through unlimited camera angles
Qlay’s AI software that detects the use of AI to cheat on tests or in an interview
Longbow Speedster retro sports car built around cutting edge technology
Reolink’s use of AI to quickly sort through surveillance videos
Those of you who follow my blog might recall that I ended my initial article on Aptera Motors Corp.1 saying “This is hopefully Part 1 of a multipart Aptera review. Stay tuned for Part 2: a factory visit and first drive…” I just returned from Aptera’s production facility and while I did not get the opportunity to drive the Aptera, I did enjoy a ride in a preproduction unit.
My focus here will be on what I’ve learned and not to go over the points discussed in my initial article (link in footnote) other than to reiterate my full transparency statement: I was so impressed with the Aptera, its cutting-edge technology and dual CEO team direction and commitment, that I have placed and received confirmation of a pre order future variant all-wheel drive Aptera.
Our tour- my wife accompanied me being highly curious about the Aptera and why I was excited about it- was facilitated by Will Jarrett from Aptera’s Marketing department. Aptera Motors intended production facility in Carlsbad California is a bright open space building of approximately 77,000 square feet.
While the formal visitor tour set up is still being developed, parts of it are currently in place including:
A preproduction version with the same body shape as the production version, but with a clear glass rear hatch instead of solar panels
The front-end light unit from the supplier with its classic smile look
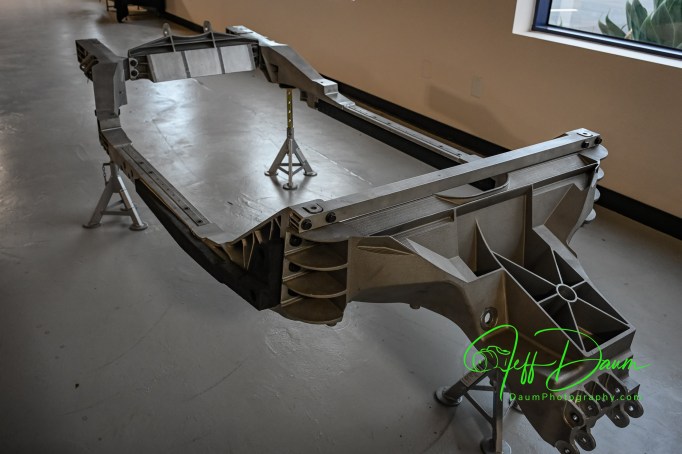
A complete body shell
A full frame
An AGV robot of the type that will be used to automatically move the assembly components around the production line
Various solar panels for different sections of the Aptera, all designed and made in-house
An earlier version Aptera in striking matt black
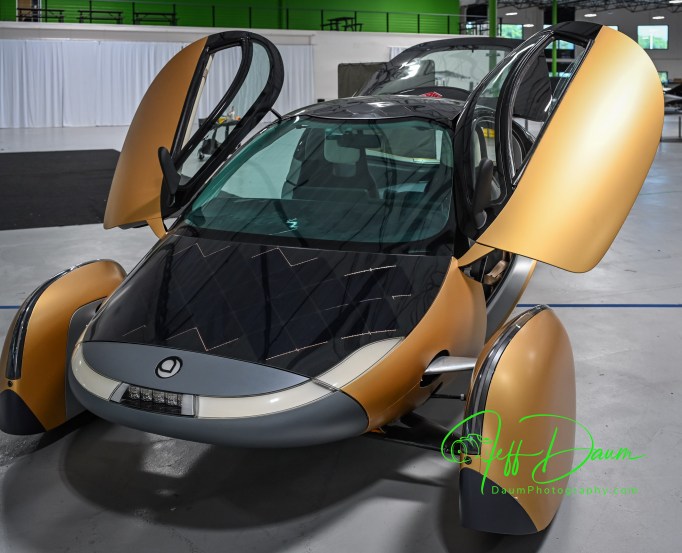
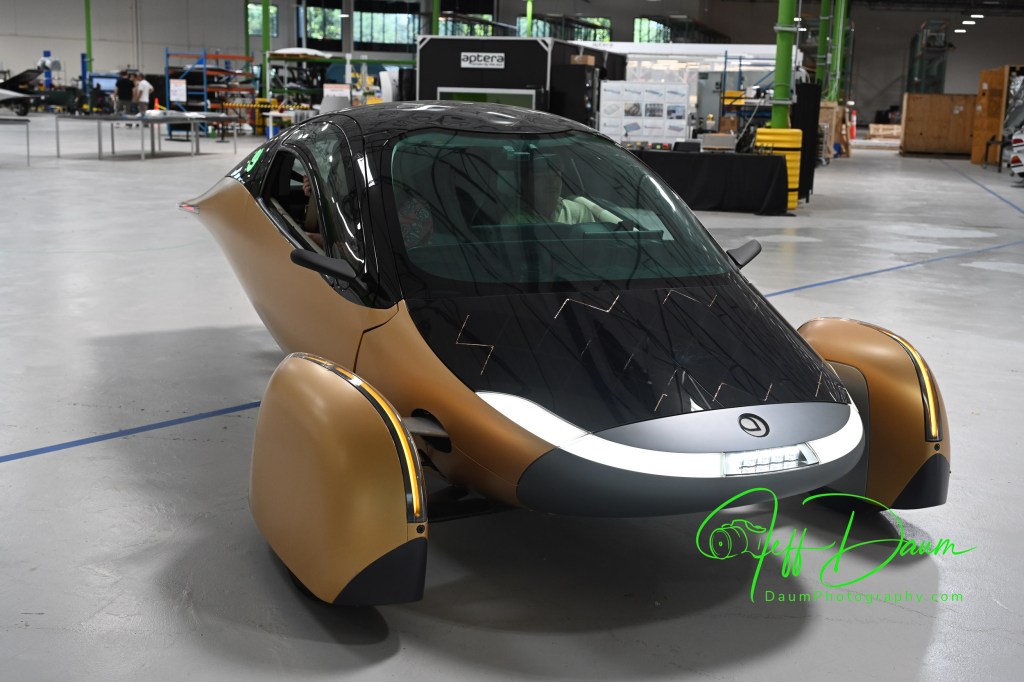
Gold colored Gamma version
More solar panels including those being sold to other companies for non-Aptera applications
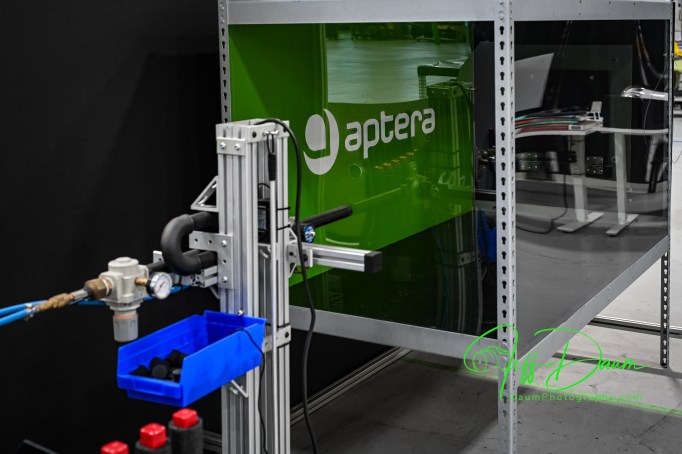
A pneumatic ‘gun’ for firing pellets at the solar panels for testing durability
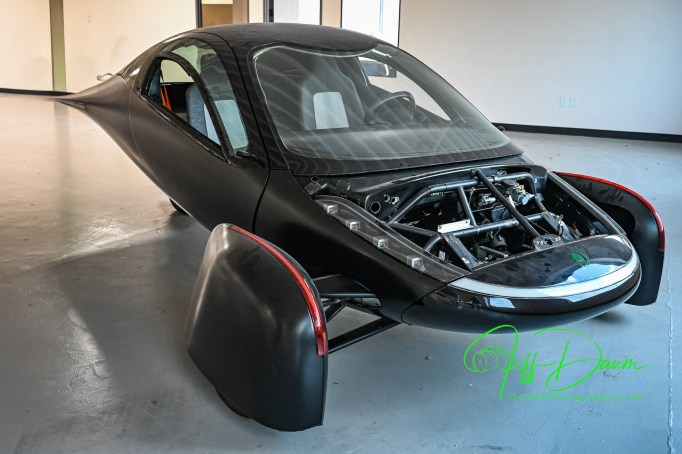
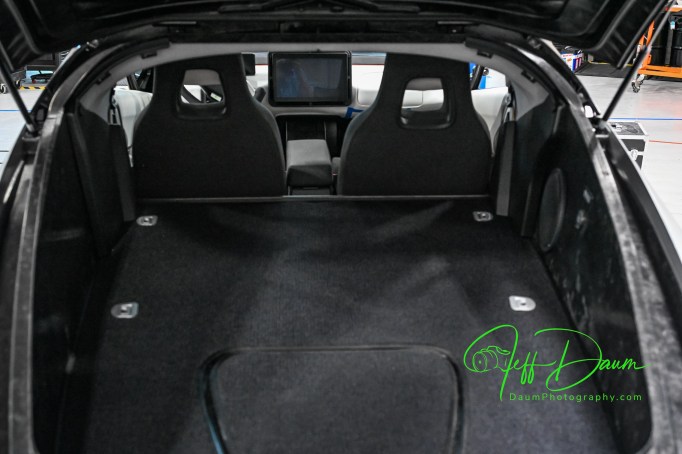
Aptera bodies with nearly complete interior components
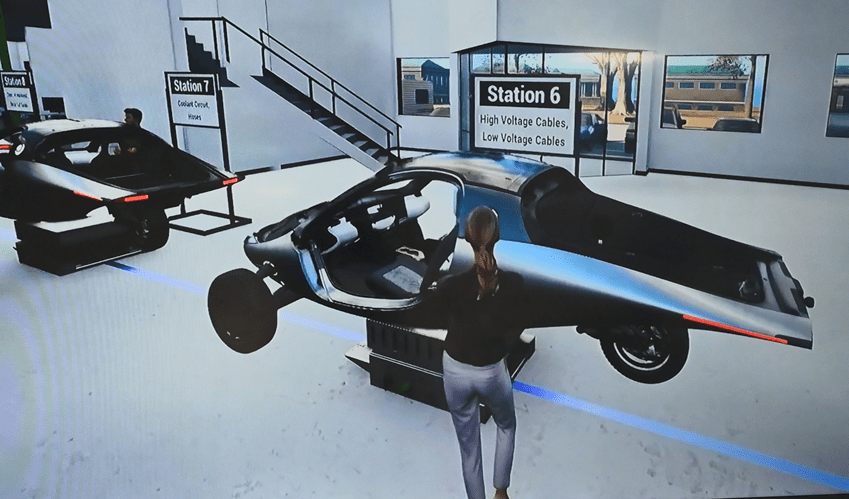
A video simulation showing the 14 or so stations that the assembly line will progress through on the AGVs
Not included in the tour were areas of the facility that housed testing rooms, subassembly rooms, etc.
As we walked through the facility, Will explained what we were looking at and responded to my questions. Here is a summary of our discussions. The extremely low coefficient of drag body is manufactured in Modena Italy by the C.P.C. Group and is a combination of Carbon Fiber Sheet Molding Compound and Glass Sheet Molding Compound and shipped over as a unit. Amongst its advantages are the significant strength to low weight ratio and that it has only six structural pieces compared to the hundreds that are used in most cars. The Aptera safety cage is modeled after Formula 1 cars!
It sits on a custom metallic chassis that is also made in Italy by the Costamp Group, located right next to C.P.C.
The components and Apteras as they are being assembled will be moved around the 14 stations of the production line on AGVs that follow the blue line that can be seen on the facility floor. The advantage of this AGV technology is flexibility over fixed production lines. If something happens with one of the AGVs it can be pushed aside and the line will continue to operate.
The cars will be primarily assembled by people, assisted by automation where practical. After the low-volume production phase, the objective is to produce 20,000 Apteras in this facility per year.
[above three images are screen shots from Aptera’s Media Simulated Production Line video]
The battery assembly will be done in house. 40 KWh unit will provide a 400-mile range. They will be using LG batteries.
The solar panels are designed and patented by Aptera’s team. They have also started licensing the technology to others for alternative applications. Amazingly they are bendable and have a glass surface similar to Gorilla Glass (as used in smartphones). They can withstand direct hits without breaking. The design allows for the panels to be replaced if necessary postproduction. For example, if a section gets damaged, or down the road the efficiency of the solar panels improves so much that it might make sense to swap the older ones out.
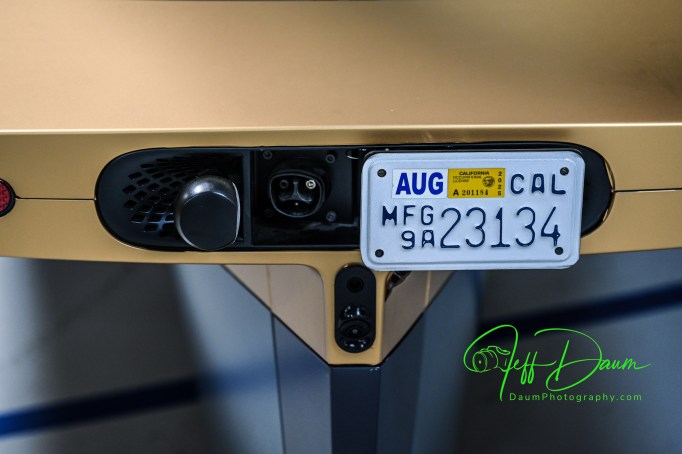
The production versions will have a solid trunk lid without glass and be covered with solar panels and use a camera for an unobstructed comprehensive rear view in a center mounted electronic rear view mirror (similar to the one used in the new Corvette for example). The side mirrors are combination of mirrors and cameras. The mirrors are required to follow existing US NHTSA law. The cameras show clear views of both sides of the Aptera on two screens directly behind the steering wheel.
The gold unit “Gamma” in the following image is the most recent prototype, though they now have Production Validation versions. This is the one we rode in.
The silver unit is a current Production Validation Aptera called Artemis and is the one that they did the extended Route 66 trip.
There are a few additional things that Will pointed out. They have built-in fail-safe backups like having buttons behind the large central screen that will allow you to continue to drive the Aptera if the screen fails.
The trunk lid is designed to open part way without flying up so that if you have a low ceiling you don’t have to worry about it hitting it. You manually open the lid the rest of the way.
There are plans to have several options for the battery pack beyond the standard 400-mile range, including a 250-mile range, 600-mile range and 1000-mile range. Also having a Level 2 Autonomous driving option.
In the image above, you can see the North American Charging Standard (NACS) port located behind the license plate which slides to the side providing access
While Will is not permitted to discuss the status of funding he said once sufficient capital is obtained it will be about nine months until the first production vehicles are finished and out the door.
My thoughts following the tour and ride
Having driven several all-electric vehicles from different OEMs and currently owning one, I’ve come to expect lots of torque and rapid acceleration from an EV and Aptera doesn’t disappoint. What I did not expect was that Aptera, a three-wheeler, would feel so rock solid through turns at speed.
The interior is roomy and comfortable, feeling for example very comparable to my Corvette Stingray Coupe (but Aptera has more headroom) with a surprising amount of usable space behind the seats.
Visibility looking out is very good and supplemented by an electronic rearview central mirror as well as electronic side views on two screens directly in the driver line of sight.
Aptera has lots of ‘coolness factors’ including its slipstream shape, knock on the body to open doors and trunk (no outside handles) and the solar recharging.
I am left with two concerns at this point: One is a driving practicality issue and the other is whether Aptera will achieve financial fluidity to realize their objectives.
What I mean by driving practicality comes down to how the two “outrigger” front wheel units will survive in real world situations. They are quite wide at approximately 88” across when the wheels are straight and wider when turned off center. This width is further compounded by the fact that the tops of the wheel units are low with respect to the Aptera body. That wheel unit to wheel unit width is greater than many cars and even small trucks on the road today.
Here is why I think this may be a concern: If you backed your Aptera in the center of a typical parking spot in a parking garage, the slot often is only 9 feet or less wide, which leaves about 10 inches or less between the edge of your wheel unit and the edge of the next parking slot. If a car, or worse a truck, then goes to back in next to you and turns in rather than pulling straight in, what are the odds that they will only glance at the body of your Aptera and not see the outrigger front wheels? Since the Aptera front wheels contain also the driving motors if they get brushed or hit the damage could be considerable. Will the wheel units need some sort of pop-up flag or indicator to ensure they are seen and avoided when parked?
This width will also require drivers to maintain better vigilance regarding staying in the center of their lane and not straying on the road compared to driving other vehicles.
Regarding Aptera Motors Corp. viability I did some research on their current financial Issues. Based on Aptera’s August 27, 2025, Form S-1 filing for listing on NASDAQ here is their estimate of funding still needed for production: “Our production plan for our Carlsbad facility is phased and each phase is contingent upon a specific level of funding. The initial “low-volume” production phase is estimated to require approximately $65 million in capital to fund remaining necessary tooling and validation programs. Following the initiation of low-volume production, a second phase to ramp to high-volume production would require an estimated additional $140-$160 million. This high-volume rate, which we project to be approximately 20,000 vehicles per year at our current facility’s maximum capacity, was a figure determined in consultation with Munro & Associates, a firm specializing in lean manufacturing principles for the automotive industry.”
“Specifically, securing the capital estimated for both initial low-volume and subsequent high-volume production phases is critical. Until this funding is secured, the Company will be unable to predict if and when production will commence.”
Hopefully the listing on NASDAQ and subsequent offers will go well (and rapidly) for Aptera- I am so looking forward to having one in my garage!
P.S., My wife really enjoyed her ride and was impressed with the Aptera 😊.
Marques Brownlee has just posted an informative video based on his driving a preproduction Aptera. You can view it at https://www.youtube.com/watch?v=2OvyyVxQjuI He raises some excellent points.
Stay tuned for my next Aptera update! Thanks for visiting and reading. If you have a question or comment, please feel free to enter it below!
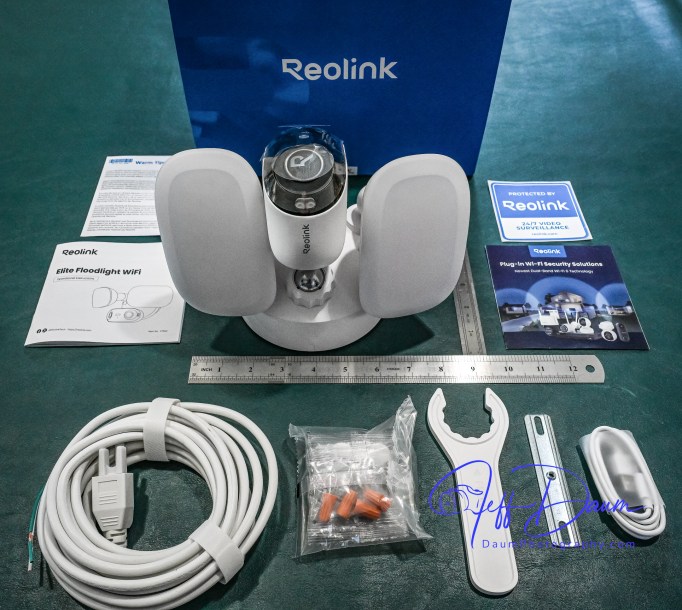
In a word, this Reolink Elite Floodlight WiFi surveillance camera is truly impressive. Reolink raises the bar for surveillance systems on multiple levels including image quality, ease and flexibility of use and AI-assisted search of recorded videos. This unit was provided to me by CommunicateMore for testing and review.
Here are the Reolink Elite Floodlight WiFi specifications listed on their website*:
Image Sensor 1/2.7″ CMOS Sensors
Resolution 5120×1552(8 Megapixels) @20fps
Lens f=2.8mm fixed, F=1.6
Field of View Horizontal: 180° Vertical: 59°
Infrared Night Vision Up to 30 meters (100ft); LED: 9pcs/850nm
(Auto-switching with IR-cut filter)
Color Night Vision With Floodlights: 19W 3000 Lumens/3000K~6000K
Frame Rate Main stream: 2fps – 20fps(Default: 20fps)
Sub stream: 4fps – 20fps(Default: 20fps)
Code Rate Main stream: 3072Kbps -8192Kbps(Default: 5120Kbps)
Sub stream: 256Kbps – 2048Kbps(Default: 1024Kbps)
Audio Two-way audio
Tailorable real-time mobile notification options of email, text or both.
Unit cost: US$219.99 list
The unit ships with just about everything you need to mount the surveillance camera and get it up and operational. Included is the camera unit with dual cameras and two LED floodlights, hardware to mount it on the wall or overhang, and a brief manual. Additionally, each package of the different screws needed are clearly labeled and match the labeling in the brief manual.
Initializing and Mounting
Before you mount the unit you need to use your smart phone to download their free app which then guides you through the initialization of the camera and linking it to your WiFi. At this stage you temporarily power the camera with the supplied USB A to C cord. However, you will need to provide your own 5-volt 2-amp USB power adaptor (standard with most phones in the past). Access the USB port on the camera body by removing two Phillips head screws in the port cover (the screws are ‘captured’ so you don’t have to be concerned about losing them).
This initialization process will go smoothly if you make sure you do a couple of necessary things:
Ensure you set up the permissions for the Reolink app to access your camera, its Bluetooth, precise location, etc.
Notice the little check box on your phone as it is stepping you through the process that says ‘you heard the voice prompt’ from the unit.
Once you get the initialization set up, you disconnect the USB cord. If you are going to use the unit’s internal storage, you will need to install a micro-SD card at this point. It supports up to a 512GB microSD card with FAT32 format and Class 10 read and write speed. You will find the microSD slot near the same area that you inserted the USB cord.
You don’t have to use internal storage, but I recommend it even if only as a backup. Reolink offers the option of storing recorded videos to the microSD card, your own NAS or their NVR unit.
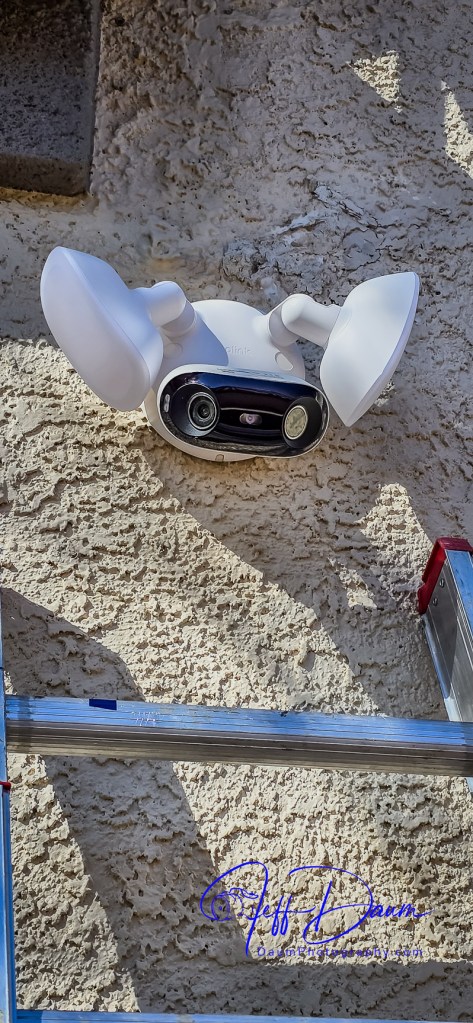
Next you screw the port cover back on and are ready to mount the unit. Since it is powered by AC 100V~240V, 50~60Hz you will need to have a junction box available where you plan on placing it or run power and a new box to the location. Wiring is straight forward, just the hot, neutral and ground connections. The mounting bracket Reolink supplies has a level built into it that makes it easy to correctly align the three screw holes as you mount it to the wall.
The camera and floodlights unit then screws on the mounting bracket. Note: There is a small loop incorporated into the back of the camera unit that allows you to temporarily support/hang it while you connect the three wires with the supplied wire nuts.
Once you have the unit mounted and have placed the supplied hole plugs over the screws, you are ready to turn on the power to the camera.
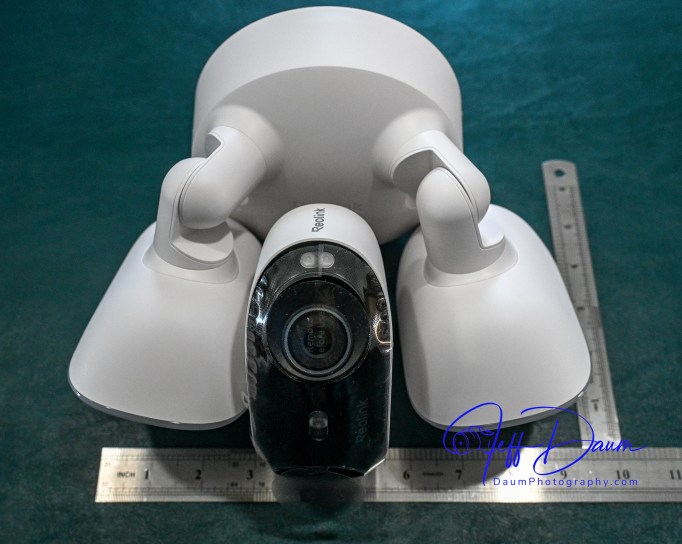
In my case the unit came online in the app on my phone almost immediately. Next, using the live stream in their app, you position the camera head to deliver the best coverage. They provide a plastic wrench to tighten the camera support once you have it positioned.
Keep your ladder handy if you mount your unit high on a wall, since you will need to wait until it is dark to position the two floodlights best for your situation.
Preliminary results
Reolink’s smart phone app is very easy to use and well designed. It opens to a live stream of the camera’s 180 view. The app is intuitive with icons to trigger the 105dB siren, floodlights, two-way audio, snap a picture or start a recording, talk over its built-in speaker, playback recorded events and access your settings.
They also have free versions of the app available for use on a PC or Mac that are equally easy to use.
The key function that sets Reolink’s app and this Elite 4K Floodlight WiFi surveillance camera apart from competition is the ease you can review recorded videos. Instead of having to wade through potentially hours of video to find what you are looking for Reolink uses AI to do it for you!
When you click on Playback on the phone, it loads the videos by date and then there is an icon that allows you to sort/search by event type. For example, you can choose to see all videos where a person entered the field of view, or a vehicle, or animal or combination of these. When you select one or more of these filters, it then quickly sorts through the videos and brings up only those matching your selection. If you used the settings function to define a specific line or zone in the viewing area, you could also select to see videos where someone has crossed the line or entered the zone. It can even identify and sort when someone is loitering in the viewing area.
When you are looking at saved videos, the app allows you to play the video at normal speed or as slow as ¼ speed or in increments up to 16xs speed. As mentioned, you can at any point snap a picture of what you are viewing, and/or download the current video.
The Reolink apps on PC or Mac are very similar to the smart phone app in functionality and ease of use.
I found this AI assisted search to be excellent and correct most of the time. It really saves so much time and effort searching through recordings to find an event.
This brings me to the quality of the image. Whether you are looking at the live feed or the recorded image, it is outstanding in both day and night versions. The image is sharp, the color excellent during the day and very good at night even with the floodlights set to lower lumen output (I did set the color temperature to 6000K and reduced the lumens to about half power).
Here are some samples of daytime images and nighttime images directly from the live stream. The detail holds up even if you considerably enlarge (crop) an image. Note, these are uncorrected images directly from the Reolink unit. Because of the native quality, they could if necessary be easily enhanced using post production editing.
These are day and night images:
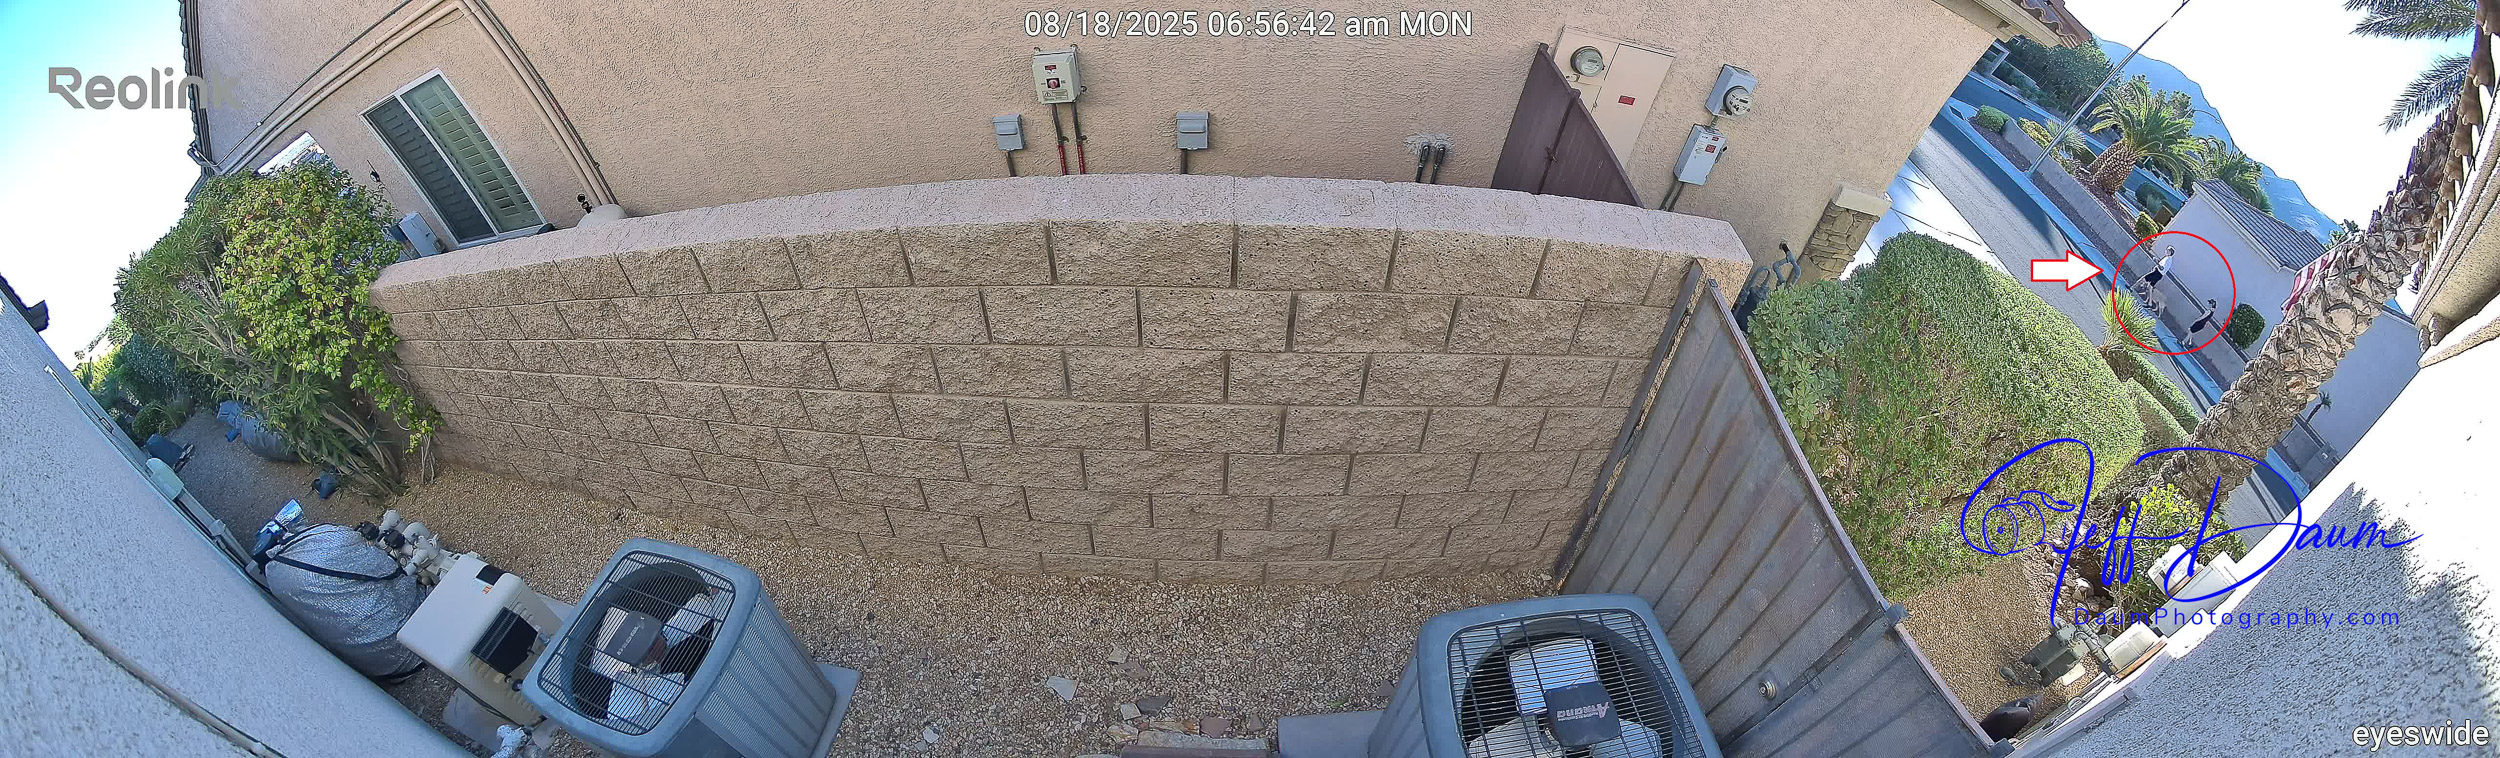
These sets show enlargements of the red circled area in the first image:
You can see in these samples that the Reolink software automatically stitches the simultaneous images from the two cameras in the unit together to provide a panoramic picture.
In my set up because I have the unit both mounted high and pointed downward so I can see both ends of the side yard as well as wall of my house, you do end up getting normal curvature distortion from the center of the image to both sides. This is mild and does not impact the sharpness of the image. If you end up mounting the unit lower or don’t need to point it downward as much, you will have little to no curvature distortion.
The type of recording you want to save is set in options, along with where you want to store them. For this review I went with a 512GB MicroSD card and allowed it to save recordings of all forms of activity. It appears that it will store approximately a month’s worth of recordings on my setting before recording over the oldest files.
Summary
The Reolink Elite 4K Floodlight WiFi surveillance camera and its free apps do not disappoint. The high quality180 degree view along with the AI search set this system apart from competition. It is easy to tailor it for your specific needs and is value-priced considering everything it delivers.
By Jeff Daum, Ph.D, PPA, Technology & Product Analyst
Smart rings are becoming popular with several companies offering competing products including Utrahuman, Oura, Samsung, RingConn and Amazfit. If you are not familiar with smart rings, think about taking most of the technology you find in smart watches and shrinking it down to fit in a normal sized ring. Amazing, right?!
Of course, you might wonder why get a smart ring if you already have a smart watch?
The short answer is convenience and wearability. Many smart watch owners don’t like wearing the watch while they sleep or go for a swim. Smart rings nicely fill that void. Also, smart watches tend to need charging every day or two, while smart rings can go four to six days before needing a charge.
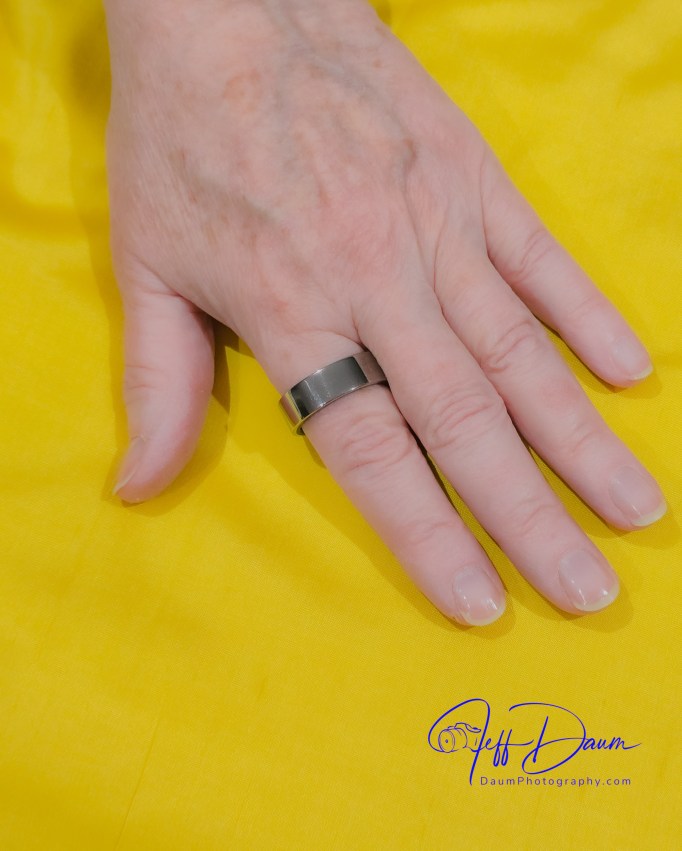
This review focuses on the Ultrahuman Ring AIR. It weighs only between 2.4 and 3.6 grams (0.08 to 0.12 ounces) depending on the size you order! They recommend you wear the Ultrahuman Ring AIR® on either your index, middle or ring fingers, and it appears that many users opt to wear it on their index finger. When you place an order they offer to ship you a free ring fitting kit to ensure you select the correct size prior to finalizing your order.
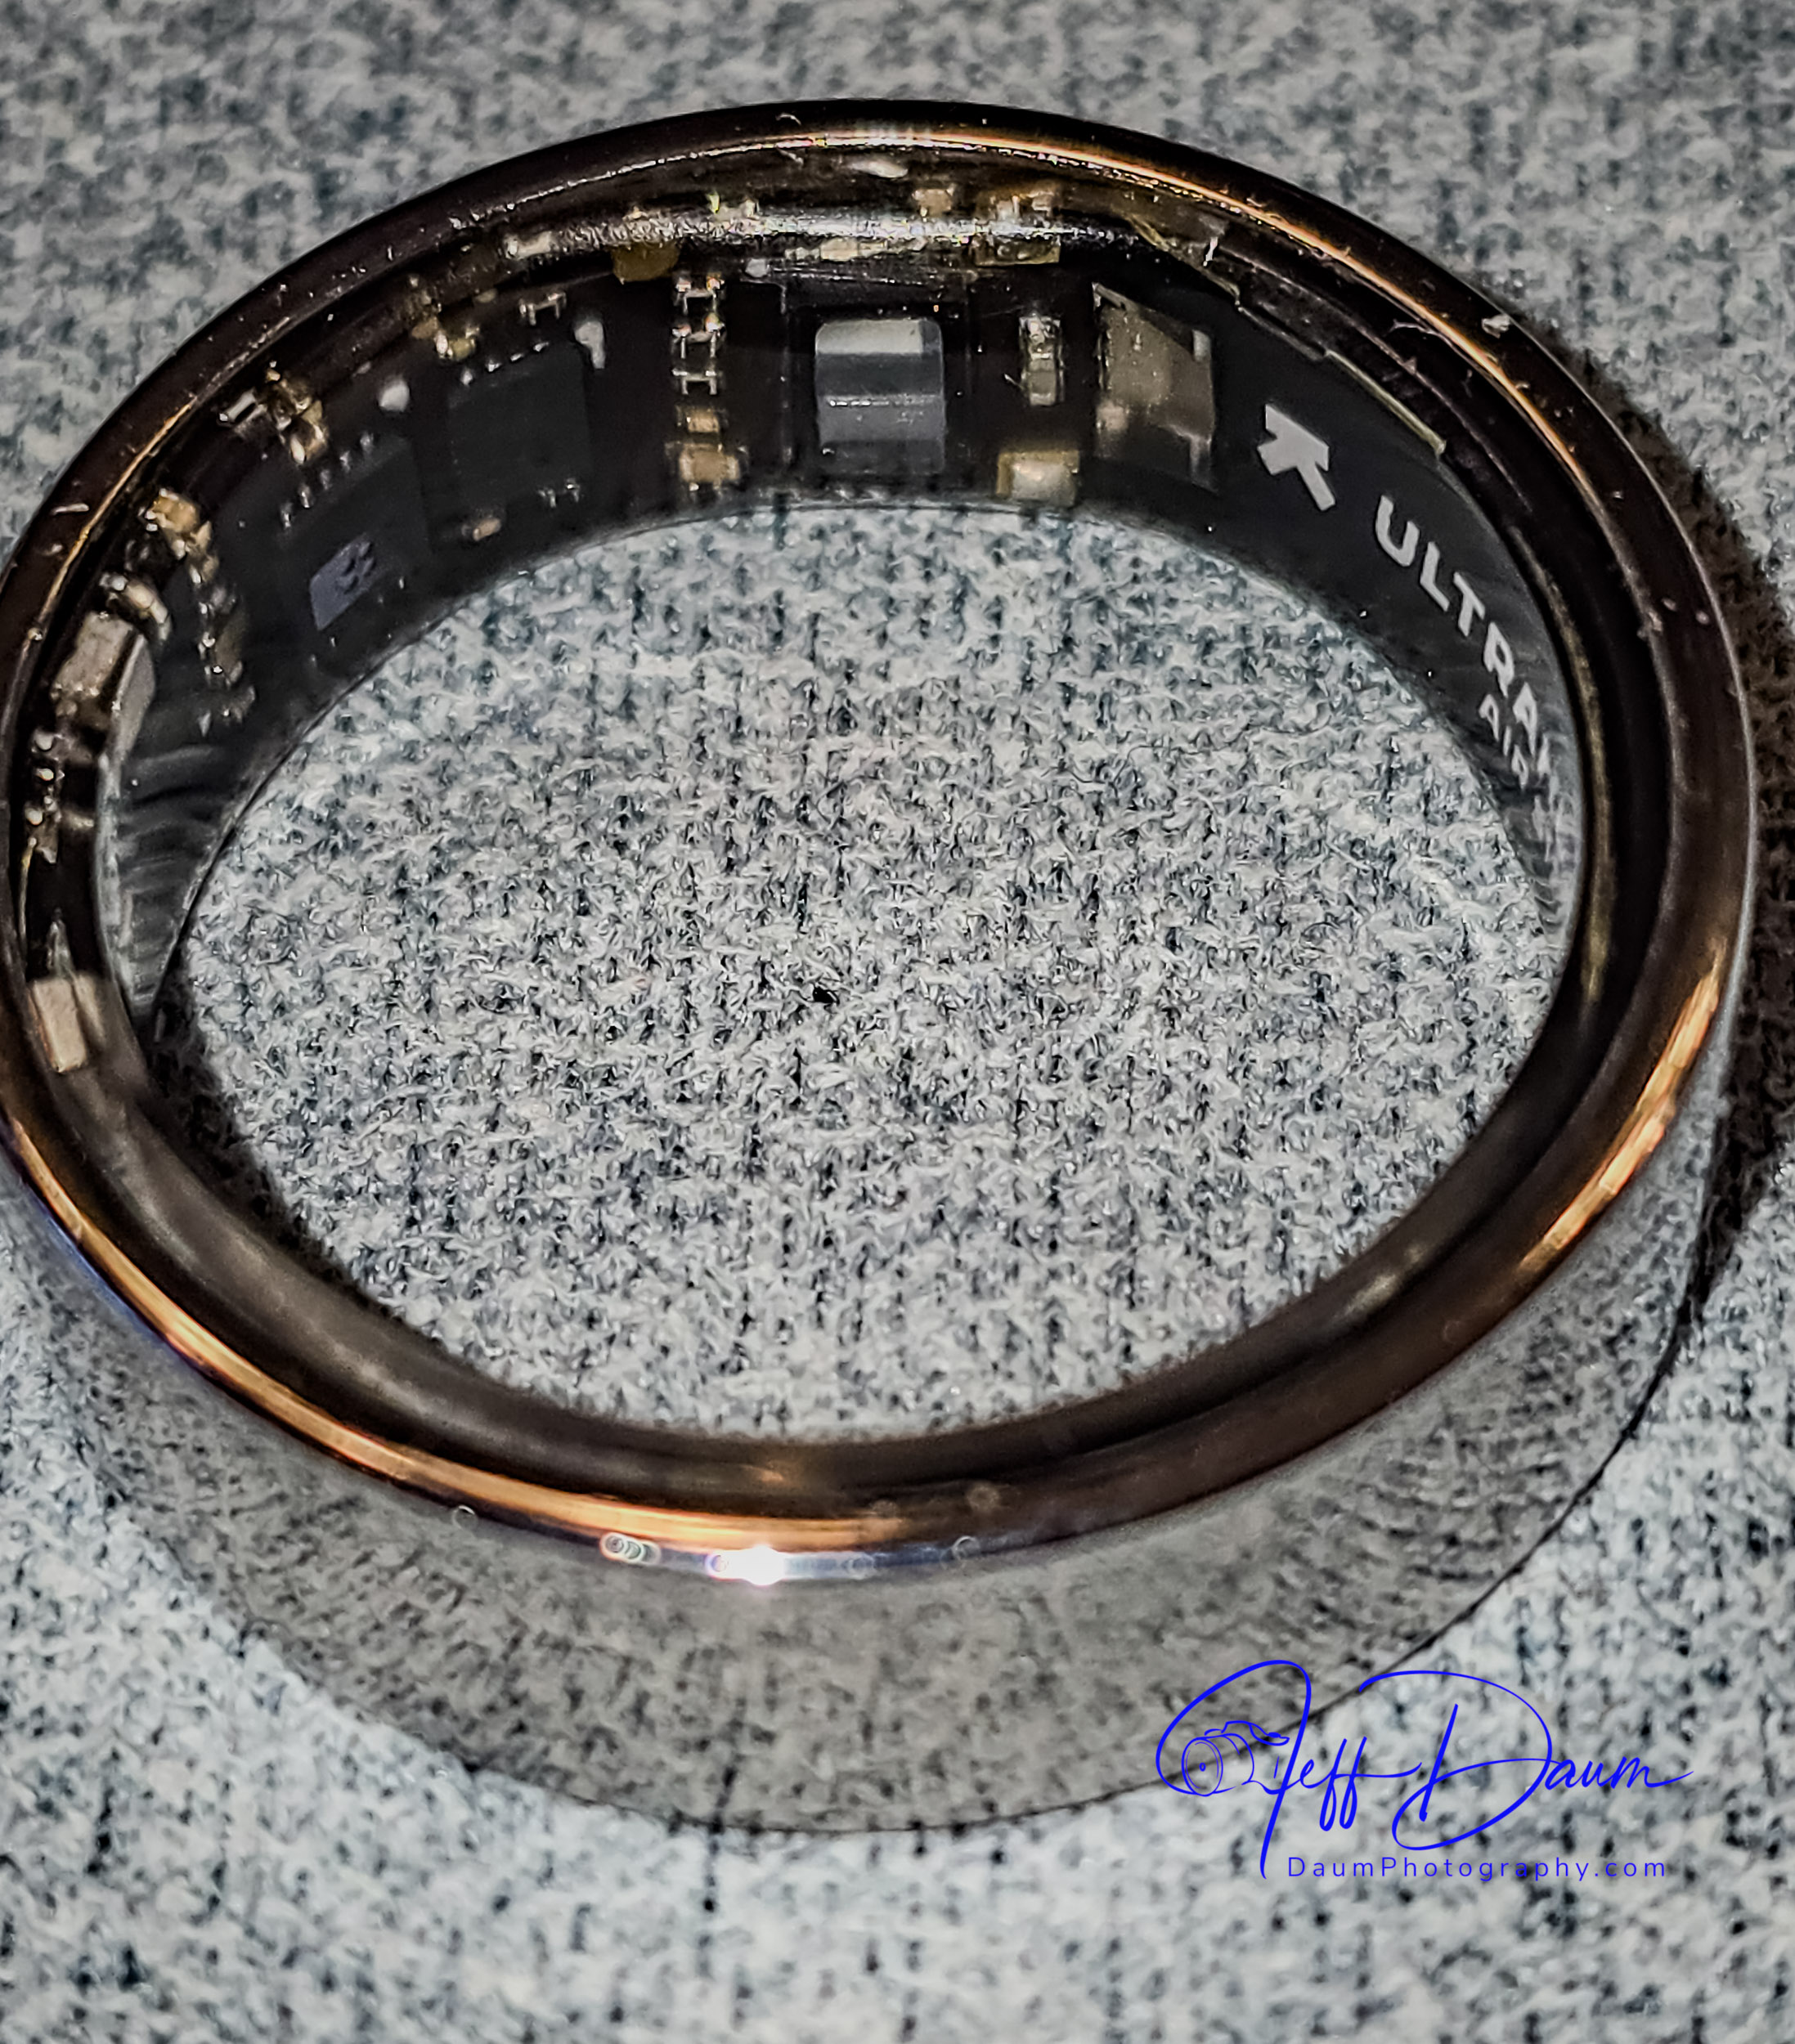
The Ultrahuman Ring AIR currently comes in five colors: Raw Titanium, Aster Black (gloss black), Matte Grey, Bionic Gold and Space Silver. All color versions have an outer shell made from high grade Titanium reinforced with a Tungsten Carbide Carbon coating. The inside of the ring is coated with a transparent medical-grade hypoallergenic epoxy resin covering all its electronics.
The ring itself is elegantly simple, what I would call almost a Bauhaus design. There are no displays, design or LEDs on the outside, but you can see some of the circuitry on the inside through the epoxy resin and occasionally a LED lighting up.
The ring contains several sensors including Infrared Photoplethysmography (PPG) [now that is a mouthful: PPG is used to detect blood volume changes] sensor, a non-contact medical-grade skin temperature sensor, 6-axis motion sensors, Red LEDs (heart rate monitoring and oxygen saturation), Green LEDs (heart rate monitoring) and Infrared LEDs (heart rate monitoring). Once you download the free Ultrahuman app these sensors communicate with your iPhone or Android automatically through Bluetooth Low Energy (BLE5).
The ring uses a permanent rechargeable LiPo battery that can last up to six days and recharges on their proprietary ring charge stand in two to three hours.
The ring is rated waterproof up to 100 meters (about 328 feet) for up to 12 hours.
Currently the rings are manufactured in India, and delivery is relatively fast from the time of the order. The Ultrahuman Ring AIR costs US$349 including delivery.
In April of 2024 Ultrahuman announced that they are building a United States factory and it is now operational in Plano Texas. They also announced at CES 2025 a new line of luxury Ultrahuman rings called Rare. These will use gold or platinum instead of the titanium shell and each has a subtle design on the surface, and retail around US$2000.
The Ultrahuman Ring AIR tracks and provides real-time metrics on heart rate, HRV (heart rate recovery), skin temperature, over ten metrics on sleep stages, steps taken, distance and estimated calories, VO2 Max (maximal oxygen consumption during exercise), stress monitoring, caffeine restriction window, BPM (pulse), and Circadian rhythm. In some regions it also provides AFiB detection. All the metrics are available in their relatively easy to use free app.
All tracking and data (mentioned above) are provided as part of the purchase price with no monthly or subscription fees. This sets Ultrahuman apart from many competitors who charge post-purchase subscription fees for the same types of information.
There are some third-party apps that they call PowerPlugs which can be added to Ultrahuman’s app. Some are free like Cycle & Ovulation, Vitamin D and Smart Alarm while others charge a monthly fee like Cardio Adaptability. Ultrahuman periodically adds both free and third-party subscription-based apps.
Here is what you get with your order
Ultrahuman has one of the best post-order communication processes I have experienced. After acknowledging and confirming my order, I received daily progress updates and then shipping status updates. From order acknowledgment to delivery was under a week.
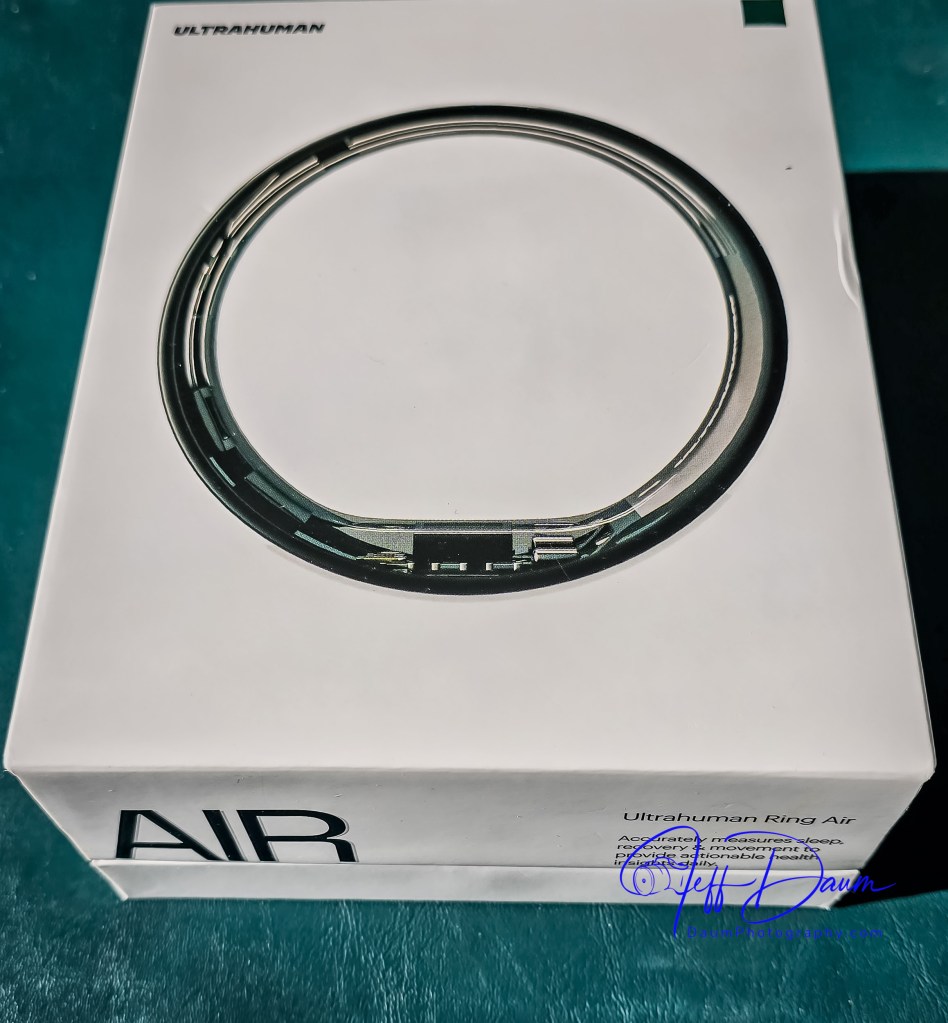
The Ultrahuman Ring AIR arrives nicely protected in a box that includes the ring, a proprietary ring charging base with a USB C to C cable, a How to Charge booklet, a User Manual, a Getting Started Guide and a humorous Hello Cyborg card (a nod to a Human Being whose powers are enhanced by mechanical parts and/or computer implants).
After downloading the Ultrahuman app and charging my ring I went through the very easy pairing process.
Initial Experience
I have worn the Ultrahuman Ring AIR continuously except for one charging period, for a little more than a week at this point. The first impression was how smooth and comfortable the extremely lightweight ring felt. I choose to fit and wear the ring on my index finger and virtually never notice that it is there (unless I look at my hand 😊 ). The finish and quality match high-end jewelry.
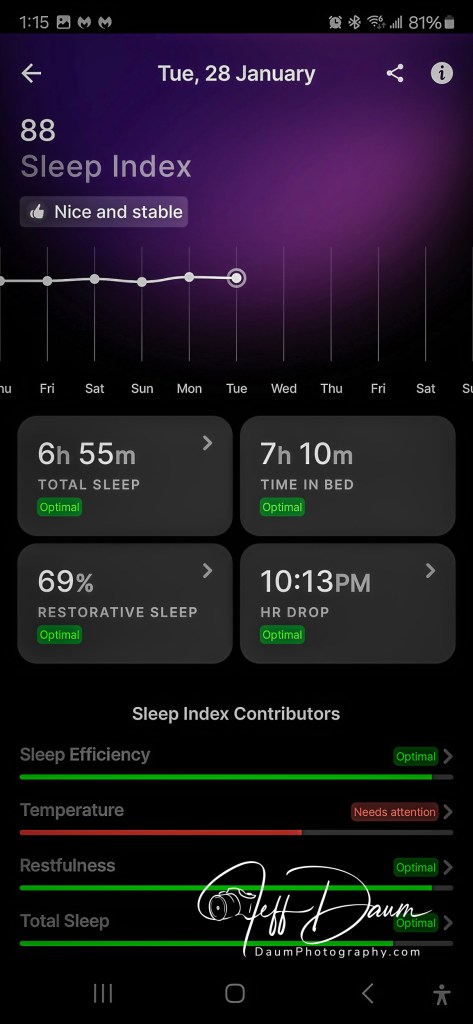
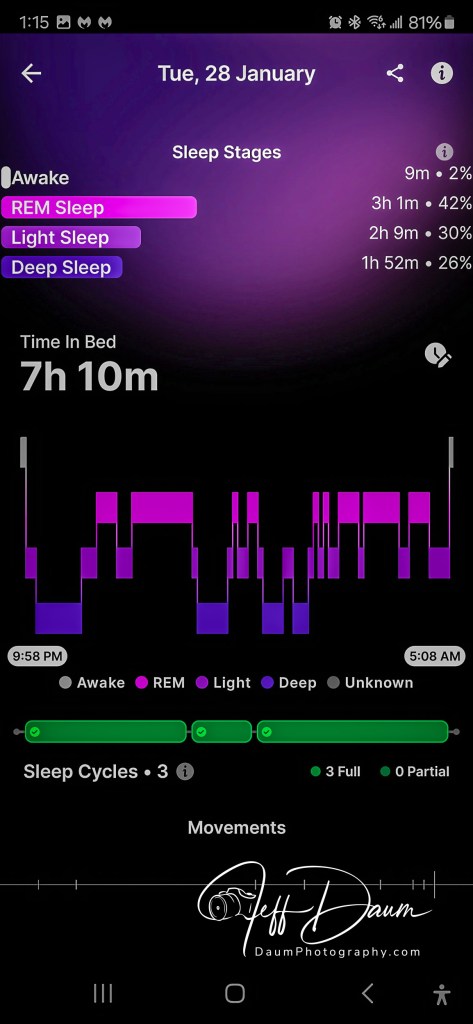
I rarely used the sleep data from my smartwatch, primarily because I do not like sleeping with it on my wrist. Conversely, I find I check the Ultrahuman app for my prior night’s sleep data every morning. As shown on the following sleep screen shots, there is a good bit of information available. In many cases there is a “>” or “i” icon next to the data that leads to more details.
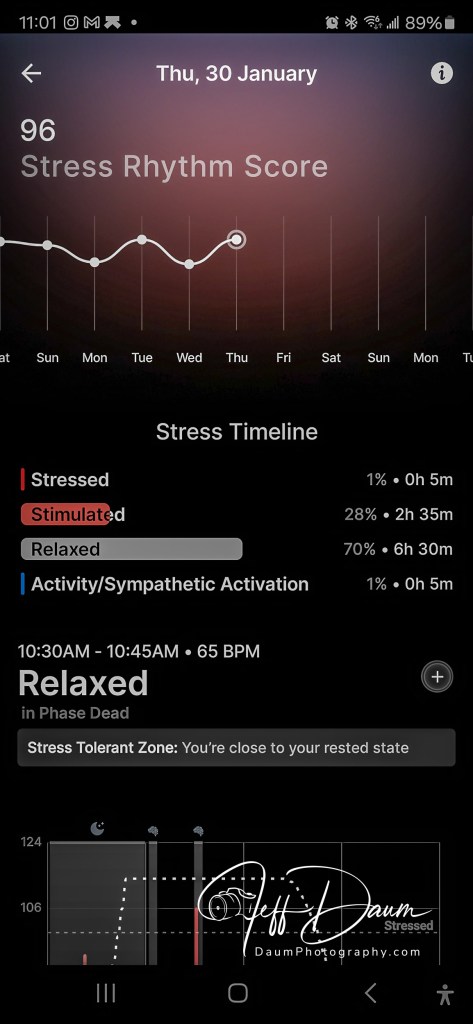
There are a lot of data and charts available to you in the Ultrahuman app, for example, here is the opening information, skin temperature, stress, heartbeat and relaxation views.
The ring automatically recorded my daily walks but seemed to miss most of my daily morning exercise routine. The 35-to-40-minutes routine is a mix of stretches, isometric and weights exercises done as soon as I get out of bed. Only one time did the app ask if I just exercised and captured related data.
Preliminary Thoughts
I find the amount and scope of data generated by the Ultrahuman Ring AIR quite amazing and worth exploring. I believe over time it can prove useful in refining some daily activities.
There are a couple of things I hope will be added through software updates going forward and one aesthetic suggestion. While the Ring AIR measures Nocturnal Oxygen Saturation and VO2 Max or oxygen during intense workouts, it does not show current blood oxygen level, or if it does I was not able to find it. My smart watch easily measures and shows accurate blood oxygen levels comparable to using a finger pulse oximeter. Blood oxygen levels are a critical indicator of many illnesses, for example, pneumonia.
I would also like the ring’s ability to autodetect workouts to be enhanced and if that is not feasible, at least an easy way to trigger related data collection at the start of a workout session.
While several people have commented on seeing the Ring AIR on my hand and liked the look, personally I would prefer some visual texture options similar to what Ultrahuman is introducing with their Rare luxury rings. Or possibly, some interchangeable very thin ring surface graphic design covers. Aesthetically I think it would make the Ring AIR fit in better when one is more formally dressed.
All in all, while I am not sure I now feel like a cyborg I have been pleasantly surprised with the comfort of the Ring AIR as well as the detailed data the app provides. Here is a link to their site https://www.ultrahuman.com/
Thanks for visiting and reading. What are your thoughts on the Ultrahuman Ring AIR?If you have a question or comment, please feel free to enter it below!
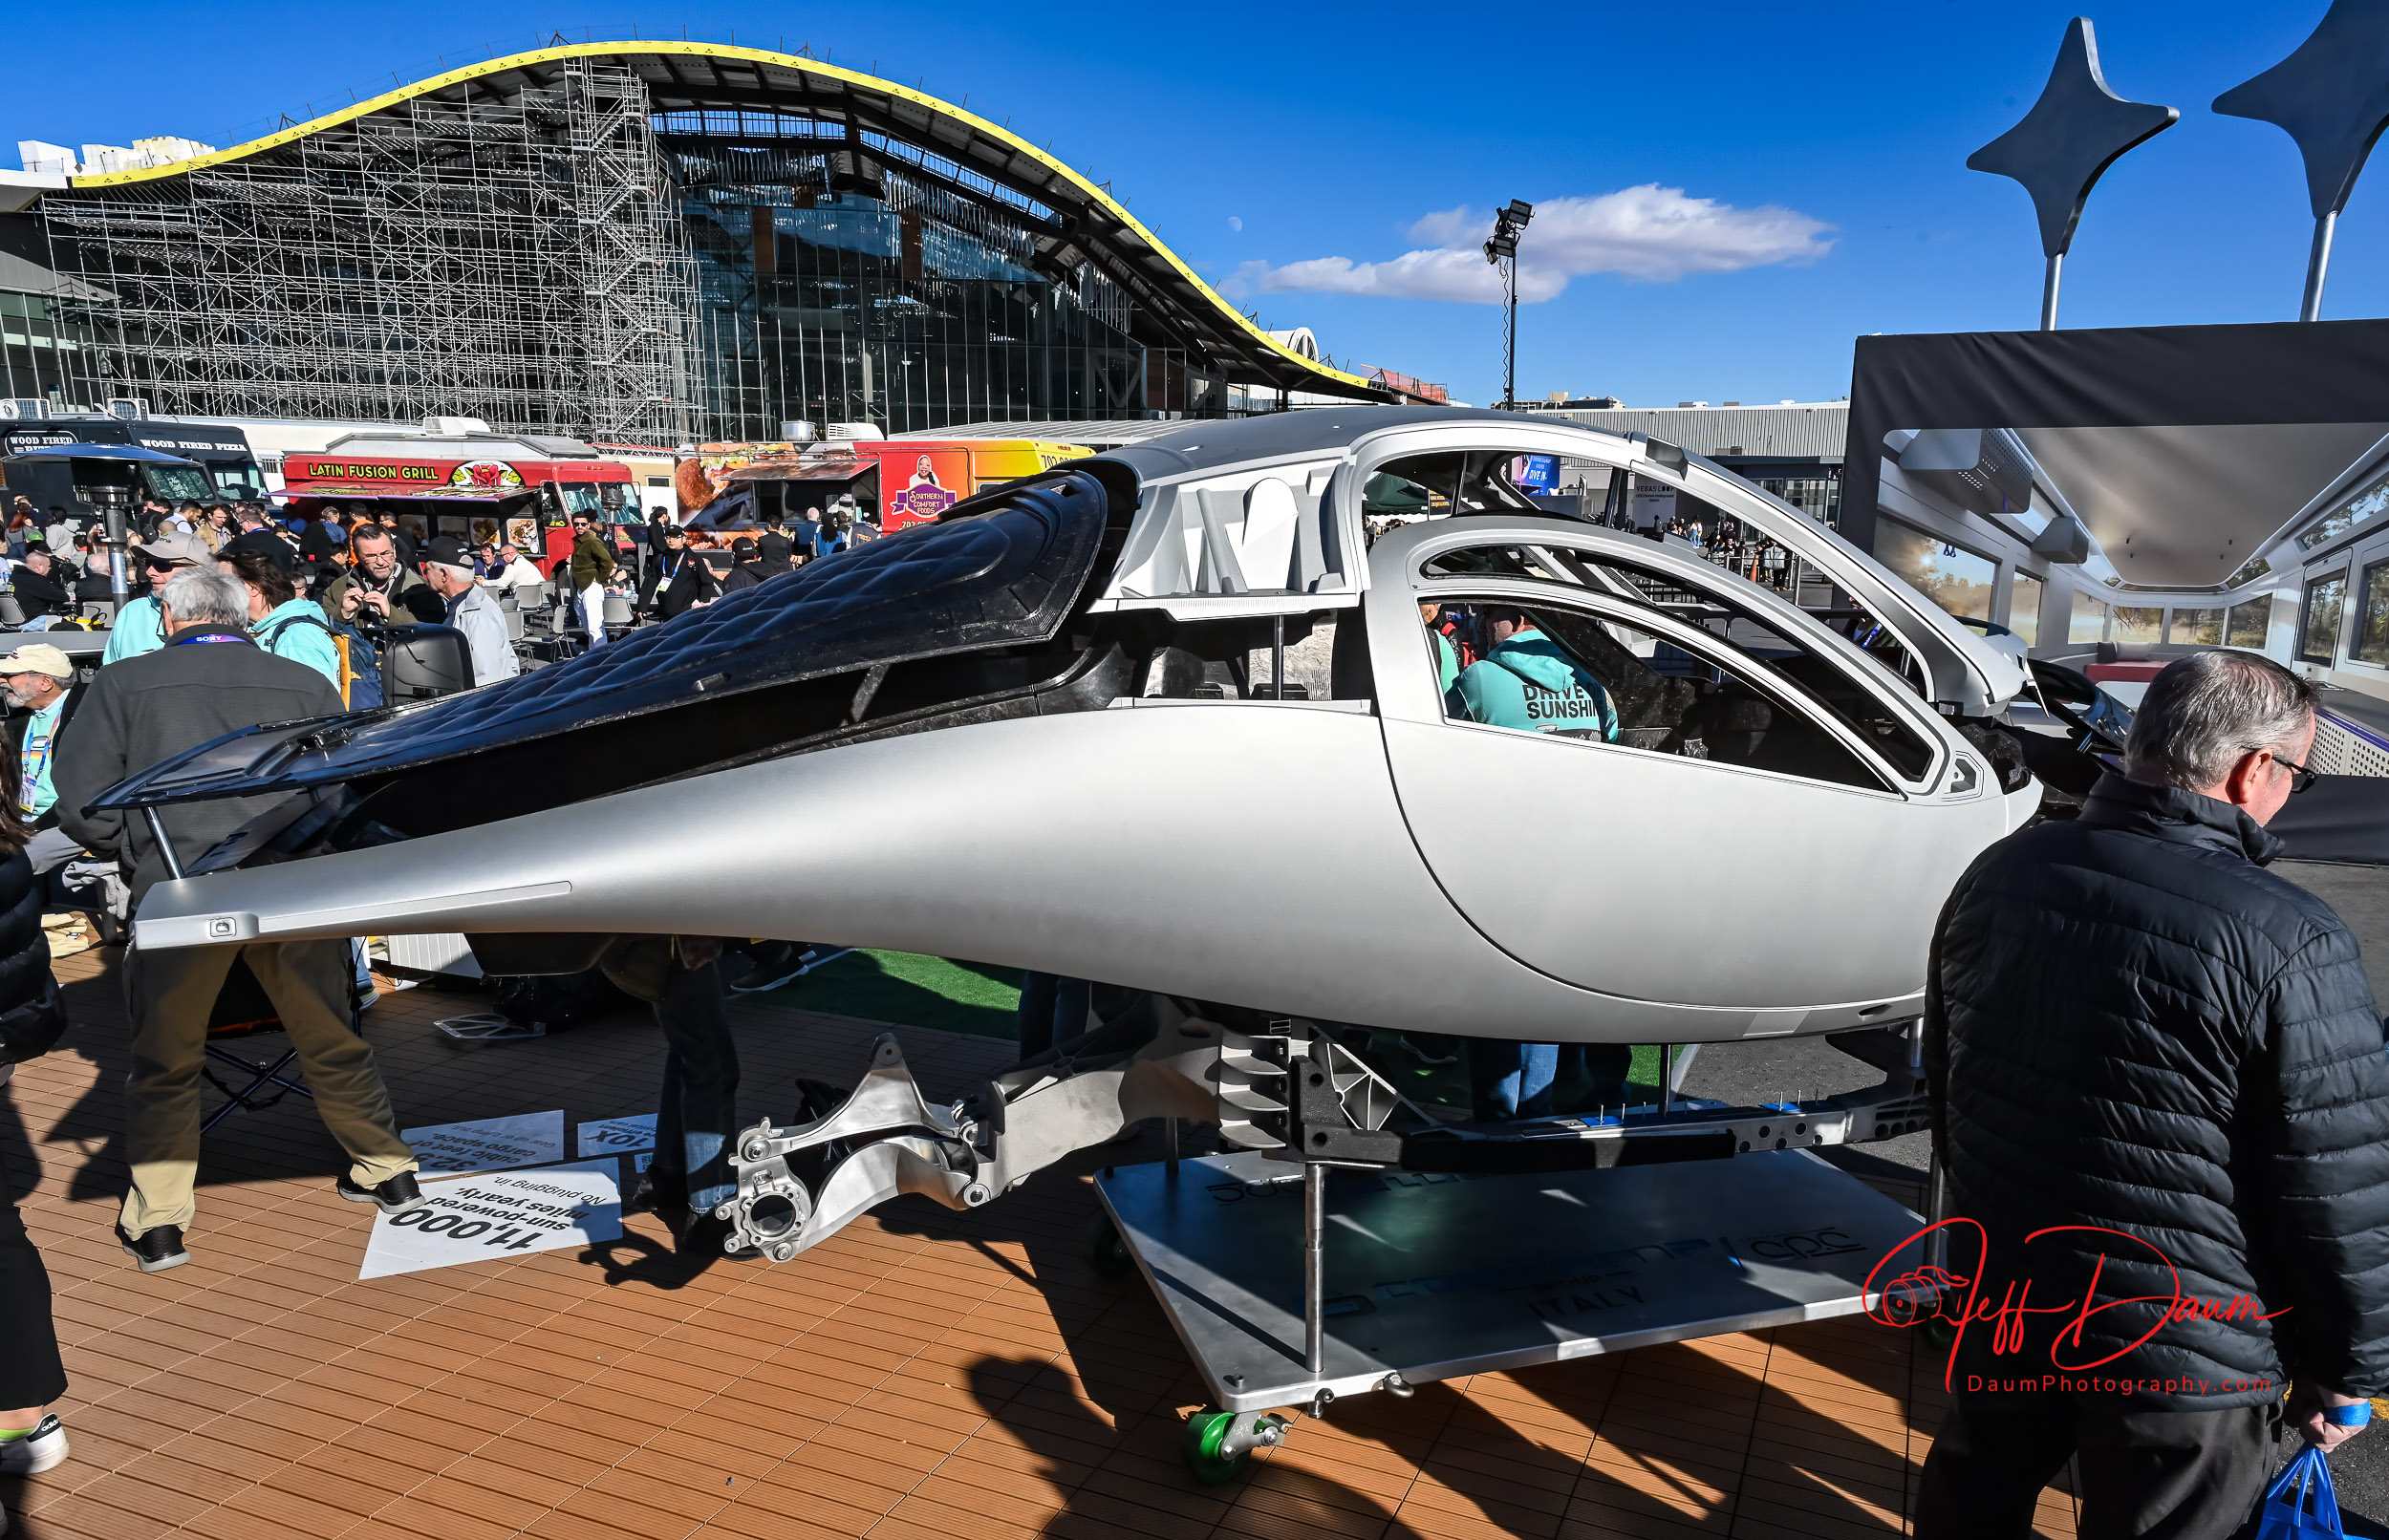
This is an initial look at the Aptera all electric solar vehicle presented at the 2025 CES (Consumer Electronics Show) in Las Vegas, Nevada.
Let me begin with a full transparency statement: I was so impressed with the Aptera, its cutting-edge technology and dual CEO team direction and commitment, that I have placed and received confirmation of a pre-order future variant all-wheel drive Aptera.
The first thing that you notice is its unique aerodynamic shape. In fact, because of this shape it has the lowest coefficient of drag of any road vehicle at approximately 0.15! The body was designed in concert with Pininfarina and is out of carbon fiber. It is manufactured in Italy and shipped to Aptera Motors facilities in Carlsbad, California.
Probably the next thing you will notice is that Aptera has two front wheels and one rear wheel- an autocycle. It is classified by the DMV as a motorcycle, specifically a Trike with full enclosure. This means that it is registered as a motorcycle but you will not need a motorcycle driver’s license nor need a helmet.
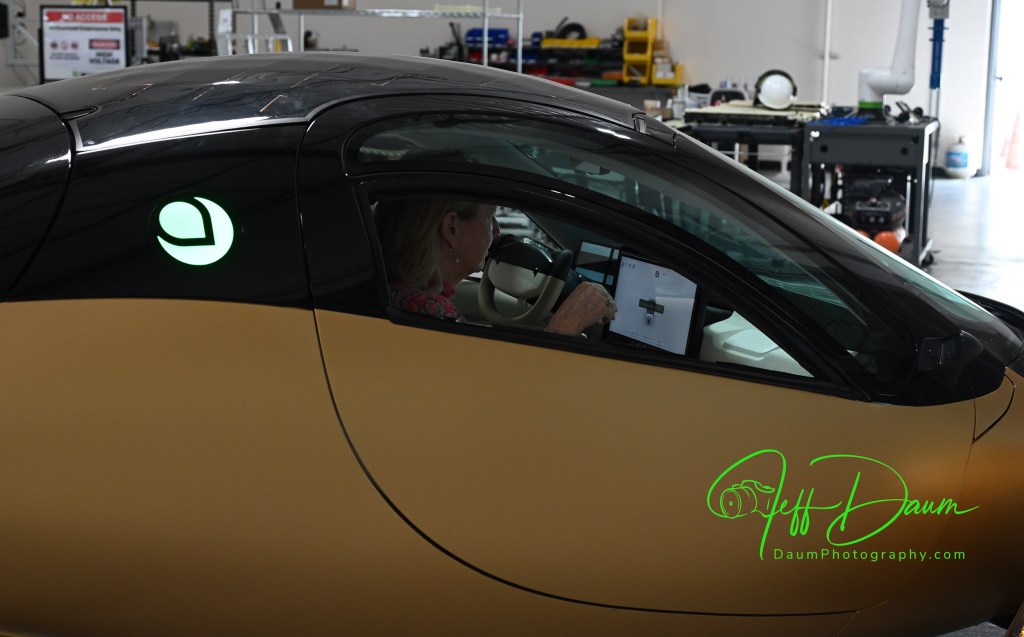
Like most sports cars, the interior includes side-by-side two passenger seating. It has all the normal accouterments: safety belts, frontal driver and passenger air bags, a steering wheel, accelerator and brake pedals, ac and heat, etc. In front of the steering wheel is a horizontal screen that continually shows full views of the right and left side of the Aptera virtually eliminating any blind spots. To the right of the steering wheel is the infotainment and information display. The electronic rearview mirror shows the unobstructed view behind the Aptera (from a camera on the roof). There is also a backup camera located adjacent to the license plate. The plate holder slides to the side, revealing the NACS charging receptor.
Aptera has bespoke solar cells on the hood, dash and roof capable of generating 700 watts of electricity. Each cell is incredibly thin, lightweight and glass covered yet capable of being bent to conform to the respective body shape. According to their website details, an individual cell could be cracked yet continue to generate power because of its unique wiring.
While I was at CES, one of the two Production Intent Vehicles was driven for 25 miles on the streets around Las Vegas. The solar cells generated and put back into the batteries the equivalent of 29 miles of electricity! Wait, what? Yes, it generated more power than it used. Of course it can be plugged in to recharge its batteries. Plugging into a regular 110-volt outlet will put approximately 150 miles of energy into the batteries overnight. It can also use Level 2 chargers which will put approximately 60 miles of energy into the batteries per hour or a DC fast charger can put approximately 500 miles of energy into the batteries in an hour. The Aptera recharges in about one fourth of the time of other EVs.
According to Aptera’s website, “the Launch Edition uses 21700 NMC 811 cylindrical lithium-ion cells, known for their high energy density and long life. The 44 kWh battery pack contains 2,304 cells, delivering 400 miles of range.” [ https://aptera.us/article/what-batteries-are-inside-aptera/ ]
I had the pleasure of talking with Chris Anthony, Founder and CEO Aptera Motors.
Chris image courtesy of Aptera
Chris’ partner, Steve Fabro, also carries the title of Founder and CEO.
Steve, image courtesy of Aptera
I started off asking Chris about Aptera’s design elements to ensure safety, Here are highlights from this interview:
Regarding Aptera’s safety: Able to do things with carbon fiber that steel and aluminum vehicles can’t do. Able to add protection such as great frontal impact strategies, offset frontal, side impact. Crash energy is diverted from the passenger area downwards to the well protected battery and frame. Aptera has front and rear crumple zones. Aptera has front and rear crumple zones and a carbon fiber roll bar.
Suspension dynamics: even though it is a three-wheel vehicle, because the heavy battery is mounted so low, it has almost the exact same suspension dynamics as a VW Golf.
Done lots of track testing and skid pad stuff, curb strike angles at forty-five miles per hour, pothole tests every which way you can think of with the vehicle, and because the battery weight is so low it is extremely stable.
We will be running Crash Tests shortly.
It has better ground clearance than a Honda Civic with six inches to the belly and five and one-quarter inches to the wheel pans, and ingress and egress a couple of degrees better than the Honda Civic.
Regarding stability, especially with the large area by the rear wheel, it has a low-profile mid-section. We have simulated cross winds up to 115 mph and it performs better than other vehicles because flat sided vehicles are much more susceptible to the winds. There is no float created because it is basically a downforce vehicle that creates a bit of downforce, though we attempted to keep it as neutral as possible.
The tires are 195-55 R16 low rolling resistance, specially formulated for them by Hankook Tires.
The ABS and airbags (passenger and driver frontal airbags) are currently undergoing calibration.
It has DC Fast Charge, Level 2 and regular 110 outlet capability. The 110-volt outlet will provide 150 miles charge overnight. The Aptera uses one quarter the energy of the average EV, meaning we charge four times faster. A DC Fast Charger will put 500 miles an hour into it, a Level 2 will put 60 miles per hour and a regular outlet will put 13 miles an hour into it.
Currently we have more than 50,000 preorders from across 115 countries, had the largest Crowd Funding in the industry with 20,000 individual investors, and now working on an IPO and hope to have production vehicles in people’s hands by the end of the year.
No dealerships, but have distribution centers around the world, and working with some Tribal communities in states that don’t like the lack of dealerships similar to what Tesla does.
In sum, the Aptiva is much more akin to a formula one car than anything else on the road. It is the penultimate in aerodynamic efficiency and has a carbon fiber chassis through and through. It is an interesting mix to try an be the most efficient vehicle in the world but also have really extreme performance, when you look at the how the vehicle is constructed and how we achieve 100-watt hours per mile and still keep safety paramount, and get all the solar power out of it we need. The Aptera is the most efficient vehicle in the world but still sporty and very nimble.
the core of our design is a safety cell crafted from Carbon Fiber Sheet Molding Compound (CF-SMC), which is both ultra-lightweight and stronger than steel, paired with metallic subframes that absorb impact energy.
Aptera’s body features a specialized composite structure known as Body in Carbon (BinC), primarily constructed from Carbon Fiber Sheet Molding Compound (CF-SMC) and Glass Sheet Molding Compound (SMC). CF-SMC is a lightweight material that utilizes a random arrangement of short fibers, allowing for the creation of intricately shaped parts with significantly higher stiffness and strength compared to standard SMC.
Aptera features an unequal-length dual wishbone suspension in the front and a double trailing link suspension in the rear. This advanced suspension system provides a balanced combination of stability, control, and ride comfort, allowing for smooth handling across diverse terrains.
The largest single component is the carbon fiber tub.
Use of SMC side panels on the body that won’t dent when hit.
Front wheel covers rotate up to allow access to tire valve stem and rear tire has a small access hole for the same purpose.
At Aptera, we’re redefining the repair experience by making it accessible, straightforward, and affordable. Whether you’re repairing your vehicle yourself or working with a local shop, Aptera will provide detailed documentation and make spare parts easy to order. Unlike typical processes where maintenance information and parts access can be limited, we believe in empowering owners with everything they need to keep their vehicles in top condition.
The Launch Edition’s dimensions are optimized for aerodynamics and stability. The vehicle measures 15 feet (4.56 m) in length, 7.3 feet (2.22 meters) in width, and stands 4.6 feet (1.4 meters) high, with a wheelbase of 9.2 feet (2.82 meters).
Aptera has integrated the Vitesco Technologies’ EMR3 drivetrain—a high-voltage axle drive that combines a permanent-magnet synchronous e-motor, inverter, and reducer in one compact unit.
Final thoughts:
I had a chance to sit in the Production Intent Aptera and found the seats very comfortable. The interior is airy with great outward visibility. The ‘double knock’ to open the door or trunk is a fun twist- there are no outside door handles. The trunk is quite spacious, easily carrying two regular golf bags or even, apparently, with the seats folded forward, room to lie down if you take the Aptera camping. There is also a small compartment under the regular rear floor that can be used to store charging cables or other supplies.
I am particularly impressed with Chris and Steve’s vision and approach. They are continually striving to use their own and their team’s knowledge, seek and use outstanding third party input and resources, and harness AI to refine the Aptera to be highly efficient, practical and fun. The use of Open-Source Software and Right To Repair sets the Aptera apart.
Of course, the ‘elephant in the room’ question, unanswered at this point is whether Aptera will make it where many others have failed. Their concept appears sound, the technology is there, Production Intent Vehicles validated, but the financial green light is still pending. According to Scooter Doll writing for electrek on Nov 5, 2024: “Last we heard, Aptera had raised over $135 million from over 17,000 investors, which the startup touted as the most successful crowdfunding raise in history. However, the company shared that it would need another $60 million in additional funding to begin low-volume SEV production, now slotted for late 2025.”
This is hopefully Part 1 of a multipart Aptera review. Stay tuned for Part 2: a factory visit and first drive…
Thanks for visiting and reading. What are your thoughts on the Aptera? If you have a question or comment, please feel free to enter it below!
BlackVue represents some of the best dashcam systems on the market. You can see my reviews of previous models at for the DR970X https://insight.daumphotography.com/2024/02/02/blackvue-dr970x-2ch-plus-and-dr970x-2ch-lte-plus-dash-cameras-field-test/ and https://insight.daumphotography.com/2020/07/11/product-review-blackvue-dr900s-2ch-field-test/ for the DR900S. This review focuses on BlackVue’s new DR770X Box-3 channel Pro version. It is primarily designed for the individual who wants up to three cameras- a front facing, rear facing and interior facing dashcams, and a system that is designed to provide protection from someone else getting to the recording memory card or attempting to physically remove the connections to each of the dashcams. You might want this added security, for example, in a ride share or taxi vehicle. Of course, the DR770X can be used in your own vehicle even if you don’t need the added security of a tamper proof set up.
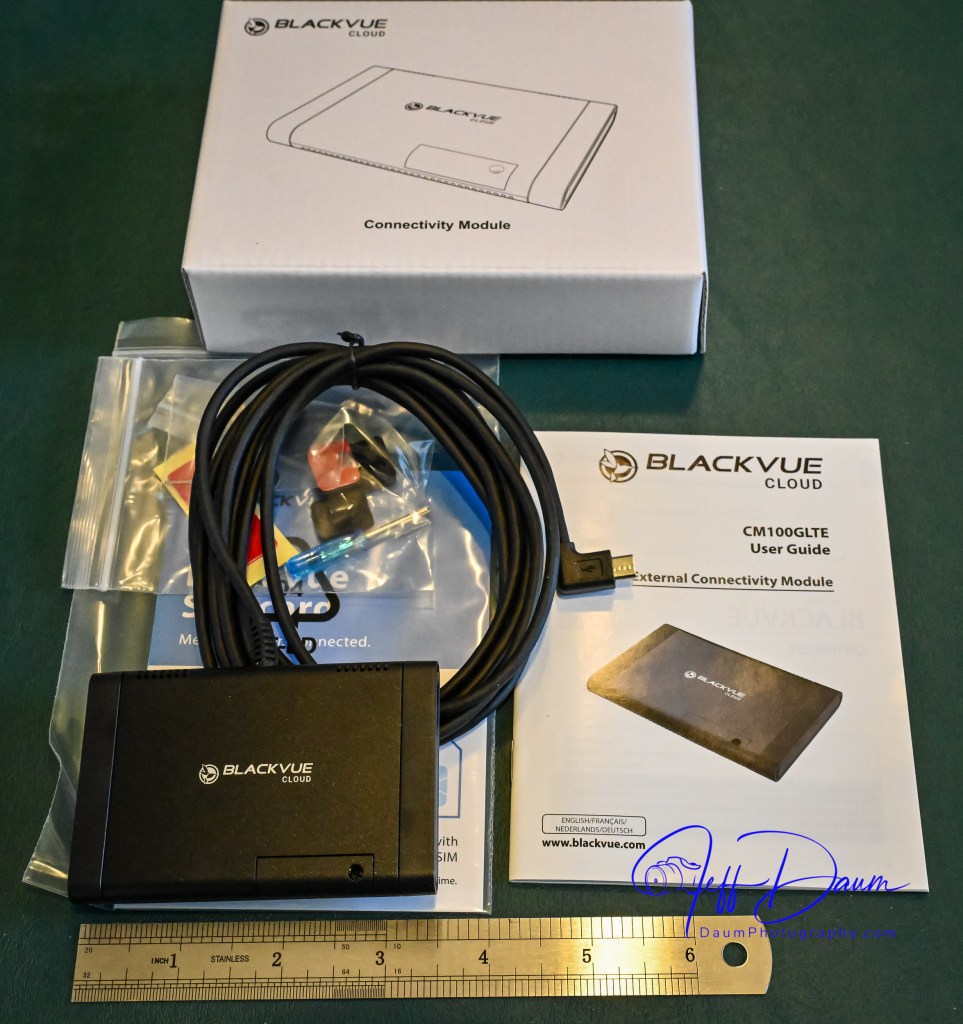
What is in the box and specifications
In the DR770X Box-3 channel Pro set you receive three dashcams, front facing, rear facing and interior facing dashcams, a central box that connects the three dashcams, the power cable, and the microSD memory card. There is also a separate GPS logger and Wireless Button. The set includes all the necessary hook-up wiring including both accessory plug or direct to fuse box hardwiring power options, a pry tool and spare 3M adhesive pads and Quick Start Guide.
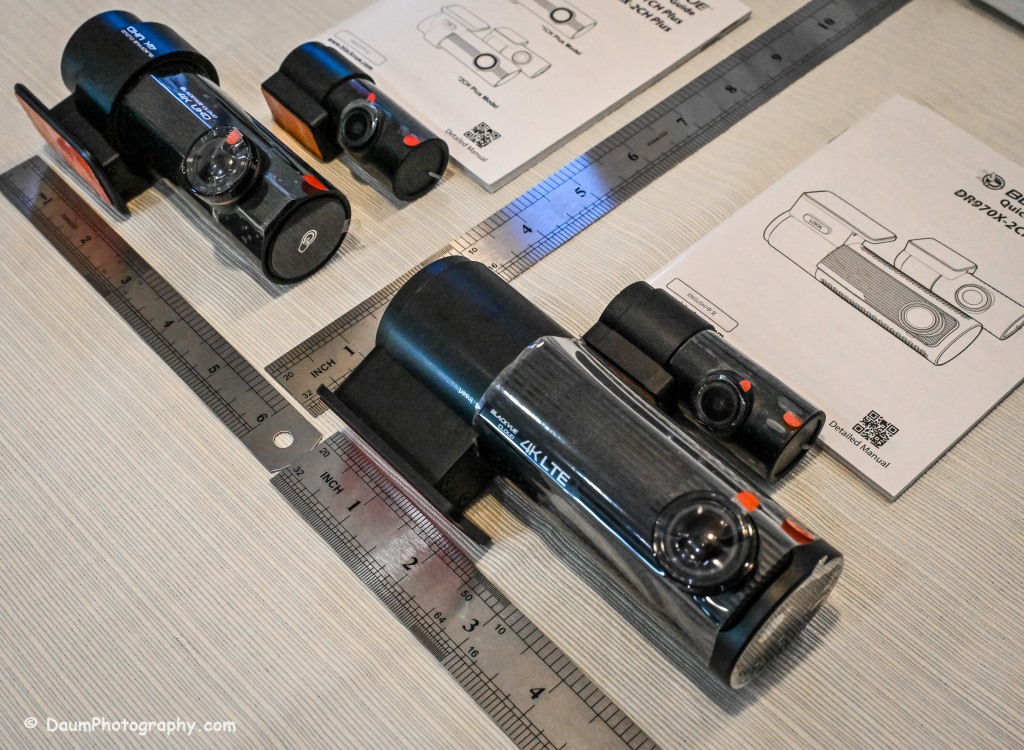
The first thing you’ll notice is that the front facing DR770X is physically a lot smaller than most other BlackVue dashcams. Specifically, the DR770X is approximately 3 inches (76mm) long compared to their DR970X and DR900S at approximately 4.7 inches (118.5mm) long or the even longer DR970X-2CH LTE Plus at approximately 5.4 inches(137.6mm).
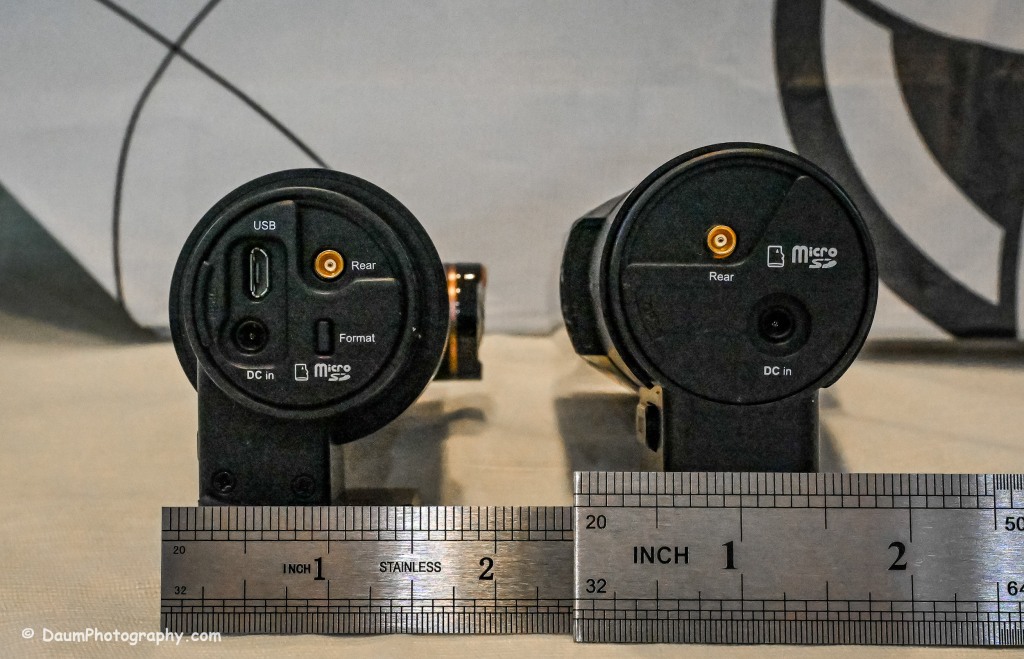
One reason for the smaller front (main) dashcam size is that the DR770X has an external GPS antenna/receiver that must be plugged into the ‘locking main box’ and does not incorporate a MicroSD memory card slot. The DR970X and DR900S incorporate both the MicroSD card and GPS into the front dash cameras. The DR770X uses a lockable main box that includes connections for the front facing (main) dashcam, the IR internal facing dashcam, rear facing dashcam, MicroSD card, power supply, and GPS. Note, if you order and use the optional external LTE BlackVue cloud Connectivity Module you do not need the GPS module, since the Connectivity Module has GPS built into its antenna that goes onto the windshield. The optional LTEConnectivity Module connects to the main box instead of the GPS module at the same port. In addition to the main box being lockable so that neither the camera connections nor the MicroSD card can be removed without the key, each camera has tamper proof caps that secure both the connecting cord and the camera to the windshield mounting bracket.
The lockable main box comes with a large Velcro pad on the back so that it can be positioned out of sight but convenient to remove to gain access to the microSD card.
While BlackVue’s marketing states the DR770X has a faster lens at f/1.7, it depends on what other dashcam they use in the comparison: The DR970X Plus also has a f/1.7, but the DR970X’s is f/2.8.
The DR770X has a narrower coverage area with Diagonal 139°, Horizontal 116°, Vertical 61° for the front camera and Diagonal 115°, Horizontal 95°, Vertical 49° for the rear facing camera. The DR970X has front: Diagonal 155°, Horizontal 130°, Vertical 70° and rear: Diagonal 139°, Horizontal 116°, Vertical 61° while the DR900S had front: Diagonal 162°, Horizontal 136°, Vertical 77° and rear: Diagonal 139°, Horizontal 116°, Vertical 61°.
The DR770X is a 4K dashcam with Sony STARVIS, the DR970X and DR900S an 8-megapixel CMOS Sensor.
The DR770X Pro has an increase in the event buffer recording time to 10 seconds up from 5 seconds compared to prior models. Events are when the system senses a bump, hard turn, crash, etc., and automatically mark the recording as such preventing it from being overwritten when the MircoSD card is full.
Note: prior to setting up your DR770X system in your vehicle, I suggest you jot down the unique password that is on the camera behind the tamper proof end cover. You will need this if the auto-find in their app doesn’t locate and load your cameras on your initial set up.
All three models incorporate a built-in microphone in the front facing camera that can be set to always record interior sounds (voices, turn signals, music, etc.) or be turned off. They also include a speaker that lets you know the system is functioning when it turns on.
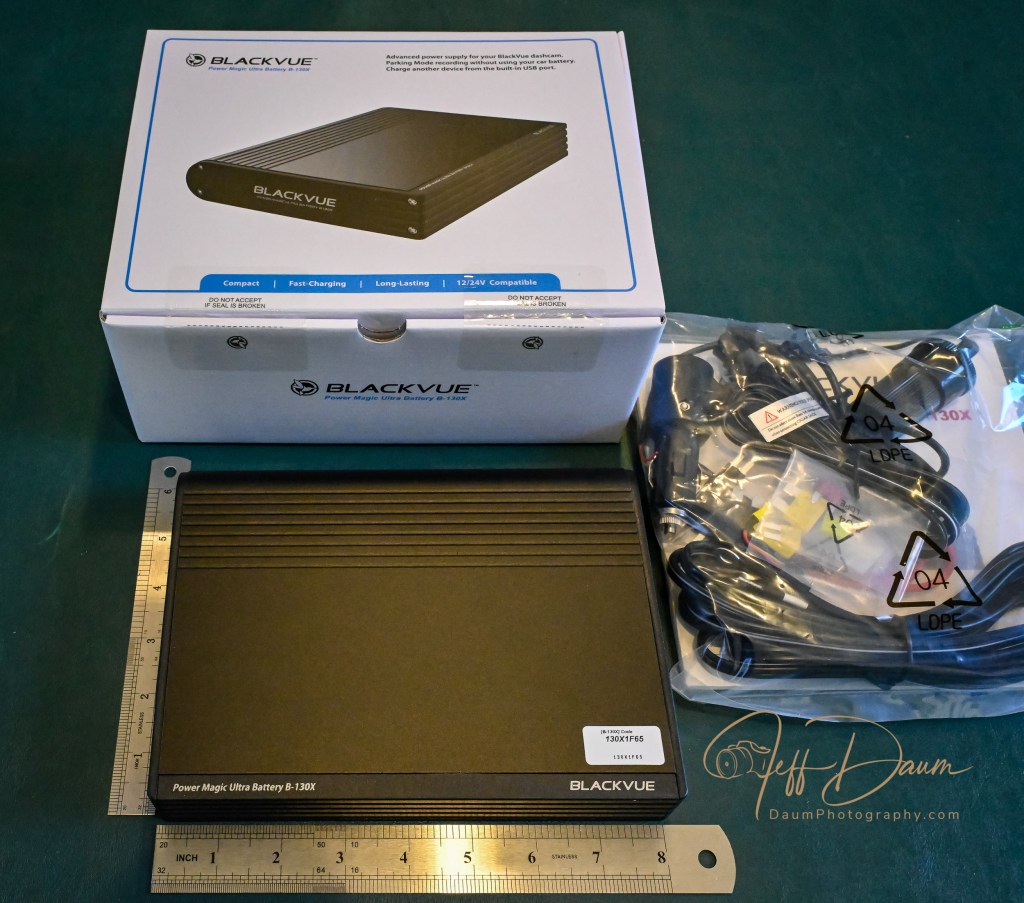
At the same time I tested the DR770X Box-3 channel Pro, I tested BlackVue’s LTE BlackVue cloud Connectivity Module and their B-130X Power Magic Ultra Battery system.
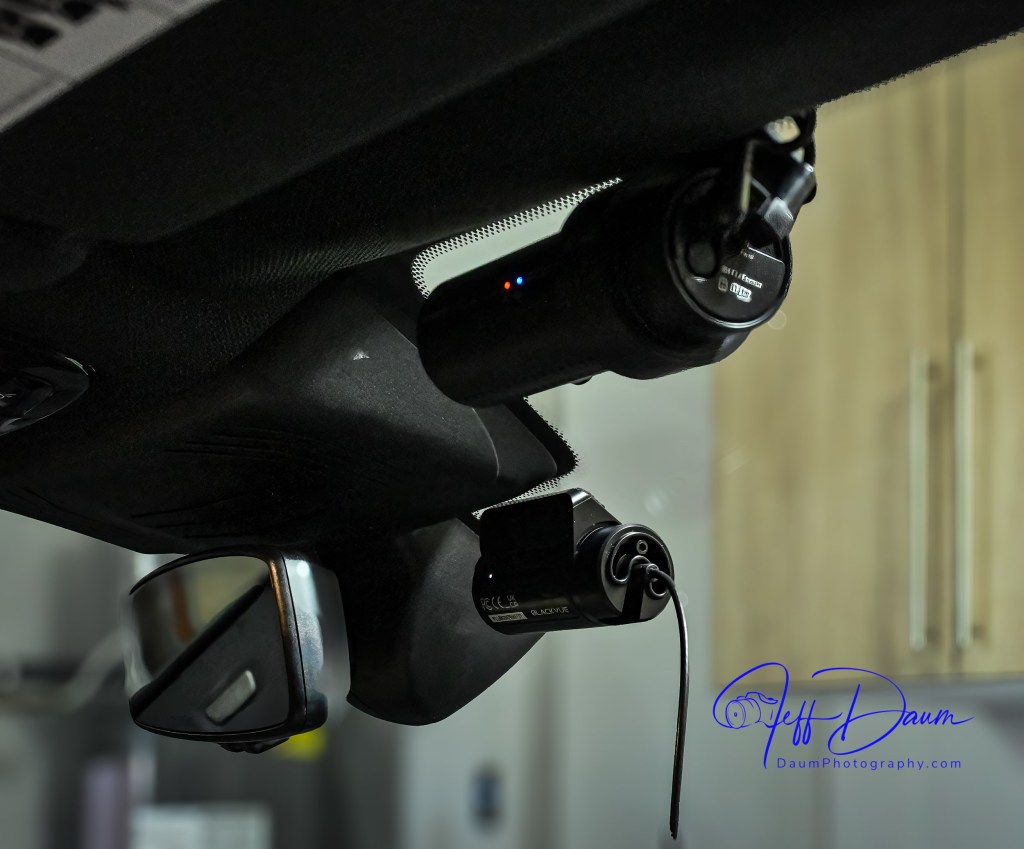
The DR770X dashcams were tested by mounting them in nearly the same perspective on the front and rear windshields as the DR900S, as can be seen in these images.
The main lockable box and B-130X Power Magic Ultra Battery were temporarily placed on the floor, with the GPS module or the LTE BlackVue cloud Connectivity Module antenna temporarily mounted near the top of the windshield.
Field Test
In this as well as all my tests, the images here are unmodified and based on the factory settings, which can be fine-tuned if one wants to.
Here is a look at the front facing cameras during the day. In this comparison the DR900 images are slightly darker than the DR770. The DR900 has a wider perspective, meaning you would see vehicles on either side earlier than with the DR770. Both systems capture solid images along with documenting your position and speed (though you can turn that off in the set-up). When I looked at enlarged images, the DR900 captures a bit more detail than the DR770.
[Note: a higher resolution video can be seen by clicking on “Watch on YouTube” in the lower left section of each video]
Here is a comparison of the rear facing cameras, with similar conclusions as the front facing cameras. Again, the DR770 has a smaller angle of coverage with its rear facing camera than the DR900S.
Turning to night captures, the front facing DR900 appears sharper with less flare around bright lights than the DR770.
Looking at the night rear facing cameras, the DR900 has more flare around bright lights than the DR770, but still a bit more detail on examination.
The interior facing camera of the DR770 provides similar quality during the day to the front facing camera, but with a much wider range of 180 degrees. It captures everything from the driver door to the passenger door and back seat. This camera includes Infrared LEDs and sensors that automatically come on in low light, providing clear images in total darkness.
The B-130X Power Magic Ultra Battery is an excellent solution for continuing to record once you turn off your vehicle. Many new model vehicles have battery management software built-in that monitors all power draws once the vehicle is shut off. In most cases this means even if you use a ‘Parking Mode’ setting on a dashcam, the software will terminate its draw (power) at a specific point and no longer record. The B-130X Power Magic Ultra Battery provides a safe means to get around this. The unit charges up when the vehicle is running and then automatically switches the power feed to your BlackVue dashcams when it senses the vehicle is turned off.
The B-130X Power Magic Ultra Battery can be connected to your vehicle power source either by plugging into the accessory outlet or by hardwiring through your fuse panel. If you use the accessory outlet it takes about 90 minutes to fully recharge the B-130X from ‘dead’ or empty. The faster method is accomplished by directly connecting to your fuse panel, where it takes only about 50 minutes to full from empty.
The B-130X Power Magic Ultra Battery software will automatically sense when you shut off your engine and switch your dashcams to draw from the Power Magic Ultra Battery. BlackVue states the B-130X will power a single dashcam for more than 30 hours or dual dashcams for more than 19 hours. In my field test, it easily powered the front and rear cameras throughout the night. You have optional settings on how the BlackVue dashcams record in parking mode including motion activated, continuous recording, interval recording, etc. Motion or interval recording will greatly reduce the amount of storage space taken on the MicroSD card. Any ‘event’ recording (from a bump or hit on the vehicle) will be protected from being overwritten the same as occurs during normal driving.
The free BlackVue app provides easy access to check on the B-130X remaining power. If you have the optional LTE Connectivity module connected, the app also allows you to see what your dashcams are seeing, stored recordings, etc. Even if you do not have the Connectivity module, the app will allow you via WiFi to see what your cameras are seeing and to modify their and the system’s settings.
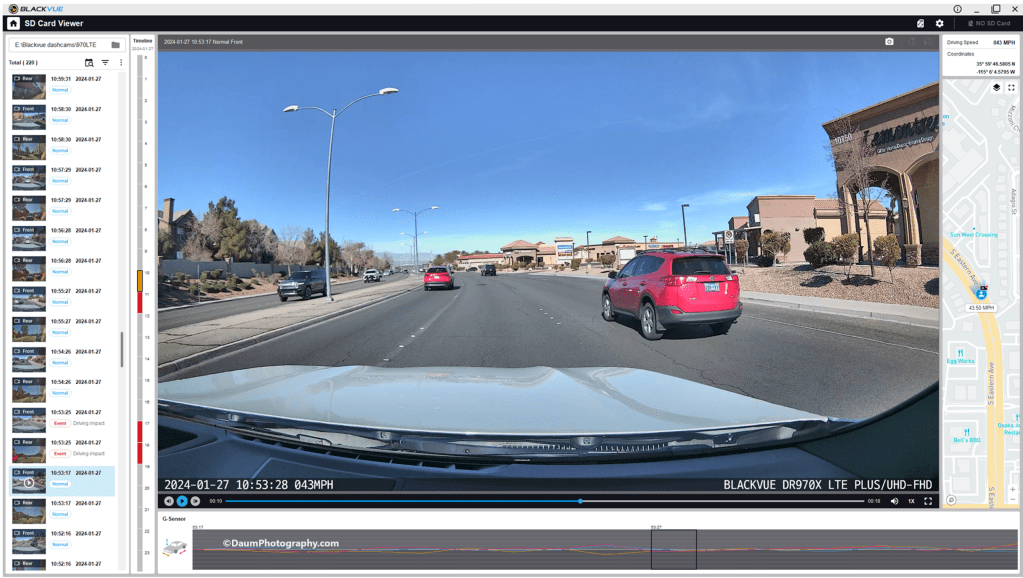
There is also a free BlackVue app for your computer that is very useful. While you can remove the MicroSD card and view the recordings on your computer without the app, the app offers several real advantages. When you use the app to view your recordings, it enables you to see all cameras (front, rear and interior) simultaneously as well as providing a sidebar with a dynamic map and GPS position. Another nice function of the app is it will automatically join the individual recordings one after another, simplifying the viewing.
Here is a screen shot of what the BlackVue computer app looks like with the DR770X. On the right side of the screen, you see a narrow column with a dynamic map showing my vehicle’s position with street names, my speed, and actual GPS coordinates. On the bottom of the screen, you will see a line with date, time, vehicle speed, and the BlackVue camera(s) on the recording. In the main part of the screen, you see a picture in a picture that has the rear facing camera and the rest is the front facing camera. You can adjust what is included in the screen.
When you look at the following example from the app, you can see how the map is dynamic, and somewhat amusing, the white van will attempt to cross three lanes nearly perpendicular to the flow of traffic!
Preliminary Field Test Conclusions
Set up of the DR770X was straight forward, especially since this system uses the included wireless button to pair the cameras with the BlackVue phone app. Once you power up everything, you simply press the wireless button which pairs with the app, and then you use it to confirm the DR770X cameras you installed. Once that is done, you are all set. You can use the system immediately or use the app to modify software defaults.
As in prior comparisons, BlackVue continues to produce top line dashcams with the most important features built in. Of course, quality does come at a price with the DR770X 3CH Pro including a 64GB microSD card retailing at US$474.99.
The Power Magic Ultra Battery B-130X retails at US$359.99. The LTE module retails at US$159.99.
BlackVue customer service has been excellent in responding to any set up questions and/or issues.
The BlackVue DR900S has been in my vehicle for nearly 5 years now and has performed flawlessly in all temperatures from freezing to extreme desert heat. I have no reason to think the new DR770X Box-3CH Pro series won’t perform equally well and it adds the ability to have the IR interior camera along with added security of the locking main box and tamperproof camera mountings.
BlackVue states that you should use their microSD cards for optimal performance. I experimented early on with several non-BlackVue microSD cards (all were name brand high-quality professional level cards, designed specifically for handling the frequent record events typical of security cameras designed for video recording), and while they would work for a period, inevitably they would stop working or have glitches. Once I went back to BlackVue’s own card I never had it stop working or fail.
These cameras offer pricing plans for saving files to the cloud as well as in the case of the option LTE connectivity module, a built-in SIM card to simplify the recording directly to the cloud. As noted, it is easy to either download the video files or temporarily remove the microSD card and transfer the files to your computer.
The fit and finish of the new DR770X is excellent and all the components included are high quality.
If you are highly concerned about your vehicle when it is parked and unattended, you should consider purchasing the optional Blackvue Power Magic Ultra Battery. I was impressed with how it elegantly solves the OEM battery management software issue. I am adding it to my cars.
A final thought worth repeating from my earlier reviews: Many of my readers have asked ‘Do you really need a dashcam, and if so which one?” Hopefully this review is helpful in reaching a decision. For me personally I always want to have documentation of what is going on around my vehicle when I am driving, so all my cars have dashcams and when I rent a car, I put in a portable dashcam before I leave the lot. I also find it is nice to have videos of scenic drives and the ones from BlackVue are perfect for this.
Thanks for visiting and reading. If you have a question, please feel free to ask below!
While I was at CES 2024 (Consumer Electronics Show) in Las Vegas, Nevada last month I attended the JETRO (Japan External Trade Organization) session. One of the demonstrations was both at the same time incredibly simple yet producing an almost unbelievable outcome. It was put on by Sound Fun Corporation of Japan demonstrating the technology behind their new Mirai Speaker. In essence they developed and patented the AudibleWave™ Technology used in the Mirai that helps produce clear dialog from televisions. Based on some initial research by a university professor that found elderly individuals could hear music more easily when it was played through an old style gramophone, they spent years perfecting how to curve sound when projected from speakers so that it can be more easily heard and understood. The demonstration was done using just his unamplified voice either behind a straight piece of plastic sheet or curving the same sheet, so it bowed out in the center towards us. When he spoke through the straight sheet it was hard to clearly hear him, however, when he curved the sheet, you could easily hear and understand what he was saying.
Here is a similar demonstration from Sound Fun’s website.
Courtesy Sound Fun Corporation
This was intriguing to say the least. So, when their team offered a Mirai Speaker unit to review I jumped at the opportunity.
Here is what the Mirai Speaker looks like as unboxed:
The Mirai Speaker is very well made and finished. The unit weighs 3 lbs. 10.6 oz/1.6625kg and is 21” W x 6” D (at its widest point) x 3.5”H/542mmW x 160mmD x 87mmH. It was designed and developed in Japan and manufactured in Vietnam. It retails for US$299. The unit is well packaged and comes with everything you need to set it up and start using it including a remote with two AA batteries, two means of connecting it to the sound source: Optical cable or analog audio cable, AC power supply and instruction pamphlet.
It is primarily intended to be connected to a television using either the optical output or analog output connection. In addition, the unit needs to have its small power adapter plugged into an AC outlet. If you use the optical outlet, you have two ways you can listen to the television. You can use just the Mirai Speaker system or use a balance between the television and the Mirai Speaker. If you use the analog outlet, you cannot use both simultaneously.
Initial Impressions
The setup was straight forward and easy. Even though the instruction pamphlet states it may take a few days to notice a real difference when using the Mirai Speaker, the effect of their AudibleWave™ Technology was immediately apparent in doing comparisons of just television speakers versus just the Mirai Speaker. It wasn’t louder but was a cleaner, clearer sound with respect to any dialog. It will take some time to refine the balance between the regular speakers and the Mirai Speaker for the best overall sound for example, in watching a movie.
So, in a word does it work? Yes. I believe this would be a nice reasonably priced addition, when you have one or more individuals in your home with some hearing loss normally associated with aging. I plan on doing more testing and also trying it incorporated into a full surround sound system set up. Stay tuned!
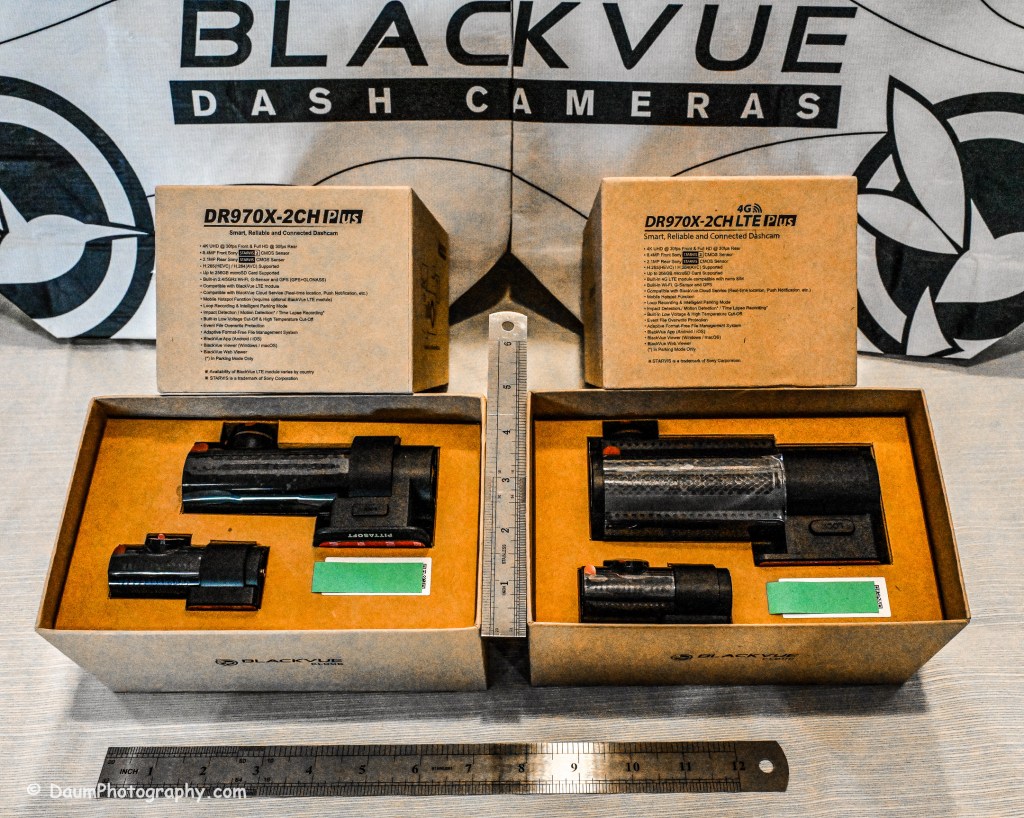
The focus (yes, literally and figuratively 😊 ) of this review is a comparison of two new BlackVue dash cameras, DR970X-2CH Plus and DR970X-2CH LTE Plus, to my current benchmark, the BlackVue DR900S-2CH camera unit. I reviewed the DR900S in 2020 and found it to be an excellent choice out of the already crowded field of dashcams. You can see my review here https://insight.daumphotography.com/2020/07/11/product-review-blackvue-dr900s-2ch-field-test/ . The new DR970X Plus units were provided to me by the Marketing Team of Pittasoft Company, who manufactures the BlackVue units in their own factory in Korea.
Technically speaking based on BlackVue press releases, the DR970X Plus appears to have several improvements over the DR900S including a faster processor chip, improved CMOS sensors, and in the case of the DR970X-2CH LTE Plus, built in SIM card capability. Top of my interest in carrying out this comparison and review is the DR970X Plus noticeably better in actual day-to-day use?
Before jumping into the field results, here are some of the respective technical specifications.
Physical dimensions:
The DR970X-2CH Plus and DR970X-2CH LTE Plus have identical core components, that is, the lens, sensor, chips, etc., with the exception that the DR970X-2CH LTE Plus has a built-in LTE SIM micro card receiver and related circuitry. This results in the DR970X-2CH LTE Plus being a little larger and slightly heavier than the sister unit.
DR970X-2CH LTE Plus vs DR970X-2CH Plus vs DR900S:
-Weight with mount: 6.8 oz (192.7g) vs 5 oz (141.7g) vs 4 oz (113.39g)
-Dimension: 5.42in (137.6mm) L x 2.67in (60.3mm) W x 1.69in (43mm) H vs 4.67in (118.6mm) L x 1.86in (47.7mm) W x 1.4 (36mm) H vs 4.66in (118.5mm) L x 1.4in (36mm) H
The rear camera is essentially physically the same on all three models: 2.6in (66mm) L x 1.1in (27.94mm) D and 1.0 oz (28.35g)
The DR970X Plus and the DR900S are almost the same physical size and weight, with the DR970X-2CH LTE being almost 2 ounces (56g) heavier as well as somewhat longer and rounder than the other two.
The lenses:
The DR970X-2CH Plus cameras (remember, both units are identical with respect to cameras and image capture) have a 125-degree horizontal and 68-degree vertical lens in the front unit, with a 107-degree horizontal and 55-degree vertical viewing angle in the back camera. The DR900S-2CH camera has a slightly wider capture with a 136-degree horizontal and 77-degree vertical lens in the front unit, with a 116-degree horizontal and 61-degree vertical viewing angle in the back camera.
The resolutions and frame rates are identical for all three units at their highest settings: 3840×2160 @ 30 fps.
Image quality for the DR970X-2CH Plus units is 60+10 Mbps at the highest setting vs the DR900S is 25+10 Mbps, and all three have the same 8+6 Mbps with quality set to Normal.
Compression Codec is the same on all three units: H.265 (HEVC), H.264 (AVC)
Additional technology:
The DR970X-2CH Plus cameras use a STARVIS 2 CMOS Sensor of approximately 8.4 Megapixels on the front camera and a STARVIS CMOS Sensor or approximately 2.1 Megapixels on the rear camera, while the DR900S uses an 8-Megapixel CMOS Sensor on the front camera, and a Sony STARVIS CMOS Sensor of approximate 2 Megapixels on the rear camera.
All three cameras record in 4k UHD front and full HD rear.
All three camera units have built-in GPS but the DR970X Plus has dual band GPS, GLONASS. They also have built-in WiFi with the DR900 supporting 802.11 2.4 GHz and 802.11 ac 5GHz dual band while the DR970X supports 802.11 a.b.g.n.ac.
All three record automatically when powered up and automatically over-write Normal recordings when the microSD card is full. They also record and preserve impact detection events that occur while driving and while in parking mode (if powered). Manual recording is also preserved. They can take microSD cards from 16GB to 256GB (but strongly recommend only using BlackVue cards- more on this later). Power is retained for a short period after shut down via built-in Super Capacitors.
All three cameras have a built-in microphone and speaker. One or both can be turned off via the BlackVue app.
All three camera units offer video recording saving to the cloud using optional paid plans, and the DR970X-2CH LTE Plus includes a free one-month trial SIM card and optional paid plans. However, you don’t have to use the cloud and can either view your saved videos or live images by means of the free BlackVue phone app. You can also download to your phone or remove the microSD card and transfer the files. More on this shortly.
Power consumption per hour (really only important if you are using a dashcam in Parking Mode with the engine turned off) as expected, highest for the DR970X-2CH LTE being 590mA/12V in Normal Mode, 430mA/12V in Parking Mode vs the DR970X-2CH Plus at 480mA/12V Normal Mode, 370mA/12V Parking Mode vs the DR900S 380mA/12V in Normal Mode (Parking Mode was not part of the DR900S, so no equivalent power consumption available)
Recorded file size: The typical DR970X Plus series front camera file size per recording (each is 1 minute in length) is 443 MB and for the rear camera 79.7 MB, while the DR900S file size per recording (1 minute in length) is 188 MB and for the rear camera 81.1 MB. So, the DR970X Plus files for the front camera are more than 2.3 times larger than the DR900S, while the rear camera files are close in size. This means that your microSD card is going to hold less than half the videos before it starts over writing as compared to the DR900S.
All come boxed with everything you need for either accessory plug powering or hard wire powering (both sets of power cords included), a starter BlackVue microSD card, connector line for linking and powering the rear camera, plastic trim pry tool, 3M adhesive for the cameras, small self-adhesive wire holders, Quick Start Guidebooks and a set of ‘nifty’ BlackVue stickers. In my experience, the supplied power lines (hardwire or accessory, and rear camera) are more than adequate for proper setup in most vehicles.
Here is what the unboxing and components look like:
Preliminary Field-Testing Results
Though I will not cover permanent mounting in this review, it is fairly straightforward. Running and tucking (hiding) the wiring needs some patience and varies from the OEM and type of your vehicle. For an example you can check out my install in a BMW X3 here https://insight.daumphotography.com/2020/02/19/blackvue-dr900s-2ch-dash-cameras-install/ . I will be doing a hardwire installation within a few months in a couple of different vehicles- a BMW i4 and a Chevrolet Corvette. A link will be provided to that when available. While these cameras all (the DR900S needs the optional Parking accessory wiring component) support automatic switch over to ‘Parking’ recording when hardwired, many vehicles today have battery management software built-in that will either cut the power to the dashcam or cut other non-essential power draws when the vehicle is turned off and the draw exceeds a certain level, to ensure the main battery has sufficient power remaining to start the engine. You can buy optional battery packs to power a dashcam for a specified amount of time, typically from a few hours to a few days by piggybacking them per manufacturer’s directions. BlackVue sells them for their cameras as do other organizations. Currently these battery packs add considerable cost especially if you are looking for several days of parking coverage. Beyond that, long term parking will require the auxiliary battery packs get recharged either by removing them to charge them or by a solar panel placed in the windshield if feasible.
The videos (MP4) can be viewed and/or downloaded through the excellent (and free) BlackVue app, or you can remove the microSD card and load the files onto your computer. Again, BlackVue has an excellent app for either PCs or Apple (I will discuss it shortly). For this review I removed the respective microSD cards and transferred the videos to my PC. All video captures and still images presented here are not retouched or corrected and appear as recorded. In some examples I have enlarged or cropped images for easier evaluation.
As I stated in my earlier dash camera review, for most dashcam users, the primary purpose is to document traffic as you are driving. Dashcams have become popular as a means of providing evidence in the event of road rage and/or an accident. Ideally the dashcam will capture clear, time and gps marked images, both during daytime and nighttime driving to aid in this objective. To begin evaluating how well these BlackVue cameras achieve this, let’s first look at a short comparison between the DR970X Plus and the DR900S.
A couple of observations- both BlackVues do well in documenting what is happening. To my eye, the DR900S images are slightly sharper during the day than the DR970X, while the opposite is true of the nighttime images. This is probably a result of the new STARVIS 2 CMOS Sensor in the DR970X. I should mention that Pittasoft has indicated a firmware update is planned for the DR970X series, while I don’t know what it will fix, perhaps focus refinement will be part of it.
You might be wondering what is in the right side of the DR900S. That is actually the bracket supporting the two DR970X cameras mounted below. Here is the set up I used:
Here are comparisons between the DR970X Plus and DR900S where you can see both the respective front and rear facing camera views, one day time and one nighttime set:
By the way, those simultaneous front and back views were generated using the free BlackVue PC app. It is a very easy to use application that also can show each video along with a GPS location on a dynamic map, as well as a g sensor graph. The g sensor shows any impact or bumps/rough road (which will also result in the video getting an “Impact” vs “Normal” label. Here is what it looks like:
Here are some still images with the DR900S on the left and DR970X on the right:
Front camera
Rear camera
As with the videos, the greatest difference between the DR900S and DR970X is in the nighttime comparisons. All images are viable straight from the respective cameras and could, if necessary, be sharpened with editing software. One real advantage of the DR970X Plus series is that the WiFi is always on and that allows you to quickly view any saved or live images using the BlackVue app on your phone. For the DR900S you have to turn on the WiFi at the front camera unit by pressing a button until it turns on (and it will automatically turn off in a few minutes). Once turned on you can then link to the camera using the app.
Summary
As in prior comparisons, BlackVue continues to produce top line dashcams with the most important features built in. Of course, quality does come at a price with the DR970X 2CH Plus including a 64GB microSD card retailing at US$474.99 and the DR970X LTE 2CH Plus including a 64GB microSD card, SIM card with a free trial of 1GB for one month retailing at US$544.99. The BlackVue DR900S has been in my vehicle for four years now and has performed flawlessly in all temperatures from freezing to extreme desert heat. I have no reason to think the new DR970X Plus series won’t perform equally well.
BlackVue states that you should use their microSD cards for optimal performance. I did experiment early on with several non-BlackVue microSD cards (all were name brand high-quality professional level cards, designed specifically for handling the frequent record events typical of security cameras designed for video recording), and while they would work for a period, inevitably they would stop working or have glitches. Once I went back to BlackVue’s own card I never had it stop working or fail.
These cameras offer pricing plans for saving files to the cloud as well as in the case of the DR970X Plus LTE, a built-in SIM card to simplify the recording directly to the cloud. As noted, it is easy to either download the video files or temporarily remove the microSD card and transfer the files to your computer.
The fit and finish of the new DR970X Plus is excellent (as was the DR900S) and all the included components are high quality.
If you are highly concerned about your vehicle when it is parked and unattended, you should consider purchasing optional battery packs to power the dashcam when the engine is off. One option is BlackVue’s Power Magic Battery Pack (US$159). It is designed for plugging into your accessory outlet and in turn your dashcam. It provides about 12 hours of front camera recording or about 7.6 hours of front and rear camera recording.
A second option is to purchase Blackvue’s Power Magic Ultra Battery (US$389.99). It is designed for either accessory plug or hardwire installation and then connection to your dashcam. The Ultra unit is a high-capacity rechargeable unit that provides about 30 hours of record time for just the front camera, or about 19 hours record time with both front and back camera recording and can be piggy-backed to increase the total record time while parked.
Final thoughts: Many of my readers have asked ‘Do you really need a dashcam, and if so which one?” Hopefully this review is helpful in reaching a decision. For me personally I always want to have documentation of what is going on around my vehicle when I am driving, so all my cars have dashcams and when I rent a car, I put in a portable dashcam before I leave the lot. I also find it is nice to have videos of scenic drives and the ones from BlackVue are perfect for this.
Thanks for visiting and reading. If you have a question, please feel free to ask below!